Monday, March 30, 2015

Cherry Frosted Pistachio Cookies


This is another recipe that I changed my mind on and wasn't even going to make, but I'm really glad I did!  My dad gave me a bag of pistachios a while ago, and I thought that these cookies would be a perfect opportunity to open them up!  I modified this recipe slightly to create these fun and delicious little treats.

Cherry Frosted Pistachio Cookies

Pistachio Cookies:
3/4 cup butter, room temperature
3/4 cup powdered sugar
1 egg
1 1/2 cups all purpose flour
1/4 teaspoon salt
1/2 cup chopped pistachios

Cherry Frosting:
1/4 cup butter, room temperature
1 1/2 cups powdered sugar
1/4 teaspoon vanilla
1 to 2 Tablespoons maraschino cherry juice

Preheat the oven to 350F.  Line a baking sheet with parchment paper.

Cream together the butter and powdered sugar until smooth and fluffy.  Beat in the egg until combined.  Add the flour and salt and beat until just blended.  Beat in the pistachios until evenly distributed.

Scoop the dough into tablespoon size balls and place on a baking sheet.  Using the bottom of a glass dipped in granulated sugar, flatten each dough ball to 1/4 to 1/2 inch thick.  Bake in the preheated oven for 8 to 10 minutes, or until the cookies are golden brown at the edges.  Remove from the oven and transfer to a cooling rack to cool completely before frosting.

For the frosting, cream together the butter and powdered sugar.  Mixture will be crumbly.  Add the vanilla and 1 tablespoon of cherry juice, and beat until well blended and smooth.  Add enough remaining cherry juice to reach the desired consistency.  Spread or pipe the frosting on top of the cookies.  Makes about 24 cookies.

Enjoy!  -Cardamommy

Friday, March 27, 2015

Tomato Seafood Soup


I found this recipe in a teeny tiny little notepad that was tucked deep in the recesses of my cookbook bookcase.  I remember handwriting the recipe years ago, and then never making this soup.  I decided that I needed to make it immediately.  This soup is simple to put together and doesn't take too much time.  And it is really yummy!  I was totally worried that my Hungry Puppies would not like it at all, but they surprised me when they said that they loved it!  Win!


Tomato Seafood Soup

½ cup chopped onion
½ cup chopped green pepper
½ teaspoon minced garlic
1 Tablespoon olive oil
1 can diced tomatoes
1 jar (14 ounces) spaghetti sauce
1 cup salsa
1 1/4 cup chicken broth
3 teaspoons dried parsley
1/2  teaspoon pepper
¼ teaspoon dried oregano
12 ounces frozen uncooked shrimp, thawed, peeled, deveined (or use cooked, and add immediately before serving)
8 ounces imitation crab meat, chopped
1 can (6.5 ounces) minced clams, undrained


In a large pot, sautee the onion, pepper, and garlic in oil until tender.  Stir in the tomatoes, spaghetti sauce, salsa, broth, parsley, pepper, and oregano.  Bring to a boil, then reduce heat, cover, and simmer for 20 minutes.  Add the seafood, cover and simmer 5 to 7 minutes or until shrimp are done.  Makes 8 servings.

Enjoy!  -Cardamommy

Monday, March 23, 2015

Chocolate Apple Brownies with Dulce de Leche Frosting


I found this recipe at bhg.com, and knew I had to make it because what a combination of flavors!  The brownies were a little problematic, so I had to make some changes on the fly, and although it was sketchy there for a while, they turned out amazing!  I totally thought that these were going to be a major fail, but I my family loved them!  Apparently, salvaged them okay.  This fudgy brownie is studded with bits of tart apple and topped off with a deliciously rich and gooey dulce de leche frosting.  

Chocolate Apple Brownies with Dulce de Leche Frosting

Brownies:
1/4 cup butter
1/2 cup semisweet chocolate chips
3/4 cup granulated sugar
1/2 teaspoon baking soda
1/4 teaspoon salt
2 eggs
1 teaspoon vanilla
1 cup all-purpose flour
1 1/2 cups finely chopped, peeled cooking apples (about 2 small apples)

Dulce de Leche Frosting:
1/2 of a 14 ounce can sweetened condensed milk
2 Tablespoons butter
1/2 teaspoon vanilla

Preheat the oven to 350F.  Grease a 9x9 inch square baking pan.

Place the butter and chocolate chips in a large microwaveable bowl.  Heat in the microwave in 30 second intervals, stirring after each, until chocolate is melted and smooth.  Add the sugar, baking soda, and salt, and beat until combined.  Beat in the eggs and vanilla until incorporated.  Add the flour and beat on low until just combined.  Stir in the chopped apples.

Pour the batter into the prepared baking pan and smooth the top.  Bake in the preheated oven for 20 to 25 minutes, or until a toothpick inserted in the center comes out with moist crumbs.  Remove brownies from the oven and prepare the frosting.

For the frosting, combine the sweetened condensed milk and butter in a small saucepan.  Heat over medium heat until mixture starts to boil.  Continue cooking, stirring constantly until the mixture has thickened and darkened slightly in color.  Remove the frosting from the heat and stir in the vanilla.  Immediately pour the frosting over the warm brownies and spread evenly.  Cool completely before cutting.  Makes 16 brownies.

Enjoy!  -Cardamommy

Friday, March 20, 2015

Fudge Brownie Filled Buttermilk Cake with Brown Sugar Marshmallow Frosting


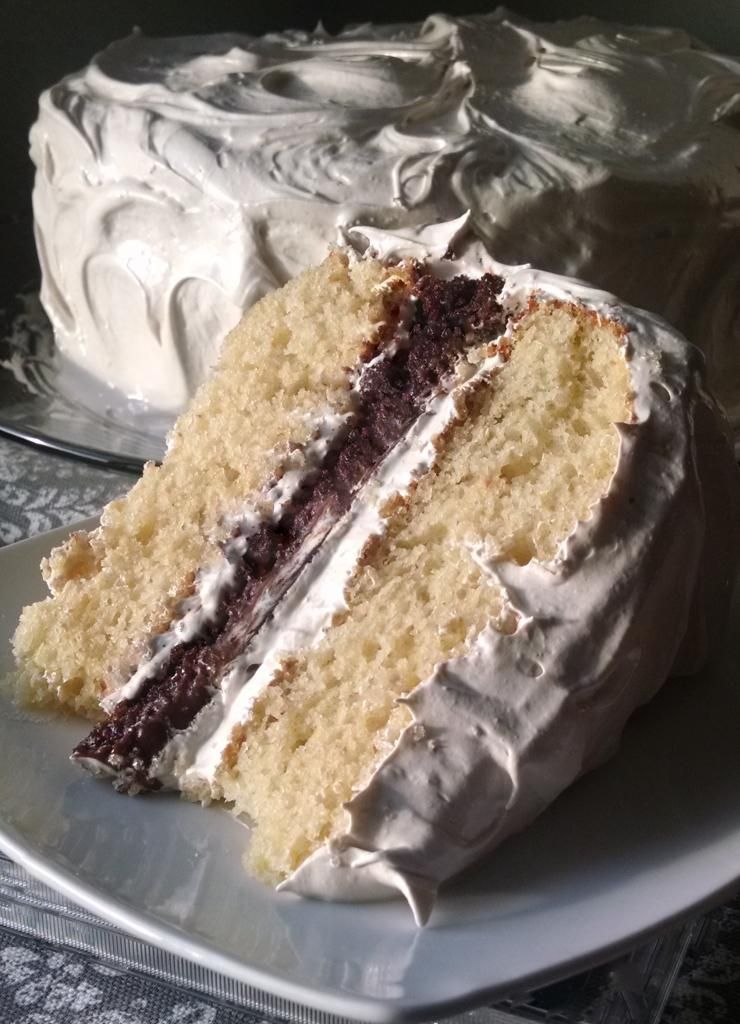
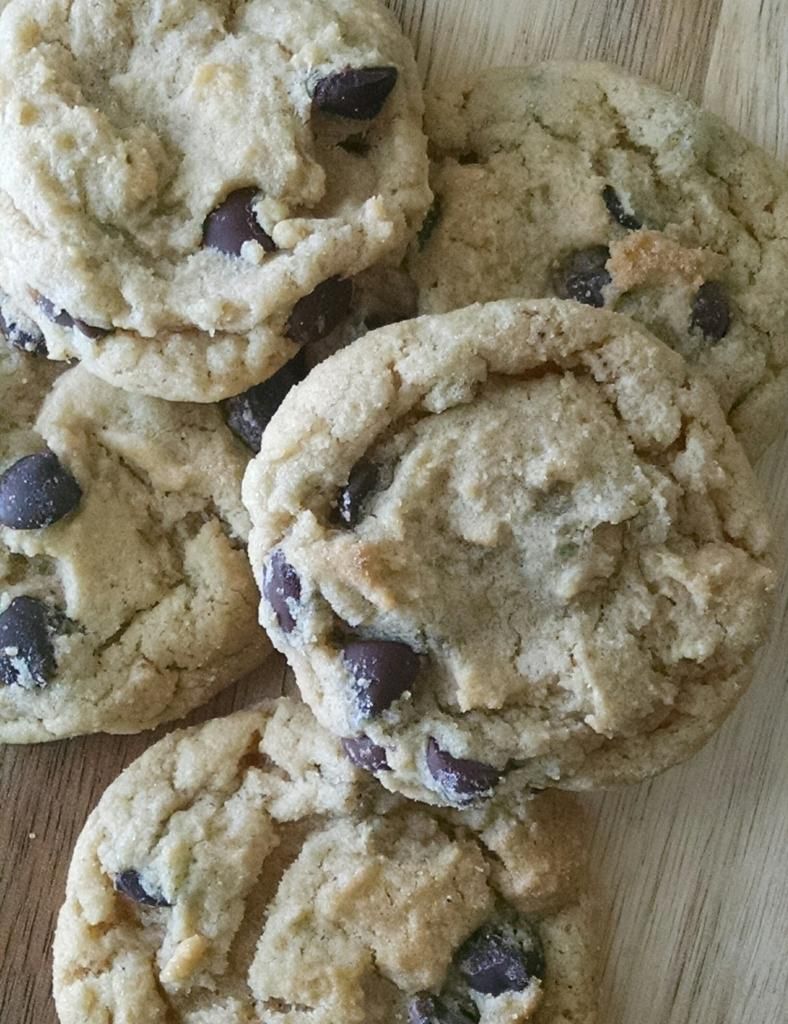
I saw a recipe a few weeks ago for a Vintage Cake.  It looked super amazing, and I wanted to try it out, but with a few changes. First, I really wanted my brownie layer to be in the middle of the cake, sort of replacing the filling.  Second, I wanted to use a slightly lighter frosting, something not too heavy and dense, so I settled on a brown sugar marshmallow frosting (which my entire family loves!).  The buttermilk cake layers are moist, flavorful, and delicious while the fudge brownie filling is a rich and dense chocolate layer.  The marshmallow frosting is smooth and fluffy and just the right touch to finish it off!  Note:  The brownies will need time to cool completely and chill in the refrigerator, so plan ahead!

Fudge Brownie Filled Buttermilk Cake with Brown Sugar Marshmallow Frosting

Fudge Brownie Layer:
1/2 cup canola oil
1 cup granulated sugar
1 teaspoon vanilla extract
2 eggs
1/2 cup all purpose flour
1/4 cup +2 Tablespoons cocoa powder
1/4 teaspoon baking powder
1/8 teaspoon salt
7 ounces (1/2 of a 14 ounce can) sweetened condensed milk
2 ounces (1/3 cup) semi sweet chocolate chips

Buttermilk Cake:

2 1/3 cups cake flour (Or sub 2 cups +3 Tbsp all-purpose flour and 2 Tbsp cornstarch)
1 1/2 teaspoons baking powder
1/2 teaspoon baking soda
1/4 teaspoon salt
12 Tablespoons (1 1/2 sticks) butter, room temperature
1 1/3 cups granulated sugar
3 eggs
1 1/2 teaspoons vanilla
1 cup buttermilk
Brown Sugar Marshmallow Frosting:

1 cup brown sugar (packed)
1/4 cup water
1/2 cup corn syrup
4 egg whites
2 tsp vanilla

Preheat the oven to 350F.  Spray a 9 inch round cake pan with cooking spray, then line the bottom with parchment paper and spray the parchment.  Set aside.

In a large bowl, whisk together the oil, sugar, vanilla, and eggs until well blended and smooth.  Add the flour, cocoa powder, baking powder, and salt, and stir until combined and no streaks of flour remain.  Pour the batter into the prepared pan and smooth the top.  Bake for 18 to 20 minutes, or until a toothpick inserted in the center comes out clean.  Do not overbake, or the brownies will be too hard to cut through in the cake. 

While the brownies are baking, place the condensed milk and chocolate chips in a microwaveable bowl and heat in 30 second intervals, stirring after each, until melted and smooth.  When the brownies are done, remove from the oven and immediately pour the condensed milk mixture over the top of the brownies, spreading all the way to the edges.  Let cool completely, then chill until cold.  When the brownies are cold, run a knife around the edge of the pan and carefully lift the brownie layer out of the pan.  Set on a plate, cover with plastic wrap, and set aside while you make the cake layers.

For the cake, preheat the oven to 350F.  Spray 2 9-inch round cake pans with cooking spray. Set aside.


In a medium bowl, whisk together the cake flour, baking powder, baking soda, and salt.  
In a large bowl, cream together the butter and sugar until well blended and smooth.  Add the eggs and vanilla, and beat for 2 to 3 minutes, or until fluffy.  Beat in 1/3 of the flour mixture until just combined, followed by half of the buttermilk.  Add another 1/3 of the flour mixture, followed by the remaining buttermilk.  Beat in the remaining flour until just combine.  

Pour the batter evenly into the two prepared pans and smooth the tops.  Place in the preheated oven and bake for 20 to 22 minutes, or until a toothpick inserted in the center comes out clean.  Remove cakes from the oven and let cool in the pans for 10 to 15 minutes.  Carefully turn the cakes out of the pans and let cool completely on a cooling rack.  


For the brown sugar marshmallow frosting, mix brown sugar, water and corn syrup in a medium saucepan. Bring to a full rolling boil. (Be careful, as it will rise, so make sure the sides of your pan are taller). Let it boil at medium to medium high until the syrup reaches 240F. Meanwhile in a stand mixer, beat egg whites until stiff.

Slowly pour the hot syrup in a thin stream into egg whites, beating constantly. Beat until icing holds peaks, then blend in vanilla.

To assemble the cake, place a buttermilk cake layer on a serving plate.  Spread with a thin layer of the frosting.  Place the brownie layer on top.  Spread with another thin layer of frosting.  Place the second cake layer on top and frost the top and sides with the remaining marshmallow frosting.  Makes 16 servings.  

Enjoy!  -Cardamommy

Monday, March 16, 2015

Mint Brownie Sandwich Bars


These brownies were definitely a stroke of genius.  I started with an easy one bowl brownie baked into two layers, then sandwiched some fluffy mint frosting between the layers.  Topped with a thin layer of chocolate and finished off with M&Ms, these brownies are soft, chewy, crunchy, chocolatey and minty all at the same time!  They are unstoppable and easily a new favorite.

Mint Brownie Sandwich Bars

Brownies:
1 cup (4 ½ ounces) All-Purpose Flour
3/4 cup (2 ¼ ounces) cocoa powder
2 cups (14 ounces) sugar
1/4 teaspoon salt
1/4 teaspoon baking powder
3 large eggs
1/2 cup (8 tablespoons) butter, melted
1/4 cup vegetable oil
1 teaspoons vanilla extract
3/4 teaspoon mint extract

Mint Frosting:
1/4 cup butter
1/4 cup shortening
1 teaspoon mint extract
Several drops of green food coloring
2 cups powdered sugar
1 Tablespoon milk

Chocolate Glaze:
4 ounces milk chocolate chips
1 Tablespoon butter
Green M&Ms

Preheat the oven to 350F.  Grease 2 9x9 inch square baking pans and line the bottoms with parchment paper, letting the ends of the parchment hang over the sides of the pan like handles.

Place all of the brownie ingredients in a large bowl and stir together until well blended and smooth. Divide the batter evenly between the two prepared pans and smooth the tops.  Bake in the preheated oven for 17 to 20 minutes, or until a toothpick inserted in the center comes out with moist crumbs.  Remove brownies from the oven and let cool completely.

For the frosting, cream together the butter, shortening, mint extract, and food coloring.  Beat in the powdered sugar, one cup at a time, until combined.  Add the milk and beat until smooth.

When the brownies are cool, run a knife around the sides of the brownies to loosen from the pan.  Using the parchment as handles, lift one the brownie layers out of the pan.  Spread the frosting evenly over the brownie still in the pan.  Remove the parchment from the second brownie layer, and place the brownie layer over the frosting.

In a small microwave safe bowl, place the chocolate chips and butter.  Microwave in 15 second intervals, stirring after each, until melted and smooth.  Spread the chocolate over the top of the brownie.  Sprinkle green M&Ms on top.  Cut into squares.  Makes 16 servings.

Enjoy!  -Cardamommy

Friday, March 13, 2015

Blueberry Lemon Cheesecake Pie


So, a while ago, I made this Cherry Cheesecake Pie, and everyone loved it and begged me to make it again.  I thought it was good, but I felt that the canned pie filling detracted from the deliciousness.  So, I decided to make it again, but this time with my own pie filling, and it was so much better!!!  My husband loves all things blueberry, so this pie is for him (although he'll probably have to fight the rest of us for it!).  I used frozen blueberries, although I'm sure you could just as easily use fresh.  


Blueberry Lemon Cheesecake Pie

Blueberry Pie Filling:
1/2 cup granulated sugar
3 Tablespoons cornstarch
2 Tablespoons lemon juice
3 cups frozen blueberries (you could substitute fresh)

Cream Cheese Filling:
9 inch double pie crust, rolled out
2 packages (8 ounces each) cream cheese, room temperature
1/2 cup granulated sugar
1 Tablespoon cornstarch
Zest of 1 lemon
1 egg

In a small saucepan, stir together the sugar and cornstarch until blended.  Add the lemon juice and stir until smooth.  Add the blueberries and cook over medium-high heat, stirring frequently, until the mixture starts bubbling.  Continue to cook, stirring constantly for about 2 minutes, or until thick.  Let cool.

Preheat the oven to 350F. Place one pie crust layer in a 9 inch pie plate.

In a large bowl or a food processor, beat together the cream cheese, sugar, and cornstarch until smooth.  Add the lemon zest and egg and beat until well combined and smooth.  Pour the cream cheese mixture into the prepared pastry crust and smooth the top.  Gently spoon the cooled blueberry pie filling evenly over the top of the cream cheese mixture.

Cut the remaining pie crust into 1/2 inch strips and arrange in a lattice over the top of the pie.  Seal and crimp the edges as desired.  Bake in the preheated oven for 50 to 60 minutes, or until the blueberry filling is bubbling and the crust is golden brown (if the crust browns too quickly, cover loosely with foil).  Remove the pie from the oven and let cool completely on a cooling rack. Serve at room temperature, or chill before serving.  Makes 8 servings.

Enjoy!  -Cardamommy

Monday, March 9, 2015

Buttermilk Lemon Pie


I found this recipe at chow.com, and originally thought it was not a success, and I almost threw away the recipe.  I tasted a sliver and wasn't really impressed because it tasted overwhelmingly of eggs.  I was planning on serving this pie the next day, however, and decided to just go with it.  When I served it the next day it tasted so much better, and everyone who ate it loved it!  So I kept the recipe and decided to share it! This pie is sweet and custardy with the perfect touch of lemon.


Buttermilk Lemon Pie

1 9-inch pie crust
2 cups granulated sugar
2 Tablespoons all purpose flour
1/2 teaspoon salt
1 cup buttermilk
4 eggs
4 egg yolks
2 teaspoons vanilla extract
1/2 cup (1 stick) butter, melted
Zest of 1 lemon

Preheat the oven to 350F.  Fit the the pie crust into a 9 inch pie plate and trim and crimp the edges.

In a large bowl, whisk together the sugar, flour, and salt until combined.  Add the buttermilk, eggs, egg yolks, and vanilla and whisk until smooth.  Add the melted butter and lemon zest and whisk until completely incorporated.  Pour the filling into the prepared pie crust.

Place the pie in the oven and bake for about 50 to 60 minutes, or until the filling is just set in the middle and the top is golden brown.  The pie may puff up a bit at the end of baking, this is okay.  Remove the pie from the oven and let cool completely.  Cover the pie and refrigerate overnight.  Serve the pie at room temperature, or chilled.  Makes 8 servings.

Enjoy!  -Cardamommy

Friday, March 6, 2015

Grandmother's Famous Cranberry Bread


Recently, my mom emailed me copies of a bunch of recipes from my grandma.  Most of them are for strudels and potica (which I will be trying out this spring!).  There was also a recipe for this cranberry bread.  I decided to make it (actually, my oldest Hungry Puppy made it) because I thought the combination of cranberries and raisins looked interesting, and it was in my grandma's collection! How cool is that?! I'm excited to be able to continue on with the baking traditions of my family.  I am sharing the recipe exactly as I received it, but made the following changes: I used 1 cup raisins, and baked only about 1 hour.

Grandmother's Famous Cranberry Bread

2 cups sifted all purpose flour
1 cup sugar
1 1/2 teaspoons baking powder
1 teaspoon salt
1/2 teaspoon baking soda
1/4 cup butter or margarine
1 egg, beaten
1 teaspoon grated orange peel
3/4 cup orange juice
1 1/2 cup light raisins
1 1/2 cups fresh or frozen cranberries

Sift flour, sugar, baking powder, salt, and baking soda into a large bowl.  Cut in butter until mixture is crumbly.  Add egg,  orange peel, and orange juice all at once; stir just until mixture is evenly moist.  Fold in raisins and cranberries.

Spoon into a greased 9x5x3 inch loaf pan.  Bake at 350F for 1 hour and 10 minutes, or until a toothpick inserted in the center comes out clean.  Remove from pan; cool on a wire rack.

If you choose, you may substitute cranberries for the raisins to have an all cranberry bread.

Enjoy!  -Cardamommy

Monday, March 2, 2015

Nielsen-Massey Chocolate Chip Cookies


You all know by now that I am a sucker for chocolate chip cookies.  Therefore, I have a ridiculous number of recipes for them, and am constantly trying out new ones!  I tried two new ones recently.  The first was called The Best Chocolate Chip Cookies from Seriouseats.com.  Holy cow they are absolute heaven.  I tiny bit more involved, but I followed the recipe almost exactly and they may be our new family favorite.  They are that good.  The other recipe that I tried was this Nielsen-Massey recipe, which also turned out really well!  They are quick to throw together, and I actually didn't even use a mixer, I just mixed the dough by hand.  The recipe uses cream of tartar, which I've not seen in a chocolate chip cookie recipe.  These cookies are soft yet chew and a bit crisp at the edges.  Delicious!


Nielsen-Massey Chocolate Chip Cookies

1 1/2 cups (3 sticks) butter, room temperature
1 1/4 cups granulated sugar
1 1/4 cups packed brown sugar
1 Tablespoons vanilla extract
2 eggs
4 cups all purpose flour
2 teaspoons baking soda
1 1/2 teaspoons salt
1 teaspoon baking powder
1 teaspoon cream of tartar
2 cups semi sweet chocolate chips

Preheat the oven to 350F. Line a baking sheet with parchment paper.

In a large bowl, stir together (or use a hand or stand mixer) the butter and brown sugar until combined.  Stir in the vanilla extract and eggs until well blended.  Add the flour, baking soda, salt, baking powder, and cream of tartar and stir until completely incorporated.  Stir in the chocolate chips.

Form the dough into 2 tablespoon size balls and place on the prepared baking sheet.  Bake for about 10 to 12 minutes, or until the edges and tops are light golden brown.  Remove the cookies from the oven and transfer to a cooling rack.  Makes about 48 cookies.

Enjoy!  -Cardamommy

Related Posts Plugin for WordPress, Blogger...