Showing posts with label Birthday Cake. Show all posts

Monday, July 18, 2016

Rainbow Layer Cake


My sister and her two kids have been staying with me for the last two weeks and it has been so fun to have them here.  My niece had her 4th birthday while she was here, so of course I had to make her a fabulous birthday cake!  I saw the idea for this cake, and figured it couldn't be too hard.  I've seen recipes making this cake from scratch, but I decided to use cake mixes.  Just for simplicity.  And for my sanity. Sometimes the two go hand in hand.  I prepared the mixes using a whole egg instead of just the egg white called for on the package, and I baked the cakes in a 9 inch round cake pan.  For the frosting, you can use home made or storebought.  I made my own frosting, and I'll tell you what.  It totally elevated this cake.  This cake was devoured in record time, and it was enormous.  When you look at the frosting recipe, don't panic.  It looks like a gigantic recipe.  And it kind of is.  But keep in mind that this is a gigantic cake.  Six layers people. We're talking cake for days weeks.  If you decide to use storebought frosting, you will need 3 cans of whichever flavor you want.  For the colorful licorice, I had some technical difficulty.  Originally, I placed the licorice at an angle and trimmed the tops, thinking that it would be not to hard to cut the cake at an angle to match the licorice.  I was wrong.  After reducing several pieces of cake to a giant pile of crumbs, I repositioned the licorice to be straight up and down, which made it no big deal to slice.  This cake looks amazing when decorated, and is so fun when you slice into it!

Rainbow Layer Cake

Cake:
Pillsbury Red Cake Mix Pouch (8.25 ounces)
Pillsbury Orange Cake Mix Pouch (8.25 ounces)
Pillsbury Yellow Cake Mix Pouch (8.25 ounces)
Pillsbury Green Cake Mix Pouch (8.25 ounces)
Pillsbury Blue Cake Mix Pouch (8.25 ounces)
Pillsbury Purple Cake Mix Pouch (8.25 ounces)
4 cups water, divided (2/3 cup for each cake mix)
1 1/2 cups oil, divided (1/4 cup for each cake mix)
6 eggs (1 for each cake mix)

Frosting:
3 sticks butter
1 1/2 cups vegetable shortening (preferably Crisco)
1/4 teaspoon salt
1 1/2 teaspoons lemon extract
1 1/2 teaspoons almond extract 
1 1/2 tablespoons meringue powder
3 pounds powdered sugar
4 tablespoon milk (optional)
3 packages of rainbow colored licorice
Gummy Bears
Rainbow Sprinkles


Preheat the oven to 350F.  Grease and flour 2 9 inch round cake pans.

For the cake, prepare the red cake mix using 2/3 cup water, 1/4 cup oil, and 1 egg.  Stir until well blended, then pour the batter into one of the prepared pans.  Repeat process with the orange cake mix, pouring the batter into the second prepared pan.  Bake the cakes in the preheated oven for 20 to 25 minutes, or until a toothpick inserted in the center comes out clean.   Cool for several minutes in the pan, then turn the cake out of the pan and let cool completely on a cooling rack.  Repeat the process with the yellow, green, blue, and purple cake mixes, regreasing and flouring the pans between uses.  Cool all of the cake layers completely.

For the frosting, cream together the butter, shortening, and salt in the bowl of a stand mixer. Add the lemon and almond extracts and beat until well blended. Turn off the mixer and add the meringue powder and half of the powdered sugar. Mix on low speed until blended. Mix in the remaining powdered sugar a little at a time, and scraping down the sides and bottom of the bowl, until all the sugar is mixed in. Turn the mixer up to medium and beat until smooth and creamy.  If the icing seems too thick to spread, beat in enough milk to reach the desired consistency.

To assemble the cake, level the cakes if necessary.  Spread a little bit of frosting on a serving plate to adhere the first layer to the plate.  Place the purple cake layer upside down on the plate.  Spread with a thin layer of frosting.  Place the blue cake layer upside down on top, and spread with a thin layer of frosting.  Repeat with the green layer, then the yellow layer, then the orange layer, then the red layer on the very top.  Spread frosting over the top and sides of the cake.  Press the licorice onto the sides of the cake, in the red, orange, yellow, green, blue, purple pattern until the entire circumference of the cake is covered with licorice.  Using kitchen shears, trim off the licorice that extends over the top of the cake.  Sprinkle the rainbow sprinkles over the top of the cake, and place the gummy bears around the top edge of the cake.  Makes 36 - 48 servings.

Enjoy!  -Cardamommy


Friday, May 20, 2016

Birthday Cake Swig Sugar Cookies


So, I kind of got into the birthday cake groove with my Hungry Puppy's birthday recently.  I had the idea for these cookies, but it got voted down by the Birthday Girl.  So what did I do?  I made them anyway.  Because I'm like that.  I've done a few variations of these cookies before because my family loves them.  These also did not disappoint.  And the frosting. Be still my heart.  This recipe makes a super ton of cookies.  If you want bigger cookies, just use a 2 tablespoon size scoop and you'll get about 30-36.

Birthday Cake Swig Sugar Cookies

Birthday Cake Cookies:
1 cup (2 sticks) butter, room temperature
3/4 cup canola oil
1 1/4 cups granulated sugar
3/4 cup powdered sugar
1 teaspoon butter flavoring
1 teaspoon cream cheese flavoring
1 Tablespoon water
2 eggs
1/2 teaspoon baking soda
1/2 teaspoon cream of tartar
1 teaspoon salt
5 1/2 cups all purpose flour
1/2 cup multicolored jimmies sprinkles

Birthday Cake Frosting:
1/2 cup (1 stick) butter, room temperature
1/2 cup shortening
1/2 teaspoon butter flavoring
1/2 teaspoon cream cheese flavoring
1 1/2 teaspoons meringue powder
3 3/4 cups powdered sugar
1 Tablespoon milk
1/4 cup multicolored jimmies sprinkles

Preheat the oven to 350F.  Line a baking sheet with parchment paper.

Cream together the butter, oil, granulated sugar, powdered sugar, butter flavoring, cream cheese flavoring, water, and eggs.  Add the flour, salt, baking soda, and cream of tartar, and beat until almost combined.  Beat in the sprinkles until evenly distributed.

Scoop the dough into tablespoon size balls, and place on the prepared baking sheet.  Using a glass dipped in sugar, flatten the dough balls until they are flat, and the edges are cracked.  

Bake the cookies in the preheated oven for about 8  minutes.  Remove cookies from the oven and transfer to a cooling rack to cool completely before frosting.


For the frosting, Cream together the butter, shortening, butter flavoring, cream cheese flavoring, and meringue powder.  Beat in the powdered sugar, one cup at a time, until combined.  Beat in the milk and continue beating the frosting for 2 to 3 minutes until light and fluffy.  Add the sprinkles and beat until evenly distributed.  Spread or pipe the frosting on top of the cooled cookies.  Makes about 70 cookies.

Enjoy!  -Cardamommy

Monday, May 16, 2016

Chocolate Birthday Cake Cookies


Yep, more birthday cake cookies.  These are super similar to the Birthday Cake Cookies, just chocolate!  And who can resist chocolate birthday cake.  If only there was frosting... Oh well.  Another day perhaps.  Wait,who am I kidding?  There will be birthday cake cookies with frosting soon for sure.  Recipe adapted from here.

Chocolate Birthday Cake Cookies

1/2 cup (1 stick) butter, room temperature
3/4 cup packed brown sugar
1/2 cup granulated sugar
1 egg
1 teaspoon vanilla extract
1 teaspoon butter flavoring
1 cup all purpose flour
1 1/4 cups chocolate cake mix 
2 Tablespoons instant chocolate pudding mix
1 teaspoon baking soda
1/2 teaspoon salt
1/2 cup multicolored jimmies sprinkles
1 cup semi sweet chocolate chips
1/2 cup milk chocolate chips

Preheat the oven to 350F.  Line a baking sheet with parchment paper.

Cream together the butter, brown sugar, and granulated sugar until light and fluffy.  Beat in the egg, vanilla extract, and butter flavoring until incorporated.  Add the flour, cake mix, pudding mix, baking soda, and salt, and beat until just combined.  Stir in the sprinkles and chocolate chips until evenly distributed. Scoop the dough into tablespoon size balls and place on a tray lined with waxed paper.  Cover and chill for several hours, or overnight. 

Place the dough balls onto the prepared baking sheet, leaving a bit of space in between for the cookies to spread.  Bake in the preheated oven for 8 to 10 minutes, or until just set in the center.  Remove cookies from the oven and let cool on the pan for several minutes.  Transfer to a cooling rack to cool completely.  Makes about 42 cookies.

Enjoy!  -Cardamommy

Friday, May 13, 2016

Neapolitan Checkerboard Cake


So this cake. It's my youngest Hungry Puppy's Birthday Cake!!  I told her that I would make it, then I realized what I had committed to and wondered if I had made a mistake.  Needless to say, I am extremely pleased that it turned out. And relieved.  I had visions of making a super simple last minute night before the party birthday cake.  Thankfully I didn't have to.  This cake maybe looks a little complex, but it was really quite easy.  A couple of notes: If you only want to do two colors, just eliminate the third and alternate dark and light, and make it a two layer cake.  You can use a cake mix (I did cake mixes this time), or use your favorite cake recipes.  You will want a somewhat sturdier cake, as you will be cutting and moving it around, so a softer crumbly cake may fall apart.  For the frosting, again, make your own (I made my own to counter the cake mix!) or use store bought.  Lastly, you will need one cake layer of each color you use, so if you use a cake mix you will have an extra layer for each color that won't be used.  I turned my extra batter into cupcakes (for a separate birthday treat), or you could tightly wrap and freeze the extra cake for another occasion.

Neapolitan Checkerboard Cake

1 9-inch Chocolate cake layer
1 9-inch Strawberry cake layer
1 9-inch Vanilla cake layer
2 cups Chocolate Frosting
2 cups Strawberry Frosting
2 cups Vanilla Frosting

For each cake layer, use a 5.5 inch round cookie cutter (or find a 5.5 inch round template and cut the cake with a knife), and cut out one ring (repeat for all three cakes).  Next, use a 2.5 inch round cookie cutter and cut out a ring inside the 5.5 inch ring (repeat for all three cakes). For each cake layer you should now have 2 rings and a center circle.

For the first layer, place the largest vanilla ring on a cake plate.  Place the second largest chocolate ring inside the vanilla ring.  Place the strawberry circle in the center.  Spread a layer of strawberry frosting on top.  For the second layer, place the largest strawberry ring on top of the first frosted layer. Place the second largest vanilla ring inside the strawberry ring.  Place the chocolate circle in the center.  Spread a layer of strawberry frosting on top.  For the top layer, place the largest chocolate ring on top of the frosting.  Place the second largest strawberry ring inside the chocolate ring.  Place the vanilla circle in the center.  

Frost the top of the cake with vanilla frosting, and frost the sides with the chocolate frosting.  Sprinkle chocolate sprinkles over the top, if desired.  Makes 16 to 20 servings.

Enjoy!  -Cardamommy

Monday, May 9, 2016

Birthday Cake Cookies


This week my baby, my youngest Hungry Puppy is turning seven. Seven!!  And oh boy do we have a treat packed week of birthday festivities.  I have planned a Neapolitan checkerboard cake for her birthday party (which I will post if it isn't a disaster), neapolitan cupcakes for her music class, and decorated doughnuts for her school class.  Two days ago she asked if she had swimming practice on her birthday.  I said yes.  She then asked if we would bring treats to swimming as well.  And because she is my baby, and I can't say no to birthday treat requests (obviously), I said yes.  And these cookies happened.  As well as a chocolate version.  They are super easy, no rolling or frosting or anything, and so cute!  And so delicious!  Like really yummy.  Recipe adapted from here.

Birthday Cake Cookies

1/2 cup (1 stick) butter, room temperature
3/4 cup packed brown sugar
1/2 cup granulated sugar
1 egg
1 teaspoon vanilla extract
1 teaspoon butter flavoring
1 cup all purpose flour
1 1/4 cup yellow cake mix 
2 Tablespoons instant vanilla pudding mix
1 teaspoon baking soda
1/2 teaspoon salt
1/2 cup multicolored jimmies sprinkles
1 cup white chocolate chips

Preheat the oven to 350F.  Line a baking sheet with parchment paper.

Cream together the butter, brown sugar, and granulated sugar until light and fluffy.  Beat in the egg, vanilla extract, and butter flavoring until incorporated.  Add the flour, cake mix, pudding mix, baking soda, and salt, and beat until just combined.  Stir in the sprinkles and white chocolate chips until evenly distributed. Scoop the dough into tablespoon size balls and place on a tray lined with waxed paper.  Cover and chill for several hours, or overnight. 

Place the dough balls onto the prepared baking sheet, leaving a bit of space in between for the cookies to spread.  Bake in the preheated oven for 8 to 10 minutes, or until just set in the center.  Remove cookies from the oven and let cool on the pan for several minutes.  Transfer to a cooling rack to cool completely.  Makes about 42 cookies.

Enjoy!  -Cardamommy

Monday, October 5, 2015

Birthday Cake Cookie Stacks


For my Hungry Puppy's birthday party, she and her friends built these cute little birthday cake cookie stacks.  Since I always make birthday treats for my Hungry Puppies to share with their classes at school, we decided to get two out of one and do cookie stacks for school as well.  This saved me some trouble because all I had to do was double the cookie recipe, and I had enough for both events.  These little treats are relatively simple, and really don't take long to put together.  Rolling and cutting the dough is the most time consuming part, but this cookie dough doesn't need to chill!  It is my favorite roll out cookie dough and is so easy to work with.  After you bake and cool your cookie circles, just swirl on some frosting (and yes, these use a lot of frosting!), stack them up, sprinkle with your favorite sprinkles and throw on a candle.  Easy, fun, and cute!

Birthday Cake Cookie Stacks

Cookies:
1 cup (2 sticks) butter, room temperature (you can substitute 1/2 cup shortening)
1 1/2 cups granulated sugar
1 egg
1 1/2 teaspoons vanilla extract
1/2 teaspoon almond extract
2 3/4 cups all purpose flour
2 teaspoons baking powder
1 teaspoon salt

Frosting:
1/2 pound (2 sticks) butter
1 cups vegetable shortening 
1/4 teaspoon salt
1 teaspoon vanilla extract
1 teaspoon butter flavoring
1/2 teaspoon almond extract
1 tablespoon meringue powder
2 pounds confectioners’ sugar, sifted
4 tablespoon milk (if needed)
Desired colors of food coloring
Sprinkles
18 birthday candles, cut in half

Preheat the oven to 400F.  Line a baking sheet with parchment paper.

Cream together the butter and sugar until light and fluffy.  Beat in the egg, vanilla, and almond extract until well blended.

In a separate bowl, whisk together the flour, baking powder, and salt.  Add flour mixture to the creamed mixture, 1 cup at a time, beating after each addition until incorporated.

Divide the dough into two balls.  Roll out one ball of dough on a floured surface to about 1/8 inch thick.  Using a 3 1/2 inch round cookie cutter, cut 18 circles.  Repeat the process using a 2 1/2 inch round cookie cutter to cut 18 circles, followed by a 1 1/2 inch round cookie cutter to cut 18 circles, using the second ball of dough and rerolling scraps as needed.  (If desired, you can use a 1/2 inch round cookie cutter to cut a tiny 4th tier.)

Carefully place the circles on the prepared baking sheet.  Bake in the preheated oven for about 7 minutes, or until a light golden brown on the edges.  Remove cookies from the oven and let cool for a couple of minutes on the pan, then transfer to a cooling rack to cool completely before assembling.  Repeat with remaining dough circles.

For the frosting, combine the butter, shortening, and salt in a large bowl and beat on low speed for 5 minutes. Add the vanilla, butter flavor, and almond extract and beat until well blended. Turn off the mixer and add the meringue powder and half of the confectioners’ sugar. Mix on the slowest speed the mixer has. Mix in the remaining sugar 1/2 cup at a time, until all the sugar is mixed in. Beat in any desired food coloring to reach desired shade.  Turn the mixer up to medium and beat until smooth and creamy. This should take about 5 minutes. If the icing seems too thick to spread, beat in enough milk until the desired consistency is reached.

To assemble the cookies, set out a large, medium, and small cookie on your work surface.  Place some frosting in a piping bag with a large star tip, and pipe a swirl of frosting on the top of each cookie.  Carefully stack the medium cookie on top of the large on, and the smallest cookie on top.  Sprinkle with sprinkles, and place a candle in the top.  Repeat with remaining cookies.  Makes about 18 3-tiered cookie stacks.

Enjoy!  -Cardamommy

Friday, October 2, 2015

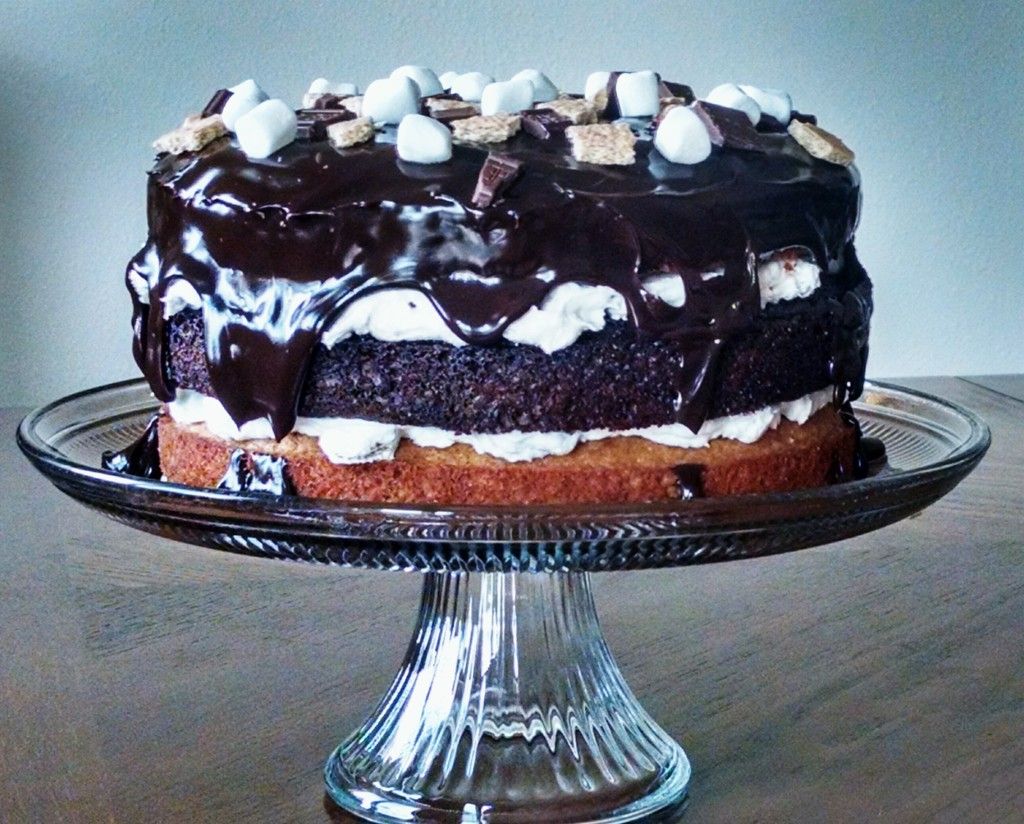
S'Mores Layer Cake


Holy Birthday Cake, right? My oldest Hungry Puppy is turning 10 in a few days, and her party is tonight!  She requested a s'mores cake, so we had to really go for it.  I did a lot of conceptualizing on this cake.  Should it be a brownie type cake? How many layers?  How should be incorporate the graham cracker element?  So many decisions!  We finally came to this conclusion, though, and it is totally a winner.  And it looks amazing too, doesn't it?  I started with a graham cracker cake layer (modified from this recipe), topped with graham cracker marshmallow cream filling, a chocolate cake layer, more marshmallow filling, another graham cracker cake layer, then hot fudge over it all.  Oh yes hot fudge.  Sprinkle some graham crackers, chocolate bar pieces, and marshmallows on top and it is finished!  Happy Birthday to my girl!!

S'Mores Layer Cake

Graham Cracker Cake:
3/4 cup all purpose flour
2 1/4 cups graham cracker crumbs
3 3/4 teaspoons baking powder
3/4 cup (1 1/2 sticks) butter, room temperature
1 cup granulated sugar
3 eggs
1 1/2 teaspoons vanilla extract
1 cup milk

Chocolate Cake:
3/4 ounces semi-sweet chocolate chips   
1/3 cup milk    
1/3 cups hot water   
1/3 cup mayonnaise 
1 large eggs  
1/2 teaspoons vanilla extract 
3/4 cups granulated sugar
3/4 cups all-purpose flour  
1/3 cup unsweetened cocoa powder 
3/4 teaspoons baking soda 
1/4 + 1/8 teaspoons baking powder  
1/4 teaspoon salt 

Graham Cracker Marshmallow Cream Filling:
2 jars (7 ounces each) marshmallow cream
1 cup shortening
2/3 cup powdered sugar
1 1/2 teaspoons clear vanilla
pinch of salt
1 Tablespoon hot water
2 full graham cracker sheets, broken into bite size pieces
1 jar (12 ounces) hot fudge sauce, warmed up until pourable
Mini marshmallows, graham cracker pieces, chocolate bar pieces, to garnish


Preheat the oven to 350F.  Spray 3 9-inch round cake pans with cooking spray, then line the bottoms with parchment paper and lightly spray the parchment. Set aside.

For the graham cracker cake, whisk together the flour, graham cracker crumbs, and baking powder in a medium bowl.  Set aside.  In a large bowl, cream together the butter and sugar until smooth.  Beat in the eggs, one at a time, until blended.  Beat in the vanilla extract.  Beat in 1/3 of the flour mixture, followed by 1/2 of the milk, then repeat.  Add the remaining 1/3 of flour mixture and beat until just incorporated.

Spread half of the batter evenly in the first prepared pan, and the other half in the second pan (the third pan is for the chocolate cake layer).  Bake the cakes for about 20 to 25 minutes, or until a toothpick inserted in the center comes out clean.  Remove cakes from the oven and let cool for about 10 minutes.  Turn the cakes out of the pans and peel the parchment off of the bottoms.  Let cakes cool on a cooling rack.

While the graham cracker cakes are baking , make the chocolate cake layer.  In a small microwaveable bowl, combine the chocolate chips, and milk.  Heat in the microwave for about 30 seconds, or until the milk is steaming, but not boiling.  Remove from the microwave and let sit for a minute or two.  Stir gently until combined, then add the hot water and set aside.

In a large bowl, beat together the mayonnaise, eggs, vanilla, and sugar until well blended and smooth.  Add the flour, cocoa powder, baking soda, baking powder, salt, and the milk/chocolate mixture.  Beat together until combined and smooth. Pour the batter into the prepared pan.

Bake the cake for 20 to 25 minutes, or until a toothpick inserted in the center comes out clean. Remove the cake from the oven and place on cooling rack for about 10 to 15 minutes.  Turn the cake out of the pan and peel the parchment off of the bottom.  Let cake cool on a cooling rack.

For the marshmallow cream frosting, beat together the marshmallow cream, shortening,  powdered sugar, vanilla, salt, and hot water until light and fluffy.  Stir in the graham cracker pieces.

To assemble the cake, place a graham cracker cake layer on a cake stand or serving plate.  Spread half of the marshmallow cream filling on top.  Place the chocolate cake layer on top, and spread the remaining marshmallow cream filling on top.  Place the remaining graham cracker cake layer on the very top, and pour the hot fudge over the cake, letting it run down the sides.  Sprinkle the top with mini marshmallows, chocolate bar pieces, and graham cracker pieces.  Makes 16 to 20 servings.

Enjoy!  -Cardamommy

Monday, October 7, 2013

Sunflower Birthday Cake


It's birthday time again!  My oldest Hungry Puppy turned 8 yesterday!  Choosing this year's birthday cake was the easiest it has ever been.  Usually, we have to look at no less than 20 options, and whittle it down from there.  This year, she was looking over my shoulder while I was on the computer when this cake popped up.  "That's my cake Mom!!!".  Just like that.  Finding the orange and lemon slices was a bit more difficult.  Like 9 stores later difficult, but we made it, and it was fabulous, and she loved it!  Happy Birthday! Original recipe found here. 

Sunflower Birthday Cake

2 9-inch round cake layers (any flavor)
Vanilla frosting (store bought or home made. I used my favorite Vanilla Frosting recipe)
Chocolate Chips
Lemon Drops
Orange candy slices (about 20)
Lemon candy slices (about 20)
Green string licorice
Green fruit leather

Place a cake layer on a serving plate.  Spread with frosting, then place the second layer on top.  Frost the top and sides of the cake with the vanilla frosting.

Arrange the chocolate chips in a filled in circle in the middle of the cake.  Place a single ring of lemon drops around the circle of chocolate chips.  Cut the orange and lemon candy slices horizontally in half lengthwise.  Arrange the orange and lemon slices around the lemon drops, and on the sides of the cake to look like petals.  Place the green string licorice around the cake to look like vines.  Cut the fruit leather into leaf shapes and arrange on the licorice.  Makes 16 servings.

Enjoy!  -Cardamommy

Friday, August 9, 2013

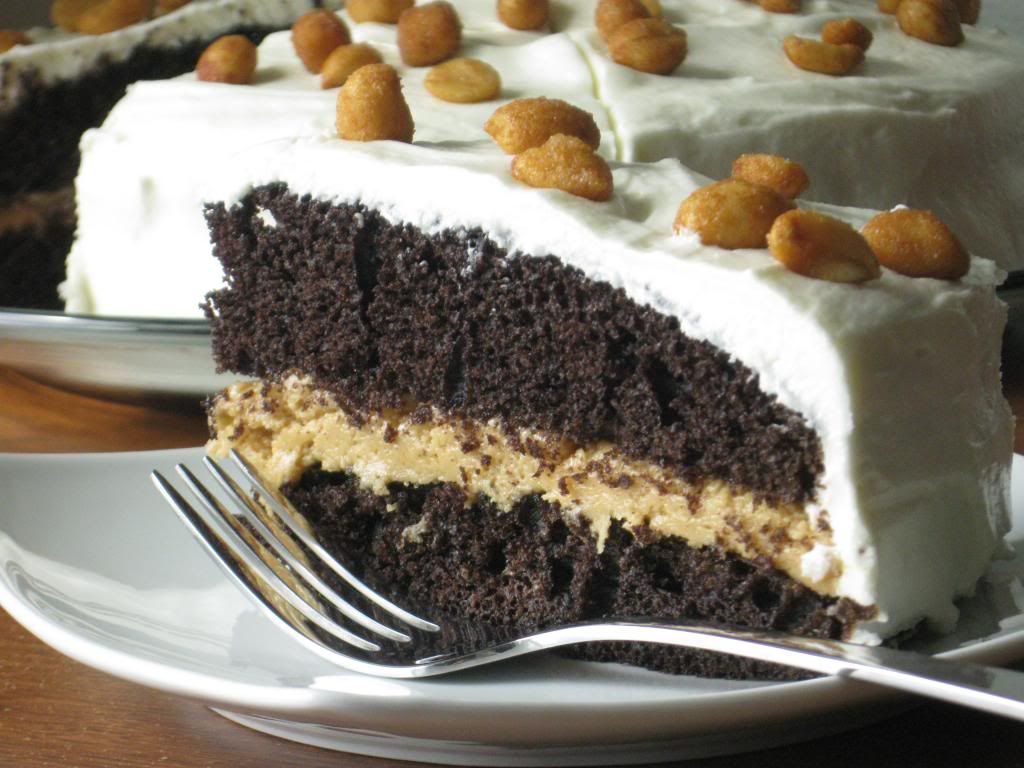
Chocolate Peanut Butter Marshmallow Cake


Okay, I have two chocolate peanut butter cakes to share with you, and this is the first.  The reason I have two, is because I couldn't decide which one to make.  This is also my husband's birthday cake!  Yet another year gone as I smile that however old I get, he will always be older.  My husband loves peanut butter, while I am not a super fan.  I can totally live without it.  This means that we don't often have peanut butter themed anything at our house.  Not peanut butter cookies, or peanut butter pie, or cake, or anything besides peanut butter sandwiches for lunch.  I figure that his birthday would be a perfect opportunity to whip out the peanut butter and bake him up a much desired treat. 

Chocolate Peanut Butter Marshmallow Cake

Cake:
1 cup all purpose flour
1 cup granulated sugar
1 Tablespoon cornstarch
1/3 cup black cocoa powder, or dark cocoa powder
1 teaspoon baking powder
1/2 teaspoon salt
1/4 teaspoon baking soda
2 eggs
1/3 cup vegetable oil
1 teaspoon vanilla extract
1/2 + 2 Tablespoons water

Peanut Butter Filling:
3/4 cup creamy peanut butter
2 cups (8 ounces) powdered sugar
1 teaspoon vanilla extract
1/3 cup milk

Vanilla Marshmallow Frosting:
1/2 cup butter, room temperature
1/2 cup shortening
3 cups powdered sugar
1 teaspoon vanilla extract
3 Tablespoons milk
1 cup (1/2 of a 7 ounce jar) marshmallow cream
Honey Roasted peanuts, for garnish, if desired

Preheat the oven to 350F.  Grease and flour 2 9-inch round baking pans.  Set aside.

In a large bowl, whisk together the flour, sugar, cornstarch, cocoa powder, baking powder, salt, and baking soda until combined.  Add the eggs, oil, and vanilla, and beat until smooth.  Add the water and beat on low speed just until combined.  Pour the cake batter evenly into the prepared pans.  Bake for about 20 minutes, or until a toothpick inserted in the center of the cake comes out clean.  Remove cakes from the oven and let cool for about 10 minutes in the pan, then turn the cakes out onto a cooling rack to finish cooling.

For the peanut butter filling, in a medium bowl, beat together the peanut butter, powdered sugar, and vanilla extract.  Add the milk and beat until smooth.  Note:  It will look very thin, like there is too much liquid.  As you continue to beat, the filling will tighten up to a firmer consistency.

For the vanilla marshmallow frosting, in a large bowl cream together the butter and shortening. Beat in the powdered sugar.  The mixture may be crumbly.  Add the vanilla extract and milk, and beat until smooth.  Beat in the marshmallow cream until incorporated.

To assemble the cake, place a cake layer upside down on a serving plate.  Spread the peanut butter filling over the top just to the edges.  Place the second cake layer right side up on top of the filling.  Frost the top and sides of the cake with the vanilla marshmallow frosting.  Garnish with peanuts, if desired.  Note:  You will probably have about a cup of frosting left over.  Just store it in a covered container in the refrigerator for another use.  Makes 8 to 12 servings.

Enjoy!  -Cardamommy


Monday, May 13, 2013

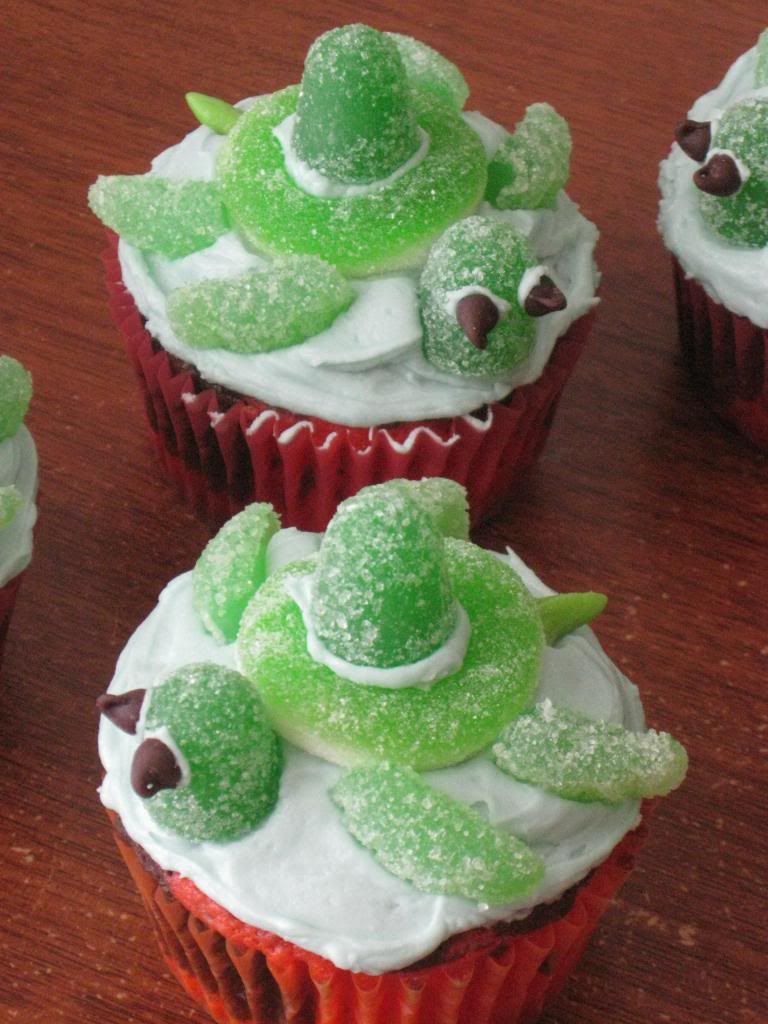
Turtle Cupcakes


My youngest Hungry Puppy just turned 4, and I can't believe it.  When she was a baby, I called her my little turtle occasionally, so I made her a turtle birthday cake when she turned 1.  This year, she told me that she had to have a turtle cake.  So, my mission was to find something that would be super cute, yet different than what she had before.  I think we have a success here.  These cupcakes are super easy to put together, and you change the candy or flavors however you'd like.  So get creative!  And Happy Birthday to my Hungry Puppy!

Turtle Cupcakes

12 cupcakes
2 cups frosting
12 green gummy fruit slices
4 green tootsie rolls
12 green apple gummy rings
24 green gumdrops
24 mini chocolate chips


Cut each green fruit slice gummy in half (so you will have 2 fruit slice wedges).  Lay the 2 fruit slices sticky side down and cut in half (you will now have 4 halves).  Cut the non-rounded corner piece diagonally off of each gummy piece to create 4 turtle fins (1 gummy fruit slice will equal 4 turtle fins).  Cut the tootsie rolls into thirds.  Roll each third into small pointed tail shape.  You may have to trim off the fat part of the tail to make the tail proportional to the turtle.  

To assemble the cupcakes, spread the frosting on the cupcakes, reserving about 1/2 cup (for attaching turtle shell and eyes).  In the center of each frosted cupcake, place a gummy apple ring.  Place a green gumdrop in front of the apple ring, and a tootsie roll tail in back of the apple ring.  Place a bit of frosting on a second gumdrop and place on top of the hollow of the apple ring.  Place the gummy fruit slice turtle fins on the cupcake, coming out from the apple ring.  Finish by attaching the mini chocolate chips to the front gum drop for eyes.  Makes 12 cupcakes.

Enjoy!  -Cardamommy

Monday, October 8, 2012

Vanilla Raspberry Chocolate Candy Cake


It is birthday time again!  I feel like I say that all the time.  This time, the birthday girl is none other than my oldest Hungry Puppy, who is turning 7.  Unbelievable.  While brainstorming what kind of cake I should make her, my thoughts turned back to this Orange Layer Candy Cake that I made for another birthday a couple of months ago.  I thought of how fun it was, how delicious it was, and how easy it was to make!  Problem solved, question answered. I would be making that cake again...but little girl style.  My Hungry Puppy loves white chocolate and the colors pink, purple, and red, so I ran with it from there.

I recently had surgery on my foot, and have thus been off of my feet for the majority of the past two weeks.  This being said, I felt the need to simplify and shorten my time spent on my foot and in the kitchen.  I started with a boxed cake mix, and dressed it up a little so it doesn't taste so "out of a boxy".  I used canned raspberry pie filling, and canned frosting, but you could easily use your favorite home made recipe.  This cake is super cute, easy, and delicious.  My Hungry Puppy loved it, and my poor bruised and broken foot doesn't hate me.  Everyone wins here (even my youngest Hungry Puppy who helped "dispose" of the leftover Kit Kats)!

Vanilla Raspberry Chocolate Candy Cake

1 box white cake mix
1 cup all purpose flour
1 cup granulated sugar
3/4 teaspoon salt
2 eggs
1 1/3 cups water
1 cup (8 ounces) sour cream
2 Tablespoons canola oil
1 1/2 teaspoons vanilla extract
1/2 teaspoon almond extract
1 cup Raspberry Pie Filling
1 (16 ounce) container (about 2 cups) vanilla frosting
11 full size White Chocolate Kit Kat Bars
2 (8 ounce) bags Raspberry Dark Chocolate M&Ms
1 piece of ribbon long enough to wrap around entire cake and tie

Preheat oven to 325F.  Grease and flour 2 9-inch round cake pans.  Set aside.

In a large bowl, whisk together the cake mix, flour, sugar and salt.  Add the eggs, water, sour cream, oil, vanilla extract, and almond extract and whisk until well blended.  Divide the batter evenly among the two prepared pans.  

Bake the cakes for about 25 to 30 minutes, or until a toothpick inserted in the center of the cakes comes out clean.  Remove cakes from the oven and let cool in the pans for 10 to 15 minutes.  Carefully remove cakes from the pans and let cool completely on cooling racks.

When the cakes are completely cool, place one layer upside-down on a serving plate.  Spread the raspberry pie filling over the cake.  Place the second layer right-side up on top of the first layer.  Spread the vanilla frosting over the top and sides of the cake (don't worry about being neat, you won't see any of it when you're done).  Place the Kit Kat Bars vertically around the cake, then wrap the ribbon around the Kit Kats and tie it.  Place the M&Ms on top of the cake to cover the frosting.  Makes about 16 servings.

Enjoy!  -Cardamommy

Monday, August 13, 2012

Orange Layer Candy Cake


When I asked my husband what kind of cake he wanted for his birthday, I already had this cake in mind because he absolutely loves Kit Kat Bars and Peanut M&Ms.  I wouldn't tell him what it was, but I told him that I had a plan.  So what kind of cake?  He picked carrot cake.  What?  So I told him no. Then I "suggested" that he choose a plain yellow cake (since chocolate is not his most favorite).  He said sure.  Because when I give him options?  Well, they're not really options.  Lucky all around that he has figured that out.  I finally settled on an orange cake with orange frosting, which I thought would compliment the chocolate candy very nicely (good thing he loves orange too, huh?  See?  I'm a good wife).  A quick note:  Please please please please please! Grease and flour the pans very well, or you will end up making another 1/2 batch of cake to replace the layer that remained stuck to the bottom of the pan.  

Orange Layer Candy Cake

Cake:
10 Tablespoons (1 stick plus 2 Tablespoons) butter, room temperature
1 3/4 cup sugar
Zest of one orange
2 eggs
1 teaspoon vanilla extract
2 1/2 cups all purpose flour
2 1/2 teaspoons baking powder
1/2 teaspoon salt
1 1/4 cups orange juice

Frosting:
1/2 cup butter, room temperature
1/2 cup shortening
1/2 teaspoon orange extract
1 teaspoon vanilla extract
4 cups powdered sugar
1 to 2 Tablespoons milk, if necessary
12 full size Kit Kat Bars
1/2 bag of M&Ms
1/2 bag of Peanut M&Ms

Preheat the oven to 350F.  Grease (well) and flour (well) 2 9-inch round cake pans.

In a large bowl, cream together the  butter, sugar, and orange zest.  Beat in the eggs and vanilla extract.  Combine the flour, baking powder, and salt, then add to the creamed mixture.  Beat the flour mixture in slowly, while gradually adding the orange juice.  Beat just until incorporated.  

Pour the cake batter evenly into the two prepared pans, and bake for about 25 minutes, or until a toothpick inserted in the center comes out clean.  Remove the cakes from the oven and let cool in the pans for about 10 minutes.  Gently turn cakes out right side up onto a cooling rack (the tops are a little sticky and might stick to the rack and tear).  Cool completely.

For the frosting, cream together the butter and shortening.  Add the orange and vanilla extract.  Beat in the powdered sugar, one cup at a time until completely incorporated.  If the frosting is too stiff, add a little milk.  Beat the frosting until it is light and fluffy.

To assemble the cake, place a cake layer on a plate and spread some frosting on top.  Place the other layer on top, then frost the top and sides of the cake.  This frosting does not have to look perfect at all.  After the candy goes on, you won't see any frosting at all. To finish the cake, place the Kit Kat Bars vertically around the cake.  Place (or dump) the M&Ms on top of the cake, covering the frosting.  Makes 10 to 12 servings.

Enjoy!  -Cardamommy

Friday, July 27, 2012

Chocolate Cake with Cream Cheese Filling


A while ago, I made this Oreo Crusted White Chocolate Mousse Torte for my brother's High School Graduation.  Wouldn't you know, that same brother is having a birthday, and I just had to make something fabulous.  Since I bragged all about him in the previous post (which he probably never read, and probably never will read, so I can always just Deny, Deny, Deny!), I'll keep it simple here.  I love my brother.  He is awesome.  Happy Birthday, Stephen!

I usually don't go for three layer cakes.  Holy cow.  I only have four people to feed!  Who's going to eat the extra layer!?  However, since this cake had to be fabulous (and since my brother can eat the extra layer) I decided to spring for a triple decker.  The filling is a luscious cream cheese filling which is firm enough not to squish out the sides (I was worried about that!).  The frosting is a rich and delicious chocolate frosting using melted chocolate.  This entire concoction is to die for.  Dense, moist, rich, chocolatey, and with the perfect touch of cream cheese.  Fabulousness achieved.


Chocolate Cake with Cream Cheese Filling


Cake:
2 1/2 ounces semi sweet chocolate chips
2 Tablespoons Nutella
1 cup milk
1 1/4 cups hot water
1 cup mayonnaise
2 large eggs
1 1/2 teaspoons vanilla extract
2 1/4 cups granulated sugar
2 1/4 cups all purpose flour
1 cup unsweetened cocoa powder
2 1/4 teaspoons baking soda
1 1/4 teaspoons baking powder
1 teaspoon salt


Cream Cheese Filling:
8 ounces cream cheese, room temperature
5 Tablespoons butter, room temperature
1 Tablespoon sour cream
1/2 teaspoon clear vanilla
2 cups powdered sugar


Dark Chocolate Frosting:
8 ounces semi sweet chocolate chips, melted
2 1/2 sticks butter, room temperature
4 Tablespoons Nutella
1 teaspoon vanilla extract
2 1/2 cups powdered sugar
Chocolate sprinkles for garnish, if desired


Preheat the oven to 350F.  Grease 3 9-inch round cake pans and line the bottoms with parchment paper rounds.  Grease the parchment paper, set aside.


In a medium microwaveable bowl, combine the chocolate chips, nutella, and milk.  Heat in the microwave for about 1 minute, or until the milk is steaming, but not boiling.  Remove from the microwave and let sit for a minute or two.  Stir gently until combined, then add the hot water and set aside.


In a large bowl, or with a stand mixer, beat together the mayonnaise, eggs, vanilla, and sugar until well blended and smooth.  Add the flour, cocoa powder, baking soda, baking powder, salt, and the milk/chocolate mixture.  Beat together until combined and smooth. Divide the batter equally among the three pans.  


Bake the cakes for 20 to 25 minutes, or until a toothpick inserted in the center comes out clean. Remove the cakes from the oven and place on cooling racks for about 10 to 15 minutes.  Turn out the cakes onto the cooling racks and peel the parchment paper off the bottoms of the cakes.  Let the cakes cool completely before frosting.


For the cream cheese filling, in a medium bowl, beat together the cream cheese, butter, sour cream, and vanilla until smooth.  Add the powdered sugar and beat until well blended and smooth.


For the dark chocolate frosting, beat together the butter, nutella, and vanilla.  Add the powdered sugar and beat until combined and smooth.  Add the melted chocolate and beat until well blended.


To assemble the cakes, place a small dab of frosting on the cake platter to hold the bottom layer in place.  Place the first cake layer on the plate and spread with half of the cream cheese filling.  Place the second cake layer on top of that and spread with the rest of the cream cheese filling.  Place the last cake layer on top of that.  Spread the dark chocolate frosting over the top and sides of the cake.  If desired, press the chocolate sprinkles onto the sides of the cake.  Makes a 9-inch 3 layer cake, about 12 to 16 servings.


Enjoy!  -Cardamommy

Wednesday, June 20, 2012

German Chocolate Ice Cream Cake

It's birthday time again!  My mom is celebrating another birthday, and I wanted to make her something special.  I knew that she loves German chocolate cake, but I wanted to put a little twist on it.  Because I just can't resist.  This cake has two layers of chocolate cake with  a layer of chocolate ice cream swirled with German chocolate frosting in the middle.  The sides of this creation are frosted with chocolate frosting, and the top is, of course, coconut pecan frosting.  And the whole thing is delicious.  Happy Birthday, Mom!


German Chocolate Ice Cream Cake


Frosting:
2 cups granulated sugar
2 Tablespoons flour
1 cup heavy cream
1 cup milk
1 cup butter, room temperature
1 Tablespoon vanilla

1 1/2 cups chopped pecans, toasted
1 cup sliced almonds, toasted
3 cups flaked coconut


1 box Chocolate cake mix, plus ingredients to make it
3 cups Chocolate ice cream
1 cup Chocolate Frosting


Prepare the cake according to package directions for 2 9-inch layers.  Let layers cool completely.


For the frosting, in a large saucepan, combine the sugar and flour.  Add the cream, milk and butter and stir well, cooking over medium heat.  Bring to a boil and cook, stirring frequently for about 12 minutes until thick.  Remove from the heat and add the vanilla, pecans, almonds, and coconut, and stir well.  Set aside to cool.


Place the ice cream in a large bowl, and add about 3/4 to 1 cup of the coconut pecan frosting to it, and fold it together.  Don't mix it in completely, as you want it to be swirled in.  Line a 9 inch round cake pan with plastic wrap and spoon the ice cream into it.  Place in the freezer to freeze completely.


To assemble the cake, place a cake layer upside-down on a serving plate.  Place the frozen ice cream layer on top of the cake, and place the remaining cake layer on top of the ice cream.  Working quickly so the ice cream doesn't melt, Spread a thin layer of chocolate frosting around the sides of the cake.  Spoon a desired amount of coconut pecan frosting on the top of the cake and spread to the edges.  You will have coconut pecan frosting left over.  Makes about 12 servings.


Enjoy!  -Cardamommy

Monday, May 14, 2012

Ice Cream Cone Cupcakes


Guess what time it is?!  It is birthday time again!  My youngest hungry puppy is 3!  Where does the time go?  To celebrate this momentous occasion, I would like to share with you some recent one-liners that passed the lips of my little one.  Entering her Aunt's mid-remodel house, "This house is kind of pretty, but it's a little bit broken."  Going down the steep stairs to the basement of the aforementioned house, "I don't want to go down into the spooky old house."  To the pilots as we exited the airplane on a recent trip, "Thanks for the ride!"  And finally, in the middle of our marathon baking day, "Don't worry Mom, I have everything under control!"  Did I mention that I love this kid?  


These cupcakes are a fun and easy project for any occasion, but they are simply adorable for a birthday!  Cupcake batter baked inside colorful ice cream cones, some frosting, sprinkles, and a cherry on top!  Happy Birthday to my Hungry Puppy!


Ice Cream Cone Cupcakes


24 flat bottom ice cream cones (you can use the traditional or the colorful cones)
1 box cake mix and ingredients to make it
2 to 3 cups of your favorite frosting
Colorful Sprinkles
24 maraschino cherries, with or without stems


Preheat the oven to 350F.  Place the ice cream cones in muffin tin cups.  Prepare the cake mix according to the package instructions, and fill the ice cream cones with the batter, dividing it evenly between all of the cones.


Bake the cupcakes for about 22-25 minutes, or until a toothpick inserted in the center of one comes out clean.  Carefully remove the cupcakes from the oven (they will be top heavy and tip over easily!), and set aside to cool.  


When cupcakes are completely cool, frost with your favorite frosting, sprinkle with sprinkles, and place a cherry on top.  To help keep the cupcakes from tipping over, dab a dot of frosting on the bottom of each cone to secure to the serving plate.  Makes 24 cupcakes.


Enjoy!  -Cardamommy
Related Posts Plugin for WordPress, Blogger...