Monday, December 29, 2014

Chocolate Peppermint Cheesecake Layer Cake


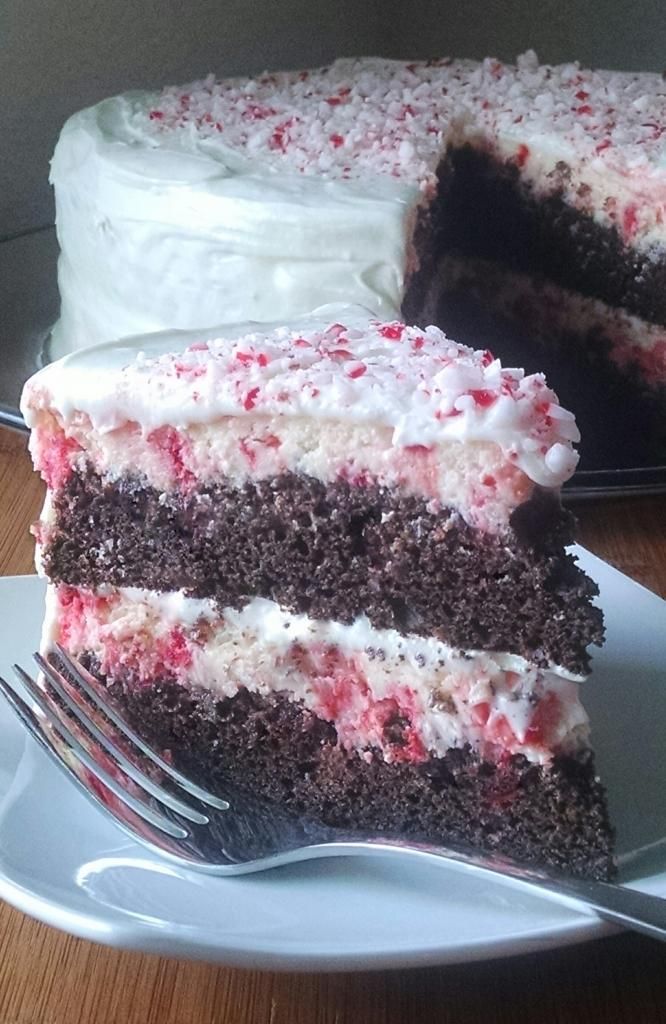
This cake.  This made me happy.  Partly because it was moist chocolate cake.  Partly because it was peppermint cheesecake.  Partly because it had peppermint cream cheese marshmallow frosting on it.  Partly because I seriously tweaked the recipe and it turned out amazing!  I'm going to be honest and tell you that I wasn't sure it would come together, but it totally did, and it was perfecty!  The flavors and textures together are awesome, but it also just looks pretty, and so easy!  Believe it or not, it wasn't that difficult to put together.  Totally worth it! Recipe adapted from here.

Chocolate Peppermint Cheesecake Layer Cake

Chocolate Cake:
1 box chocolate cake mix
1 cup water
1/2 cup sour cream
1/3 cup canola oil
3 eggs
1 box (4 serving size) instant chocolate pudding

Peppermint Cheesecake:
24 ounces (3 8-ounce packages) cream cheese, room temperature
3/4 cup granulated sugar
1 teaspoon vanilla
3/4 cup sour cream
3 eggs
1 bag (10 ounces) peppermint baking chips

Peppermint Cream Cheese Marshmallow Frosting:
4 ounces cream cheese, room temperature
1/4 cup butter (1/2 stick), room temperature
12 ounces (about 3 cups) powdered sugar
1 teaspoon peppermint extract
7 ounce jar marshmallow cream

Preheat the oven to 350F.  Place 2 strips of foil (about 3 to 4 inches wide) inside two 9 inch round cake pans (2 strips per pan) in the form of an X, with the ends hanging over the sides. Spray the pan and foil with cooking spray.  Set aside.

For the chocolate cake, in a large bowl whisk together the chocolate cake mix, water, sour cream, oil, and eggs until well blended.  Add the chocolate pudding mix and whisk until combined.  Batter will be thick.  Spread the batter evenly into the prepared pans and smooth the top.  Bake the cakes for 20 to 25 minutes, or until a toothpick inserted in the center comes out clean.  Remove the cakes from the oven and carefully flatten the top of the cakes by pressing down gently with the back of a spatula.  

While the cakes are baking, make the peppermint cheesecake.  In a large bowl, beat together the cream cheese, sugar, and vanilla until smooth.  Beat in the sour cream.  Beat in the eggs, one at a time, and beat until well blended and smooth.  Stir in t he peppermint baking chips.  Pour the cheesecake batter evenly over the two flattened cakes (still in the pans) and smooth the tops.  Bake for 25 to 30 minutes, or until the center of the cheesecakes slightly wobbly.  Remove the cakes from the oven and run a knife around the edges to loosen the cakes from the pans.  Let the cakes cool, then chill for 2 to 4 hours, until completely cold.  

When you are ready to assemble the cake, make the frosting.  Beat together the cream cheese and butter until smooth.  Beat in the powdered sugar, 1 cup at a time, until blended.  Beat in the peppermint extract and marshmallow cream until smooth.

Remove the cakes from the refrigerator, and using the foil as handles, carefully lift the cakes out of the pans.  Place one cake layer on a serving plate and spread about 1/2 cup of frosting over the top, just enough for a very thin layer to cover the cheesecake.  Place the second cake on top of the first and use the remaining frosting to frost the top and sides of the cake.  Garnish with crushed peppermints, if desired.  Makes 16 to 20 servings.

Enjoy!  -Cardamommy


Monday, December 22, 2014

Triple Chocolate Gingerbread Cookies


My oldest Hungry Puppy has been learning about persuasive writing in school.  The assignment was to write a persuasive letter to Santa.  Well, she brought it home on Friday and I had a chance to read it, and I think that she's getting the art of persuasion down pretty well!  I definitely think that Santa may have a change of heart after reading that persuasive letter.  Anyhow, she told Santa that she was planning on leaving out chocolate gingerbread cookies and chocolate milk for his snack.  This was the first time I had heard anything about chocolate gingerbread cookies from either of my Hungry Puppies, but I obviously had to make some so Santa wouldn't be disappointed.  I used this recipe as an outline, and changed it to fit what my Hungry Puppy had envisioned, a chocolate gingerbread cookie with 2 kinds of chocolate chips.  The cookies turned out delicious! We've never had chocolate and gingerbread together before, but it was definitely a hit!

Triple Chocolate Gingerbread Cookies

2 1/2 cups all purpose flour
2 Tablespoons cocoa powder
2 teaspoons cornstarch
1 teaspoon baking soda
1/2 teaspoon salt
1/4 teaspoon baking powder
2 teaspoons ground ginger
1 teaspoon cinnamon
1/2 teaspoon nutmeg
1/4 teaspoon cloves
1/4 teaspoon allspice
3/4 cup (1 1/2 sticks) butter, room temperature
1 cup packed dark brown sugar
1/4 cup granulated sugar
2 Tablespoons molasses
1 egg
2 teaspoons vanilla extract
1 cup semi sweet chocolate chips
1 cup milk chocolate chips

Preheat the oven to 350F.  Line a baking sheet with parchment paper.

In a medium bowl, whisk together the flour, cocoa powder, cornstarch, baking soda, salt, baking powder, ginger, cinnamon, nutmeg, cloves, and allspice.  Set aside.

In a large bowl, cream together the butter, brown sugar, and granulated sugar until smooth.  Add the molasses, egg, and vanilla extract, and beat until fluffy.  Beat in the flour mixture until just barely combined.  Beat in the semi sweet and milk chocolate chips until evenly distributed.

Scoop the dough into tablespoon size balls and place on the prepared baking sheet.  Bake in the preheated oven for about 9 minutes, or until the tops are just set.  Remove the cookies from the oven and let cool on the pan for a couple of minutes, then transfer the cookies to a cooling rack to cool completely.  Makes about 4 dozen cookies.

Enjoy!  -Cardamommy

Friday, December 19, 2014

Cashew Butterscotch Chip Cookies


I realized recently that it has been a long time since I have made anything with cashews.  I love cashews...they are one of the few types of nuts that I like. These crunchy and chewy cookies contain butterscotch chips and cashews, and are quite a delicious little treat. Original recipe found here.

Cashew Butterscotch Chip Cookies

1/2 cup butter, room temperature
1 cup granulated sugar
1 cup packed brown sugar
1/2 teaspoon baking powder
1/2 teaspoon baking soda
1 teaspoon salt
2 eggs
2 teaspoons vanilla
1 cup white whole wheat flour
1 cup all purpose flour
3/4 cups salted roasted cashew halves or pieces
3/4 cup butterscotch chips

Preheat the oven to 375F.  Line a baking sheet with parchment paper.

In a large bowl, cream together the butter, sugar, brown sugar, baking powder, baking soda, and salt.  Beat in the eggs, one at a time, followed by the vanilla.  Beat until incorporated.  Add the white whole wheat flour, and all purpose flour, and beat until combined.  Stir in the cashews and butterscotch chips.

Shape the dough into tablespoon size balls and place on the prepared baking sheet.  Bake in the preheated oven for 8 to 9 minutes, or until the edges are just golden brown and the center is set.  Remove cookies from the oven and let cool on the pan for several minutes.  Transfer cookies to a cooling rack to cool completely.  Makes about 3 dozen cookies.

Enjoy!  -Cardamommy

Monday, December 15, 2014

Fudgy Brownie Bisquick Cookies


These cookies totally surprised me.  I came across this Betty Crocker recipe and decided to give it a shot, not really thinking that it would be that amazing.  Holy cow, though, it was that amazing.  These cookies are so fast and simple to make, thanks to the prepared baking mix!  They fudgy and chocolatey, and the chocolate chips inside are just perfect!  The chocolate frosting on top caps them off perfectly.

Fudgy Brownie Bisquick Cookies

Cookies:
1 cup Bisquick 
3/4 cup granulated sugar
1/2 cup cocoa powder
1/2 cup milk chocolate chips
1/2 cup sour cream
1 teaspoon vanilla extract
1 egg

Chocolate Frosting:
2 ounces semi sweet chocolate, chopped
2 Tablespoons butter
2 cups powdered sugar
3 to 4 Tablespoons water

Preheat the oven to 350F.  Line a baking sheet with parchment paper.

In a large bowl, combine all of the cookie ingredients and mix by hand or beat with an electric mixer until all ingredients are well blended.  

Scoop the dough into tablespoon size balls and place on the prepared baking sheet.  Bake for about 8 minutes, or until the tops are just set.  Remove cookies from the oven and transfer to a cooling rack to cool before frosting.

While the cookies are cooling, make the frosting.  In a medium saucepan over low heat, melt the butter and chocolate, stirring until smooth.  Stir in the powdered sugar and 3 tablespoons of the water until the frosting is smooth.  Add additional water, 1 teaspoon at a time if the frosting is too thick.  Spread the warm frosting over the cooled cookies.  Makes about 24 cookies.

Enjoy!  -Cardamommy

Friday, December 12, 2014

Chocolate Dipped Cherry Bites


This Christmas, my Hungry Puppies and I decided to make a couple of no bake treats that we haven't done before.  We found this recipe at bhg.com, and decided to give it a whirl.  It was simple, fast, and fun, which was perfect for a kitchen project with my girls!  They also turned out really well, and are yummy too!  The cream cheese cherry filling definitely comes through for a quick and easy Christmas baking project!

Chocolate Dipped Cherry Bites

4 ounces (1/2 of an 8 ounce package) cream cheese, room temperature
1/2 cup powdered sugar
1/2 cup finely chopped maraschino cherries, well drained
1/4 teaspoon almond extract
80 vanilla wafers
12 ounces chocolate candy coating, chopped (or use chocolate chips)
2 teaspoons shortening
Christmas sprinkles, if desired

In a medium bowl, stir together the cream cheese and powdered sugar until smooth.  Add the chopped cherries and almond extract and stir until well blended. Place about 1 teaspoon (level or slightly less) of the cream cheese mixture on the bottom of half of the vanilla wafers.  Gently press the remaining vanilla wafers on top of the filling to create little cookie sandwiches.  Refrigerate for about 30 minutes.

After the cookies have chilled, melt the candy coating and shortening in a double boiler or microwave (heating in 15 second intervals and stirring after each until melted and smooth).  Dip each cookie in the candy coating, making sure to coat each cookie completely.  Use a fork to lift the cookie out of the candy coating and tap off any excess candy coating.  Place the cookie on a piece of waxed paper, and sprinkle with sprinkles, if desired.  Let stand until set.  Makes 40 cookies.

Enjoy!  -Cardamommy

Monday, December 8, 2014

Black and White Peppermint Brownies


I found this recipe while I was with my Hungry Puppies in Target recently.  We all decided it would be a fabulous recipe to make for Christmas.  I was feeling incredibly ambitious and decided that it would be a simple thing to convert the recipe and make it from scratch instead of using mixes.  Then life happened, and I totally changed my mind.  I am totally feeling the semi home made-ness of this recipe.  My youngest Hungry Puppy threw these bars together super fast, and they are incredibly delicious.  The recipe made a 9x13 pan, but I really only needed an 8x8 so I adjusted the recipe to account for that. It only uses half of the sugar cookie dough, so use the rest to make cookies, or double the recipe to make a 9x13 pan.

Black and White Peppermint Brownies

1 (1 pound size) sugar cookie mix
1 (8x8 pan size) brownie mix
1/2 teaspoon mint extract
1/2 cup semi sweet chocolate chips
1/2 white chocolate chips
1/2 bag white chocolate peppermint M&Ms (or use chocolate mint M&Ms)
Holiday sprinkles

Preheat the oven to 350F.  Spray an 8x8 inch square baking pan with cooking spray, set aside.

Prepare the sugar cookie mix according to package directions.  Press HALF of the cookie dough evenly into the bottom of the prepared pan (use the remaining dough for another use).  

Prepare the brownie mix according to package directions and stir in the mint extract.  Pour the brownie batter over the sugar cookie dough layer.  Sprinkle the chocolate chips evenly over the top.  Bake the brownies for 25 to 28 minutes, or until a toothpick inserted in the center comes out clean.  Remove brownies from the oven.

Place the white chocolate chips in a small microwaveable bowl.  Heat the chips in the microwave in 15 second intervals, stirring after each, until melted and smooth.  Drizzle the melted white chocolate over the brownies.  Immediately sprinkle the M&Ms and sprinkles evenly over the brownies.  Let cool completely before cutting.  Makes 16 brownies.

Enjoy!  -Cardamommy

Friday, December 5, 2014

Coconut Maple Date Bars


I love dates.  I mean, I really love dates!  I don't often think of things to make with dates, though.  I stumbled across this recipe though, and thought it would be perfect! These bars are so simple and delicious, and perfect for those extra dates you've been wanting to do something with!  Original recipe found here.

Coconut Maple Date Bars

Maple Date Filling:
12 ounces chopped, pitted dates
3/4 cups water
1/3 cup maple syrup

Crust:
1/2 cup butter, room temperature
2/3 cup granulated sugar
1 cup all purpose flour
1 cup old fashioned oatmeal
1 cup shredded coconut
1/4 teaspoon baking soda
1/4 teaspoon salt

For the maple date filling, place the dates, water, and syrup in a small saucepan.  Bring to a boil over medium heat, stirring occasionally.  Reduce heat to low and continue to simmer, stirring frequently, until the mixture is very thick, about 10 minutes.  Remove from the heat and let cool.

Preheat the oven to 400F.  Lightly grease a 9x9 inch square baking pan.  Set aside.

For the crust, cream together the butter and sugar until light and fluffy.  Add the flour, oatmeal, coconut, baking soda, and salt, and beat until well blended and crumbly.  Place 2 cups of the crust mixture into the prepared pan and press evenly onto the bottom of the pan.  Spread the cooled date mixture evenly over the top of the crust.  Sprinkle the remaining crumbs on top of the date filling.

Place the bars in the preheated oven and bake for about 18 to 20 minutes, or until the top is lightly browned.  Remove from the oven and let cool completely before cutting.  Makes 16 servings.

Enjoy!  -Cardamommy

Monday, December 1, 2014

Cinnamon Raisin Buttermilk Biscuits


This is my absolute favorite biscuit recipe ever.  It's in the America's Test Kitchen cookbook, and it is my tried and true best loved ever.  This time though, I decided to add cinnamon and raisins to the dough to change things up a bit.  These biscuits blew me away!  My Hungry Puppies were in heaven!  Crunchy on the outside and tender on the inside and bursting with cinnamon and raisins, I didn't want to stop eating them!

Cinnamon Raisin Buttermilk Biscuits

1 cup all purpose flour
1 cup cake flour
2 teaspoons baking powder
1 teaspoon granulated sugar
1 teaspoon cinnamon
1/2 teaspoon baking soda
1/2 teaspoon salt
1/2 cup (1 stick) cold butter
3/4 cup raisins
3/4 cup cold buttermilk

Preheat the oven to 450F.  Line a baking sheet with parchment paper.

In a large bowl, stir together the all purpose flour, cake flour, baking powder, sugar, cinnamon, baking soda, and salt.  Cut in the butter using a pastry blender until coarse crumbs form.  Stir in the raisins.  Add the buttermilk and stir together until evenly moistened.  Scoop out pieces of the dough and drop onto the prepared baking sheet.  

Place the biscuits in the preheated oven and bake for about 10 to 12 minutes, or until the tops are lightly browned.  Remove from the oven and transfer to a cooling rack.  Makes 12 biscuits.

Enjoy!  -Cardamommy

Friday, November 28, 2014

Mint Chocolate Double Chip Cookies


I good friend of mine moved out of town recently, and I asked her if there was anything I could do to help her out (thinking of packing or cleaning, or watching her kids, etc...).  She said that there was something that I could do for her, could I please bring over a batch of cookies?  Any kind would be fine.  Of course I would absolutely love to bring cookies over!  I made these cookies using the dough recipe from these Triple Chocolate Peppermint Patty Cookies (which now makes me want to go buy some peppermint patties and make them again for real!).  This fudgy chocolate cookie has just a touch of mint flavor that doesn't overpower the whole cookie, and the chocolate and white chocolate chips are the perfect addition.

Mint Chocolate Double Chip Cookies


2 3/4 sticks butter, grated and cold
3/4 cup granulated sugar
3/4 cup packed brown sugar
2 large eggs
2 Tablespoons half and half or cream
1 1/2 teaspoons vanilla extract
1 teaspoon peppermint extract
3 cups all-purpose flour
1/2 cup plus 2 Tablespoons cocoa powder
3/4 teaspoon salt
1 1/2 teaspoon baking powder
1/2 teaspoon baking soda
1 1/2 cups chocolate chips (semi-sweet or milk)
1 1/2 cups white chocolate chips

Preheat the oven to 375F.  Line a baking sheet with parchment paper.

In a large mixing bowl, beat cold grated butter with granulated sugar and brown sugar just until creamy.  Don't overbeat.  Add the eggs, vanilla, peppermint extract, and half and half, and beat until just incorporated.

Combine the flour, cocoa powder, baking soda, baking powder, and salt.  Add flour mixture to the creamed mixture and carefully stir until well blended.  When the dough is thoroughly mixed, stir in the chocolate chips.  

Scoop the dough into 2 tablespoon size balls and place on the prepared baking sheet.  bake in the preheated oven for 8 to 9 minutes, or until just set in the center.  You don't want to overbake these.  We want them to stay moist and fudgy inside.  Remove the cookies from the oven and let cool on the pan for several minutes.  Transfer cookies to a cooling rack to cool completely.  Makes about 36 cookies.

Enjoy!  -Cardamommy

Monday, November 24, 2014

Sweet Potato Oatmeal Chocolate Chip Cookies


I'm really not sure where I found this recipe, but I've had it for years and have never made it!  This is somewhat odd, because I adore sweet potatoes.  These cookies are soft with a perfectly spiced sweet potato flavor and are full of chewy oats.  I made these cookies a second time using chocolate covered raisins and chunks of heath bar and I loved them even more than the original!

Sweet Potato Oatmeal Chocolate Chip Cookies

1/3 cup butter, room temperature
1/2 cup granulated sugar
1/2 cup packed brown sugar
1 egg
1/2 cup sweet potato puree
1/2 teaspoon vanilla extract
1 cup all purpose flour
1 teaspoon baking powder
1/2 teaspoon baking soda
1/2 teaspoon salt
1/2 teaspoon cinnamon
1/4 teaspoon cardamom
1/4 teaspoon nutmeg
2 cups quick cooking oats
1/2 cup milk chocolate chips
1/2 cup mini chocolate chips

Preheat the oven to 350F.  Line a baking sheet with parchment paper.

In a large bowl, cream together the butter, granulated sugar, and brown sugar.  Beat in the egg until well blended, followed by the sweet potato puree and vanilla extract.  Add the flour, baking powder, baking soda, salt, cinnamon, cardamom, and nutmeg and beat on low until just blended.  Add the oats and chocolate chips and beat until evenly distributed.

Scoop the dough into tablespoon sized balls and place on the prepared baking sheet.  Flatten the tops of the cookies just slightly.  Bake for 8 to 9 minutes, or until golden brown at the edges.  Remove cookies from the oven and let cool on the pan for several minutes before transferring to a cooling rack to cool completely.  Makes 36 cookies.

Enjoy!  -Cardamommy

Friday, November 21, 2014

Easy Pumpkin Spice Eggnog


I saw an idea for pumpkin spice eggnog recently, and have been dying to create my own version.  I found several recipes that called for separating a ton of eggs, folding in whites, whipping cream, etc... I decided that I needed something a little more straight forward.  This is it!  It is so simple to put together and has just the right touch of pumpkin flavor to the eggnog.

Easy Pumpkin Spice Eggnog


4 eggs
¾ cup granulated sugar
1 cup pumpkin puree
1/2 teaspoon cinnamon
1/4 teaspoon allspice
1/4 teaspoon nutmeg (or more to taste)
2 cups milk
3 cups half and half
2 teaspoons vanilla extract
½ teaspoon rum extract

In a large saucepan, whisk together the eggs, sugar,pumpkin, cinnamon, allspice, and nutmeg until well blended.  Whisk in the milk and half and half and cook, stirring constantly over medium heat until the mixture reaches 160°F.  Continue to cook and stir for about one more minute, not letting the mixture boil.  Remove from the heat and stir in the vanilla and rum extracts.  Let cool, then chill completely before serving.  Makes about 2 quarts.

Enjoy!  -Cardamommy


Monday, November 17, 2014

Pumpkin Toffee Streusel Cupcakes


My youngest Hungry Puppy requested that I make pumpkin muffins with her halloween pumpkin.  I was so ready to make muffins!  I had a recipe picked out and everything.  Then she told me that she wanted candy pumpkins stuck into the frosting of her muffins.  I asked her if she meant cupcakes.  I got a "duh" look in response.  Yeah, Mom, cupcakes.  With frosting.  And candy pumpkins.  So okay then, switching gears to cupcakes!  I found this recipe and turned them into cupcakes.  I made a super small batch of maple frosting (just enough to stick a candy pumpkin on), and here we go!  If you want, you can skip the frosting all together.

Pumpkin Toffee Streusel Cupcakes

Cupcakes:
1/2 cup (1 stick) butter, room temperature
1 cup granulated sugar
2 eggs
1 teaspoon vanilla extract
1 1/2 cups all purpose flour
1 teaspoon cinnamon
1/8 teaspoon nutmeg
1/8 teaspoon cloves
1/2 teaspoon baking soda
1/2 teaspoon salt
1 cup pumpkin puree
1/2 cup toffee bits
1/4 cup mini chocolate chips

Streusel:
1/4 cup all purpose flour
2 tablespoons packed brown sugar
2 Tablespoons butter
1/4 cup toffee bits
1/4 cup mini chocolate chips

Maple Frosting:
1 Tablespoon butter, room temperature
1/2 cup powdered sugar
1 Tablespoon maple syrup
Several drops (literally) milk, if necessary

Preheat the oven to 350F.  Line 12 muffin cups with paper liners, or grease the cups.

For the cupcakes, cream together the butter and sugar until light and fluffy.  Beat in the eggs and vanilla until smooth. Add the flour, cinnamon, nutmeg, cloves, baking soda, and salt, and beat until partially combined.  Add the pumpkin puree and beat on low until incorporated and no streaks of flour remain.  Stir in the toffee bits and chocolate chips. Spoon the batter into the prepared muffin cups, filling each about 3/4 full.

For the streusel, stir together the flour and brown sugar.  Cut in the butter, using a fork, until mixture is crumbly.  Stir in the toffee bits and chocolate chips.  Sprinkle streusel over the batter in the muffin cups.  Place cupcakes in the oven and bake for 16 to 18 minutes, or until a toothpick inserted in the center comes out clean.  Remove cupcakes from the oven and let cool for several minutes in the pan.  Carefully remove cupcakes from the pan and let cool completely on a cooling rack.

For the frosting, stir together the butter and a little powdered sugar at a time until smooth and all of the sugar is incorporated (mixture will be stiff).  Stir in the maple syrup, and enough milk to reach the desired consistency.  Pipe or spread a small amount of frosting on each cooled cupcake.  Place a candy pumpkin on top of the frosting.  Makes 12 cupcakes.

Enjoy!  -Cardamommy

Friday, November 14, 2014

Mascarpone Apple Pie


I have a slightly different sort of apple pie for you today.  This pie is almost no bake!  You only bake the crust, so it saves a little time and effort, and you don't have to roll any pie dough, which saves even more time and effort!  You start by pressing in an easy oatmeal crust, then sautee the sliced apples on the stove.  Layer the apple pie filling with mascarpone whipped cream and you have a winner apple pie! Recipe adapted from bhg.com

Mascarpone Apple Pie

Oatmeal Crust:
1 1/2 cups old fashioned oatmeal
3/4 cup all purpose flour
1/4 cup packed brown sugar
1/2 teaspoon cinnamon
1/4 teaspoon salt
1/2 cup (1 stick) butter, melted

Apple Pie Filling:
2 Tablespoons butter
1/2 cup packed brown sugar
1 Tablespoon lemon juice
1 teaspoon cinnamon
7 apples, peeled, cored, and sliced (I used granny smith, ginger gold, and honeycrisp) 
1Tablespoon all purpose flour
2 to 3 teaspoons cold water

Mascarpone Whipped Cream:
1 carton (8 ounces) mascarpone cheese
1/4 cup granulated sugar
1/2 teaspoon almond extract
1 cup whipping cream

Preheat the oven to 350F.  Lightly grease a 9 inch pie plate.  Set aside.

For the crust, in a medium bowl, combine the oatmeal, flour, brown sugar, cinnamon, and salt.  Stir in the melted butter until mixture is evenly moistened.  Press evenly on the bottom and up the sides of the prepared pie plate.  Bake in the preheated oven for 15 minutes.  Remove crust from the oven and let cool.

For the apple pie filling, melt the butter in a very large skillet or saucepan.  Add the brown sugar, lemon juice, and cinnamon and stir to combine.  Add the sliced apples and cook over medium heat for about 20 to 25 minutes until tender, stirring occasionally.  When the apples are tender, place the flour in a small bowl.  Stir enough of the water into the flour to make a thick but pourable liquid.  Scoot the apples to the edges of the skillet, leaving a well of liquid in the center.  Pour the flour/water mixture into the liquid in the skillet, stirring quickly and constantly.  Stir the apples back into the mixture.  Remove from the heat and let cool.

For the mascarpone whipped cream, place the mascarpone cheese, sugar, and almond extract in a large bowl.  Beat on low until combined.  In a separate bowl, beat the whipping cream until stiff peaks form.  Add the whipped cream to the mascarpone mixture and beat on low until blended.

To assemble the pie, place half of the apple filling into the pie crust.  Spread with half of the mascarpone whipped cream.  Place the remaining pie filling on top of the mascarpone mixture.  Spread the remaining mascarpone whipped cream on top.  Cover and refrigerate until chilled through.  Makes 8 servings.

Enjoy!  -Cardamommy


Monday, November 10, 2014

Cake Batter Oatmeal Cookie Dough Sandwiches


I have been dreaming about cake batter cookie dough for weeks now, and trying to figure out something to make with cookie dough in it.  I was getting desperate.  I was almost ready to just make a batch, freeze it, and eat the dough just like that.  Then I saw this recipe and I figured it out.  I made a few changes to the original cookie recipe, and turned the cookie dough into frosting! The cookies bake up nice and soft and chewy, and the cake batter cookie dough frosting will leave you scraping every last bit out of the bowl.


Cake Batter Oatmeal Cookie Dough Sandwiches

Cake Batter Oatmeal Cookies:
1/2 cup (1 stick) butter, room temperature
1/2 cup granulated sugar
6 Tablespoons packed brown sugar
1 egg
1 teaspoon vanilla extract
1 teaspoon butter flavoring
3/4 cup all purpose flour
1/2 cup yellow cake mix (from a box mix)
1 cup quick cooking oatmeal
1/2 teaspoon salt
1/2 teaspoon baking soda
1/4 cup mini chocolate chips
6 Tablespoons rainbow sprinkles

Cake Batter Cookie Dough Frosting:
1/2 cup (1 stick) butter, room temperature
1/3 cup packed brown sugar
1 cup powdered sugar
1/4 cup all purpose flour
1/2 cup yellow cake mix (from a box mix)
1/4 teaspoon salt
1 teaspoon vanilla extract
1 teaspoon butter flavoring
1 to 2 teaspoons milk (if necessary to reach desired consistency)
1/4 cup mini chocolate chips
2 Tablespoons rainbow sprinkles

Preheat the oven to 350F.  Line a baking sheet with parchment paper.  Set aside.

In a large bowl, cream together the butter, granulated sugar, and brown sugar until light and fluffy.  Add the egg, vanilla extract, and butter flavoring and beat until well blended.  Add the flour, cake mix, oatmeal, salt, and baking soda, and beat until just combined.  Beat in the chocolate chips and sprinkles.

Scoop the dough into tablespoons size balls and place on the prepared baking sheet.  Bake in the preheated oven for 8 to 9 minutes.  Remove from the oven and let cool on the pan for about 5 minutes.  Carefully (these are really soft!) transfer to a cooling rack to cool completely before frosting.

For the frosting, cream together the butter, brown sugar, and powdered sugar until light and fluffy.  Beat in the flour, cake mix, and salt until blended.  Add the vanilla extract and butter flavoring and beat until combined.  Beat in the milk if necessary to reach desired consistency.  Beat in the chocolate chips and sprinkles.  

To make the cookie sandwiches, spread or pipe the frosting on the back of one cookie.  Press another cookie on top of the frosting.  Makes about 12 cookie sandwiches.

Enjoy!  -Cardamommy


Friday, November 7, 2014

Chocolate Chunk Yeast Bread


The story behind this bread recipe is this: I have a calendar app on my phone that displays a different picture every day.  Some days I notice the picture, some days not.  This day, I definitely notice the picture because it was of this amazing looking chunky chocolate swirled bread.  I couldn't trace the picture back to a recipe, so I came up with one of my own, and wow did it impress!  I modified the recipe for Basic Soft White Sandwich Loaf (One of my favorite sandwich breads, and really not difficult to make!) out of Rose Levy Beranbaum's The Bread Bible.  I substituted some whole wheat flour and tossed in some chopped chocolate and I couldn't be happier with the result! Don't let the fact that this recipe starts with a sponge deter you.  It really is not any more difficult, it just sounds daunting.

Chocolate Chunk Yeast Bread

Sponge (Dough Starter):
2 1/2 cups all purpose flour
3/4 teaspoon instant yeast
1 3/4 cups room temperature water
2 Tablespoons honey

Flour Mixture:
2 cups whole wheat flour
1/4 cup nonfat dry milk
3/4 teaspoon instant yeast
1/2 cup (1 stick) butter, room temperature
2 1/4 teaspoons salt
6 ounces semi sweet chocolate, chopped (about 1 cup chopped)

For the sponge, in a large bowl combine the flour, yeast, water, and honey.  Whisk together vigorously until completely incorporated and smooth.  Scrape down the sides of the bowl and set aside.

For the flour mixture, in a medium sized bowl, stir together the whole wheat flour, dry milk, and yeast.  Sprinkle this flour mixture on top of the sponge and cover tightly with plastic wrap.  Let sit at room temperature for 1 hour, then transfer to the refrigerator for 8 to 24 hours.  The sponge will bubble and rise a bit, which is normal.

When you are ready to make the bread, remove sponge from the refrigerator and add the butter and salt to the mixture.  With a large wooden spoon, stir the dough together until the all the flour is moistened.  When you can no longer incorporate anymore flour with the spoon, turn the mixture out onto your work surface and start kneading the dough until all of the flour is incorporated.  Knead for about five minutes, lightly flouring your hands and work surface (use as little flour as possible) as necessary.  The dough will be very sticky.  Place the bowl upside down over the dough and let rest for about 20 minutes (this will help the dough to be less sticky).  

Remove the bowl from over the top of the dough and knead for another 5 minutes.  Lightly spray a large bowl with cooking spray, and place the dough inside.  Spray the top of the dough with cooking spray and cover tightly with plastic wrap.  Let the dough rise for 1 1/2 to 2 hours, or until about double in size.  Once the dough has risen, turn the dough out onto a lightly floured work surface and press gently into a rectangle.  Sprinkle the chopped chocolate evenly over the dough.  Fold the right side of the dough halfway over, then the left side of the dough overlapping the right side (like a tri folded business letter).  Repeat this process by folding the top halfway over then the bottom overlapping the top, again like a tri folded business letter. Replace the dough in the greased bowl, cover and let rise about 1 hour.

Grease 2 8x4 inch loaf pans.  Remove the dough from the bowl and divide in half.  Pat each half into a rectangle, pressing out any large air bubbles.  Fold the right side of the dough about halfway over, then fold the left side to overlap the right.  Starting at the top, begin rolling the dough tightly until it forms a log.  Place each log into a prepared loaf pan, and let rise about 1 to 1 1/2 hours or until the center of the dough is about 1 inch above the sides of the pan.

Preheat the oven to 350F.  Place the bread in the oven and let bake for about 30 to 35 minutes, or until the top is golden brown.  Remove bread from the oven and immediately remove from pans.  Let cool completely on a cooling rack before slicing.  Makes 2 loaves.

Enjoy!  -Cardamommy

Monday, November 3, 2014

Blueberry Oatmeal Lemon Cream Bars


Here's another lemon recipe that I just had to make.  I made a few changes to this recipe, and the results are amazing!

Blueberry Oatmeal Lemon Cream Bars

Blueberry Oatmeal Crumble:
1 1/4 cups all purpose flour
1 1/4 cups old fashioned oatmeal
2 teaspoons lemon zest
1/2 teaspoon salt
1/2 teaspoon baking soda
1/2 cup granulated sugar
1/2 cup packed brown sugar
3/4 cup dried blueberries
3/4 cup butter, melted
1 teaspoon vanilla extract

Lemon Cream Filling:
1 can (14 ounces) sweetened condensed milk
1 Tablespoon lemon zest
1/3 cup fresh lemon juice
2 large egg yolks
1/2 teaspoon lemon extract

Preheat the oven to 350F.  Lightly grease an 8x8 inch square baking pan.  Set aside.

In a large bowl, whisk together the flour, oatmeal, lemon zest, salt, baking soda, granulated sugar, and brown sugar until well blended.  Stir in the dried blueberries.  Stir the vanilla extract into the melted butter, then pour the butter/vanilla mixture into the flour mixture and toss together until evenly moistened and crumbly.  

Press half of the crumble mixture evenly into the prepared pan.  Bake in the preheated oven for 15 minutes.  While the crust is baking, make the lemon filling.

For the lemon filling, whisk together the sweetened condensed milk, lemon zest, lemon juice, egg yolks, and lemon extract until well blended.  When the crust is finished baking, remove from the oven and immediately pour the lemon filling evenly over the top.  Sprinkle the remaining crumble mixture evenly over the lemon filling and return to the oven for about 20 minutes, or until golden brown.  Remove from the oven and let cool.  Cover and refrigerate until chilled.  Cut into squares and serve.  Makes 16 servings.

Enjoy!  -Cardamommy

Friday, October 31, 2014

Glazed Lemon Bars


Needing to use a bag full of lemons recently, I asked my family what I should make.  My husband adamantly requested lemon bars, and I realized that we haven't had lemon bars in a really long time, and I'm not sure I've even ever made lemon bars!  Obviously, his request was the perfect opportunity to do so.  I adapted these lemon bars from this recipe, and we really loved them!

Glazed Lemon Bars

Crust:
1 cup all purpose flour
1/4 cup granulated sugar
1 teaspoon lemon zest
1/2 cup (1 stick) butter

Lemon Filling:
2 eggs
1 cup granulated sugar
2 Tablespoons all purpose flour
1/2 teaspoon baking powder
1 teaspoon lemon zest
2 Tablespoons fresh lemon juice

Glaze:
1/2 cup powdered sugar
1 to 2 Tablespoons fresh lemon juice

Preheat the oven to 350F.  Lightly grease an 8x8 inch square baking dish.  Set aside.

For the crust, in a medium bowl, combine the flour, sugar, and lemon zest.  Cut in the butter using a fork or pastry blender until the mixture resembles coarse crumbs.  Pour the crumb mixture into the prepared pan and press evenly.  Bake in the preheated oven for 15 to 20 minutes, or until golden brown.  While the crust is baking, make the lemon filling.

For the lemon filling, in a medium bowl, whisk together the eggs, sugar, flour, baking powder, and lemon zest until smooth.  Carefully whisk in the lemon juice.  When the crust has finished baking, remove from the oven and immediately pour the lemon filling over the warm crust.  Return to the oven and bake for about 18 to 20 more minutes, or until the top is lightly browned.  Remove from the oven and let cool completely.

For the glaze, stir together the powdered sugar and lemon juice until smooth.  Pour the glaze over the cooled bars.  Cut into squares and serve.  Makes 16 servings.

Enjoy!  -Cardamommy


Monday, October 27, 2014

Cake Batter Cookie Dough Ice Cream


I saw this recipe a while ago and bookmarked it because I majorly love cookie dough, and to mix it with cake batter?  What's not to love?  This is a no churn recipe, which is also great because it is so fast and easy to make.  I've made no churn ice cream recipes before (like this one) using heavy whipping cream.  This time, I decided to try the cool whip version.  I was a little bit afraid that it would be too sweet, but it is totally delicious, and I don't really mind the sweetness.  Let me just say, though, that my true love in this ice cream is the cookie dough.  Oh my goodness I can't even get over the cookie dough.  This ice cream is seriously addicting!

Cake Batter Cookie Dough Ice Cream

Cookie Dough:
1/2 cup (1 stick) butter, room temperature
1/2 cup granulated sugar
1/3 cup packed brown sugar
3/4 cup all purpose flour
1/2 cup white or yellow cake mix
1/4 teaspoon salt
1 teaspoon vanilla extract
1/2 teaspoon butter flavoring
1 Tablespoon milk
1/4 cup mini chocolate chips
1/4 cup multi colored sprinkles (if desired)

Ice Cream:
1 can (14 ounces) sweetened condensed milk
1/2 cup white or yellow cake mix
1 tub (16 ounces) cool whip

For the cookie dough, in a large bowl, cream together the butter, sugar, and brown sugar.  Beat in the flour, cake mix, and salt.  Add the vanilla extract, butter flavoring, and milk, and beat until well blended.  Stir in the chocolate chips and sprinkles.  Spoon the cookie dough into a piping bag or heavy duty zip lock bag.  Pipe the cookie dough in lines onto a cutting board (if your cookie dough is too stiff, you can either add more milk to thin it or just scoop teeny tiny balls of dough and skip the piping bag).  Place the lines of cookie dough in the freezer until hard (about 30 to 60 minutes). When the dough is frozen, remove from the freezer and use a knife to cut the lines into bite size pieces. 

For the ice cream, in a large bowl (I used the same one that held the cookie dough...fewer dishes!) stir together the condensed milk and cake mix until well blended.  Fold in the cool whip until incorporated.  Stir in the frozen cookie dough pieces.  Place ice cream in a freezer container and freeze until frozen through.  

Enjoy!  -Cardamommy

Friday, October 24, 2014

Browned Butter Caramel Pecan Cookies


There is no chocolate in these cookies.  I debated this decision.  I agonized over this decision.  I was pretty sure I didn't want chocolate in them, but no chocolate?  Sacrilege!  I even went as far as to make the cookies and taste test the dough without chocolate to make sure that the flavor was what I wanted.  It was.  These cookies are so delicious, and the pecans and caramel are perfect with the browned butter.  Even a friend who was super skeptical about the pecans in these cookies absolutely loved them.  I think you will too.  Note:  If you don't need this many cookies (are you crazy?!) you can cut the recipe in half.

Browned Butter Caramel Pecan Cookies

2/3 cup (10 2/3 Tablespoons) butter, room temperature
2/3 cup (10 2/3 Tablespoons) shortening
1 cup granulated sugar
1 cup packed brown sugar
2 eggs
2 teaspoons vanilla extract
2 Tablespoons milk
2 cups all purpose flour
1 cup bread flour
1 teaspoon baking soda
1 teaspoons salt
1 cup caramel bits
1 cup chopped pecans

Preheat the oven to 350F.  Line a baking sheet with parchment paper. 

Place the butter in a shallow saucepan (one with a light colored bottom is best so you can see the progress of the browning).  Heat the butter over medium-high heat until melted and bubbling.  Continue cooking the butter, swirling the pan, or stirring occasionally to see how the butter is cooking.  Cook the butter until it reaches a golden brown color.  Remove from the heat and let cool to room temperature.

In a large bowl, cream together the browned butter, shortening, granulated sugar, and brown sugar until smooth.  Beat in the eggs, vanilla, and milk until well blended. Add the flour, bread flour, baking soda, and salt, and beat until just combined.  

Scoop the dough into 1 tablespoons size balls and place on the prepared baking sheet.  Bake for about 10 minutes, or until golden brown at the edges.  Remove cookies from the oven and transfer to a cooling rack to cool completely.  Makes about 6 dozen cookies.

Enjoy!  -Cardamommy

Monday, October 20, 2014

Cinnamon Orange Pumpkin Chip Cookies


I was wandering through Target the other day and found some Nestle Tollhouse pumpkin spice chocolate chips that looked super amazing.  I bought them (obviously), and they totally exceeded my expectations.  They actually tasted pumpkin-y!  I've been wanting to make cookies with cinnamon and orange zest, but I didn't know what else to add to them.  This was my answer, and the cookies are delicious!  Cinnamon, orange and pumpkin. How can you go wrong?  Note:  If you can't find the pumpkin spice chips, just use caramel bits, or your favorite chocolate chips instead.

Cinnamon Orange Pumpkin Chip Cookies

1/2 cup butter, room temperature
1/4 cup butter flavored shortening (you can use regular if you don't have butter flavor)
3/4 cups brown sugar
1/4 cup granulated sugar
Zest of 1 large orange
1 1/2 teaspoons cinnamon
1 egg
2 teaspoons vanilla extract
2 cups all purpose flour
1 Tablespoon corn starch
1 teaspoon baking soda
1/2 teaspoon salt
1 bag (about 1 3/4 cups) Pumpkin Spice Chocolate Chips

Preheat the oven to 350F.  Line a baking sheet with parchment paper.

Cream together the butter, shortening, brown sugar, granulated sugar, orange zest, and cinnamon until light and fluffy.  Beat in the egg and vanilla until well blended and smooth.  Add the flour, corn starch, baking soda, and salt, and beat on low until just combined.  Stir in the the pumpkin spice chips.

Scoop the dough into 1 tablespoon size balls and place on the prepared baking sheet.  Bake the cookies for about 8 minutes, or until the edges and very top are light brown.  Remove cookies from the oven and let cool for 2 to 3 minutes on the pan, then transfer to a cooling rack to finish cooling.  Makes about 36 cookies.

Enjoy!  -Cardamommy

Friday, October 17, 2014

Crispy Coconut Lime Butter Cookies


I have been wanting to make a coconut lime cookie for a while now.  I really like my cookies to be thick and chewy, but I wanted this one to be crisp and buttery and full of coconut lime flavor.  I think that we accomplished that with this cookie!  I had to top it off with a white chocolate lime drizzle, which was totally an experiment, and I loved it.  I actually kind of just wanted to eat the chocolate drizzle just like that.  It was the perfect sweet tart topping to this buttery cookie.

Crispy Coconut Lime Butter Cookies

1 cup (2 sticks) butter, room temperature
1 1/2 cups powdered sugar
Zest of 2 limes
2 egg whites
1 teaspoon vanilla extract
2 1/2 cups all purpose flour
1/2 teaspoon baking soda
1/2 teaspoon baking powder
Pinch of salt
1 cup shredded coconut
Granulated sugar
1 cup white chocolate chips
2 Tablespoons lime juice

Preheat the oven to 350F.  Line a baking sheet with parchment paper.

Cream together the butter, powdered sugar, and lime zest until light and fluffy.  Beat in the egg whites and vanilla extract until well blended.  Add the flour, baking soda, baking powder, and salt, and beat until just combined.  Beat in the coconut until evenly distributed.

Scoop the dough into tablespoon size balls and place on the prepared baking sheet.  Using a the bottom of a glass dipped in sugar, flatten the dough balls until about 1/4 inch thick.  Bake in the preheated oven for about 12 minutes, or until light golden brown at the edges.  Remove cookies from the oven and transfer to a cooling rack to cool completely.

For the white chocolate lime drizzle, place the white chocolate chips and lime juice in a plastic microwave safe bowl.  Microwave in 15 second intervals, stirring after each, until melted and smooth.  Drizzle white chocolate over cooled cookies.  Makes about 40 cookies.

Enjoy!  -Cardamommy

Monday, October 13, 2014

Chocoloate M&M Cookies


I am always looking for a nice chocolate cookie.  Something simple, chocolatey, and chewy.  I was totally surprised by the outcome on these.  They fit all of the above criteria.  And I am really excited about them!  I found the recipe on the back of a bag of mini M&Ms and thought I'd give it a shot.  I don't often make product recipes, but I made this one on a whim and they totally turned out great.

Chocolate M&M Cookies

1 cup (2 sticks) butter, room temperature
1 cup granulated sugar
3/4 cup packed brown sugar
2 eggs
1 teaspoon vanilla extract
2 1/4 cups all purpose flour
1/3 cup cocoa powder
1 teaspoon baking soda
1/2 teaspoon salt
1 1/2 cups  mini M&Ms
1 cup milk chocolate chips

Preheat the oven to 350F.  Line a baking sheet with parchment paper.  Set aside.

In a large bowl or stand mixer, cream together the butter, granulated sugar, and brown sugar until light and fluffy.  Beat in the eggs and vanilla extract.  Add the flour, baking soda, and salt, and beat until just combined.  Stir in the mini M&Ms and chocolate chips.

Drop the dough by 2 tablespoons size balls onto the prepared baking sheet.  Bake for about 10 minutes, or until the tops of the cookies are just set.  Remove cookies from the oven and let cool for several minutes on the pan.  Transfer to a cooling rack to cool completely.  Makes about 30 cookies.

Enjoy!  -Cardamommy


Related Posts Plugin for WordPress, Blogger...