Monday, July 29, 2013

Cinnamon Raisin Brown Rice Pudding


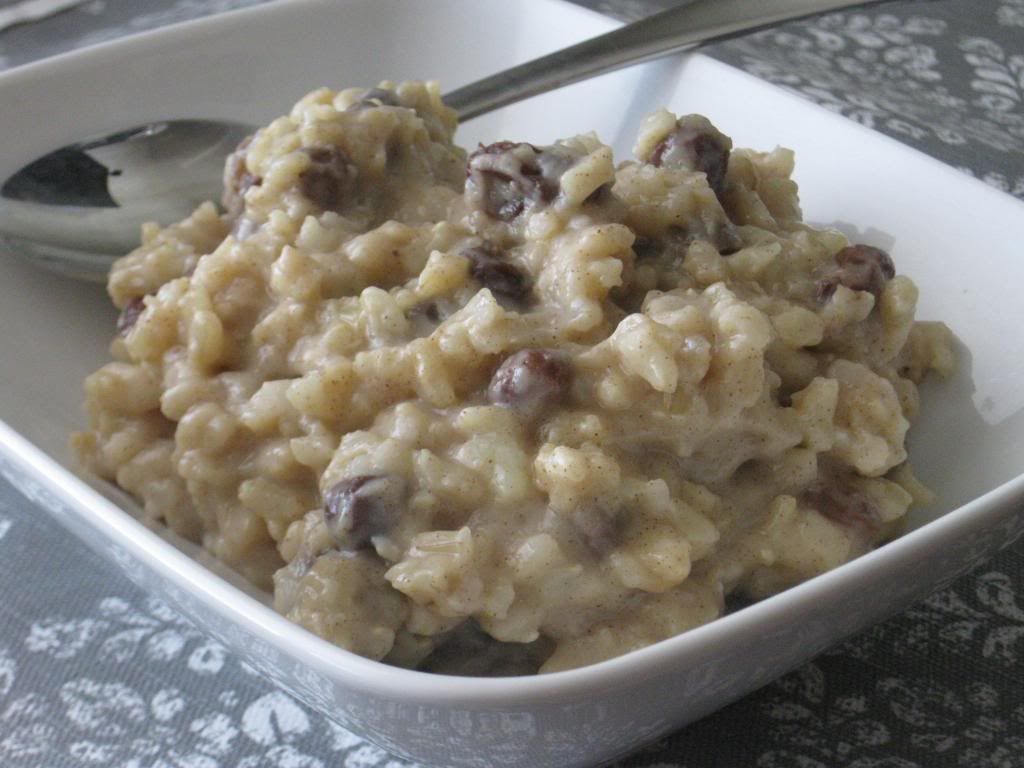
I have been meaning to make rice pudding using brown rice for quite some time now.  It has actually been on my to do list for months.  I decided to make rice pudding for breakfast, then decided to use brown rice instead of white.  Only then did I realize that it was on my list!  Well, I got it done, and here we are.  I really really love this rice pudding, and it was a big hit!  It is very moist and creamy, even the next day.  The warm cinnamon is perfect with the plump sweet raisins.  

Cinnamon Raisin Brown Rice Pudding

2 Tablespoons cornstarch
1/3 cup granulated sugar
1/4 teaspoon salt
2 cups milk
1 egg
2 cups cooked brown rice 
2 Tablespoons butter
2 teaspoons vanilla extract
1 teaspoon cinnamon
1/2 cups raisins

In a large saucepan, combine the cornstarch, sugar, and salt.  Slowly whisk in the milk and egg.  Cook over medium heat, stirring frequently until the mixture is thick and steaming.  Do not boil, you don't want to scramble the egg.  

Remove the mixture from the heat and stir in the cooked brown rice, butter, vanilla, cinnamon, and raisins.  Serve warm or cold.  Makes about 4 servings.

Enjoy!  -Cardamommy

Friday, July 26, 2013

Blackberry Cheesecake Ice Cream


I threw this ice cream together the other day, and it is a huge hit at my house.  It has a wonderful cream cheese flavor with swirls of blackberry pie filling and chunks of cheesecake throughout. 

Blackberry Cheesecake Ice Cream

4 cups half and half or whipping cream
1 cup granulated sugar, divided
pinch of salt
8 ounces cream cheese, room temperature
2 eggs
2 teaspoons vanilla extract
1 can (21 ounces) blackberry pie filling
6 ounces (about 1 cup) cheesecake, chopped

In a medium saucepan over medium heat, whisk together the half and half, 1/2 cup sugar, and salt.  Heat until mixture comes to a simmer.

In a large bowl, whisk together the remaining 1/2 cup sugar, cream cheese, and eggs.  Once the half and half mixture is simmering, slowly pour about 1/2 of it into the cream cheese mixture, whisking constantly.  Return the combined mixture to the saucepan, and continue heating over medium heat, stirring constantly until the mixture thickens.  Do not boil, or the eggs will scramble (and no one wants scrambled egg ice cream!).  

Remove the mixture from the heat and stir in the vanilla extract.  Let cool to room temperature, then cover and refrigerate until completely chilled.

Pour the ice cream mixture into your ice cream freezer and process according to manufacturer's directions.  Once the ice cream has finished churning, spoon into a large bowl.  Add the blackberry pie filling and cheesecake pieces, and fold in 3 to 4 times (this will leave ribbons of pie filling).  Transfer to a freezer container and store in the freezer. Makes about 8 cups.

Enjoy!  -Cardamommy

Monday, July 22, 2013

Fresh Strawberry Cream Cheese Pudding Pie


I picked up some fabulous strawberries the other day and couldn't decide whether to just eat them, or to make something with them.  Obviously, I decided to make something with them...half of them, anyway.  This pie comes together very easily and fairly quickly.  You don't have to bake any of it, which is great in the Summertime.  Start off with a vanilla wafer crust (you can make it or buy it), then make a quick pudding from scratch, adding a block of cream cheese at the end.  Top it off with some fresh strawberries and a pureed strawberry glaze, and you're set!  One quick note:  The pudding does not firm up enough to hold its shape when you cut the pie, which was fine for me as we all loved the pie despite it's lack of pie shape.  Adding a bit more cornstarch would probably help, but I haven't tried it.

Fresh Strawberry Cream Cheese Pudding Pie

Crust:
1 box (11 ounces) vanilla wafers
6 Tablespoons melted butter

Pudding:
3/4 cup granulated sugar
3 1/2 Tablespoons cornstarch
1/8 teaspoon salt
2 eggs
2 1/2 cups milk
2 Tablespoons butter
1 teaspoon vanilla
1 package (8 ounces) cream cheese, room temperature, cubed

Pureed Strawberry Glaze:
16 ounces fresh strawberries, divided
1/2 cup water
1/4 cup granulated sugar
2 teaspoons cornstarch

For the crust, place the vanilla wafers in a food processor and process until you have fine crumbs.  Add the melted butter and continue to process just until the crumbs are evenly moistened.  Press the crumbs onto the bottom and up the sides of a 9 inch pie plate.  Place in the refrigerator to chill for about 1 hour.

Meanwhile, make the pudding.  In a large saucepan, whisk together the sugar, cornstarch, and salt.  Whisk in the eggs, then the milk.  Heat the mixture over medium heat, whisking  constantly, until the mixture is thick and steaming, but NOT BOILING (or you will get egg white chunks in your pudding).  Remove the pudding from the heat and stir in the butter, vanilla, and cream cheese.  Whisk until the butter and cream cheese are melted.  Pour the pudding into the prepared crust and chill in the refrigerator while you prepare the strawberry topping.

For the Pureed Strawberry Glaze, slice about 2/3 of the strawberries, and place on top of the pie in a circle, starting from the outside and working towards the center.  With a food processor, puree the remaining strawberries.  Place pureed strawberries in a small saucepan with the water. In a small bowl, combine the sugar and cornstarch.  Bring the strawberry/water mixture to a boil and boil for 1 to 2 minutes.  Add the sugar/cornstarch mixture and stir quickly until dissolved.  Continue to cook and stir the strawberry mixture until it has thickened.  Remove from heat and let cool slightly.  Spoon strawberry glaze evenly over the sliced strawberries.  Chill the pie for at least 4 hours, or until completely chilled.  Slice and serve.  Makes 8 to 12 servings.

Enjoy!  -Cardamommy

Friday, July 19, 2013

Coconut White Chocolate Cinnamon Chip Cookies


These are the new most favorite cookies ever at my house.  My family couldn't get enough.  They are a wonderful departure from the classic chocolate chip cookie, and absolutely hit the spot.  These cinnamon spiced cookies are full of coconut, cinnamon chips, and white chocolate chips.  I can see the next batch having a handful of pecans in them!

Coconut White Chocolate Cinnamon Chip Cookies

1 cup (2 sticks) butter, room temperature
3/4 cup granulated sugar
3/4 cup brown sugar
1 egg
2 teaspoons vanilla
2 1/2 cups all purpose flour
1 Tablespoon cornstarch
1 1/2 teaspoons cinnamon
1 teaspoon baking soda
1/2 teaspoon salt
3/4 cup white chocolate chips
3/4 cup cinnamon chips
3/4 cup shredded coconut

Preheat the oven to 375F.  Line a baking sheet with parchment paper.

Cream together the butter, granulated sugar, and brown sugar until light and fluffy.  Beat in the egg and vanilla.  Add the flour, cornstarch, cinnamon, baking soda, and salt.  Beat until just combined.  Stir in the white chocolate chips, cinnamon chips, and coconut.

Use a cookie scoop to scoop the dough into balls and place on the prepared baking sheet. Bake for 10 to 11 minutes, or until the edges are lightly browned, and the centers are just set.  Remove the cookies from the oven and let cool on the pan for about 3 minutes.  Transfer the cookies to a cooling rack.  Makes 2 dozen cookies.

Enjoy!  -Cardamommy

Monday, July 15, 2013

Chocolate Spiral Biscuits


I found digital copy of this cookbook at the library and couldn't check it out fast enough.  It's called Deep Dark Chocolate: Decadent Recipes for the Serious Chocolate Lover, by Sara Perry.  I found a couple of interesting recipes in there, like one for Brown Sugar Chocolate Sauce (can't wait to try that one!).  Lately Friday has been designated leftovers day, where our dinner menu consists of all the leftovers from earlier in the week.  It has been so great!  Until we had no leftovers...and I had no alternate plan.  So we had salad and these biscuits, which I threw together in about 30 minutes.  Not bad...and delicious too.

Chocolate Spiral Biscuits

Dough:
2 cups all purpose flour
1 Tablespoon granulated sugar
1 Tablespoon baking powder
½ teaspoon salt
5 Tablespoons cold butter
¾ cup whole milk

Filling:
3 Tablespoons butter, room temperature
2 Tablesppons granulated sugar
1/2 cup mini chocolate chips
Demarara Sugar

Preheat the oven to 400F. Line a baking sheet with parchment paper.

Whisk the flour, sugar, baking powder, and salt. Cut the butter into the flour mixture until resembles coarse crumbs. Add the milk and toss together with a fork until a rough dough forms. Turn the dough out onto a floured surface and knead several times. Roll the dough into a 13x11 inch rectangle.

Spread the butter evenly over the dough, then sprinkle evenly with the sugar and the chocolate. Roll up the dough like cinnamon rolls, then cut the roll with a sharp knife into 12 slices. Place the slices about 2 inches apart on the prepared baking sheet. Sprinkle the tops with demarara sugar.  Bake about 18 minutes, or until golden and done. Place on a cooling rack and let cool. Makes 12 biscuits.

Enjoy!  -Cardamommy

Friday, July 12, 2013

Honey Wheat Cinnamon Oatmeal Raisin Banana Yeast Bread


Every time I make bread at my house (which seems to be constantly sometimes) I ask the Hungry Puppies what kind of bread they want this time.  Plain white, wheat, honey wheat, cinnamon raisin... This time, I created this delicious and hearty bread to please everyone.  A bit of banana doesn't overpower the flavor, wheat flour and oatmeal lend to the heartiness of this loaf, while the cinnamon and raisins bring a warmth and fruitiness to the bread.  I totally love this creation and knew I had to document it so I can repeat it in the future (or it will leave my mind forever).  This loaf is tender and moist, great for sandwiches or as toast.

Honey Wheat Cinnamon Oatmeal Raisin Banana Yeast Bread

1 1/2 cups warm water
1 egg
1 very ripe banana
1/4 cup oil
1/4 cup honey
1/4 cup dry  milk powder
1/2 cup mashed potato flakes
1 1/2 teaspoons salt
2 teaspoons cinnamon
1/2 cup oatmeal
1 1/2 cups wheat flour
2 cups white flour (plus more if necessary)
1 Tablespoon active dry yeast
1/2 cup raisins

In the pan of your bread machine (or using a stand mixer) combine all of the ingredients and set the machine for the dough cycle (or run the mixer until a soft dough forms).  If the dough is too sticky during kneading, add flour, a tablespoon at a time until the dough is tacky.  After the dough cycle has finished (or the bread has risen for about 1 hour), turn the dough out onto a floured surface and knead one or two times to remove any air bubbles.  

Grease 2 8x4 inch loaf pans (or 1 8x4 and 1 9x5 loaf pan, which is what I do).  Divide the dough in half and shape each half into a loaf (if using an 8x4 and a 9x5, make one loaf a bit larger than the other).  Place the formed loaves in the prepared loaf pans.  Cover with plastic wrap and let rise until dough comes about 1 inch over the top of the pan, about 30 minutes.  

Preheat the oven to 350F.  Bake the loaves for 20 to 25 minutes, or until the tops are golden brown.  Remove from the oven and turn loaves out of the pans immediately.  Let bread cool on a wire.  Makes 2 loaves.

Enjoy!  -Cardamommy

Monday, July 8, 2013

Copycat Nestle Cafe Oreo Brownies


On our way back from vacation last month, we stopped by the Mall of America to go to the Sea Life Aquarium.  While we were there, we had dinner at the Rainforest Cafe, and dessert at the Nestle Cafe.  We had a couple of different things, but the Oreo Brownies are what really did it for me.  They were so chocolatey and deliciously moist with chocolate and vanilla frosting on top then sprinkled with Oreo cookies.  I honestly have been thinking about them every since!  I knew I had to make a copycat, and here we are. I couldn't find a copycat recipe online, so I created my own, and I feel that I did a pretty good job.  I slightly modified this brownie recipe, and used a Nestle Tollhouse frosting recipe that I stumbled upon here (slightly modified).  I topped it off with this Oreo filling frosting recipe, and we're in business!

Copycat Nestle Cafe Oreo Brownies

Brownies:
1/2 cup butter, room temperature
1 cup granulated sugar
1 teaspoon vanilla extract
2 eggs
1/2 cup all purpose flour
1/2 cocoa special dark cocoa powder (can substitute regular cocoa powder)
1/4 teaspoon baking soda
1/4 teaspoon salt

Chocolate Frosting:
1 1/2 cups powdered sugar, divided
2 Tablespoons cocoa powder
2 Tablespoons special dark cocoa powder
1/4 cup (1/2 stick) butter, room temperature
2 Tablespoons milk, divided
1/2 teaspoon vanilla extract

Oreo Filling Frosting:
2 Tablespoons butter, room temperature
2 Tablespoons shortening
1 cup powdered sugar
1 teaspoon clear vanilla extract
1 cup chopped Oreos (about 8 Oreos)

Preheat the oven to 350F.  Grease an 8x8 inch square baking pan, then line the bottom with parchment paper and lightly grease the paper.  Set aside.

In a large bowl, beat together the butter and sugar until combined.  Add the vanilla extract and eggs and beat until incorporated.  Add the flour, cocoa powder, baking soda, and salt, and beat until just combined.  Scrape the brownie batter into the prepared pan and bake for about 25 minutes, or until a toothpick inserted in the center comes out with moist crumbs.  Remove brownies from the oven and let cool completely before frosting.

For the chocolate frosting, beat together 1/2 cup powdered sugar, cocoa powder, dark cocoa powder, butter, 1 Tablespoon of milk, and vanilla extract until smooth.  Beat in the remaining powdered sugar and milk until smooth.

For the Oreo Filling frosting, beat together the butter, shortening, sugar, and clear vanilla extract until smooth.  Spoon the frosting into a quart size plastic bag (or piping bag), and snip the tip.

To assemble the brownies, remove the brownies from the pan and peel off the parchment paper.  Place the brownies on a large cutting board.  Spread the chocolate frosting evenly over the top of the brownies.  Pipe the Oreo filling frosting in a criss-cross pattern on top of the the chocolate frosting.  Sprinkle the chopped Oreos on top of the frosted brownies.  Use a large knife to cut the brownies.  Makes 16 brownies.

Enjoy!  -Cardamommy

Saturday, July 6, 2013

Cherry Chocolate Chip Cookies


This week, I decided to take a last minute vacation for the 4th of July.  We surprised my Hungry Puppies and met my older sister and her family in Powell, Wyoming.  My girls were so excited to see their baby cousin, it was great!  On the 4th, we went up to my brother-in-law's family's cabin in the mountains of Shoshone National Forest.  It was so beautiful!  They live right by the river and the sound was wonderful!  We had a fabulous visit with some lovely and generous people (who are also fans of this blog!  Wow!  I didn't know this blog had fans!).  Pat, Joan, Vint, Tom, and Maggie were my first non-immediate family taste testers for these cookies (and a brownie recipe that will be appearing soon...).  The feedback that I heard on these cookies was that they were being rationed.  I love it!  I loved this recipe and made a very few and very minor changes.  Original recipe found here.

Cherry Chocolate Chip Cookies

1 cup (2 sticks, 8 ounces) butter, room temperature
1/4 cup granulated sugar
1/4 cup demerara sugar (or turbinado)
1 3/4 cup packed brown sugar
2 eggs
2 teaspoons vanilla extract
3 1/2 cups all purpose flour
1 1/2 teaspoons baking soda
3/4 teaspoon salt
1 cup tart dried cherries, cut in half (or roughly chopped)
1 cup milk chocolate chips
1 cup semi sweet chocolate chips

Preheat the oven to 360F (Yes, 360F.  I tried it and it worked beautifully.  If you need to use 350F or 375F, increase or decrease bake time accordingly).  Line a baking sheet with parchment paper.

Cream together the butter, granulated sugar, demerara sugar, and brown sugar until light and fluffy.  Beat in the eggs and vanilla until well blended and smooth.  Add the flour, baking soda, and salt, and beat until just combined.  Stir in the dried cherries, milk chocolate chips and semi sweet chocolate chips.

Use a cookie scoop to scoop the dough into balls and place on the prepared baking sheet. Bake in the preheated oven for about 12 minutes, or until the cookies are a light golden brown at the edges.  Remove cookies from the oven, and transfer to a cooling rack to finish cooling.  Makes about 30 cookies.

Enjoy!  -Cardamommy

Monday, July 1, 2013

Fluffernutter Cookie Sandwiches


My youngest Hungry Puppy recently requested peanut butter cookies, which quickly evolved into peanut butter sandwich cookies, and what other choice did I have than to do Fluffernutters?  If my poor metabolism could take it, I would regularly eat fluffernutter sandwiches.  Because they are totally amazingly delicious.  These cookies are the same.  I actually ate two of them.  Which is amazing because they are serious cookies.  The cookies are a little more crumbly than I wanted, but I'm going with it.  They are soft and tender and peanut buttery, and since that luscious marshmallowy goodness holds all the pieces together, they can crumble away!

Fluffernutter Cookie Sandwiches

Peanut Butter Cookies:
1/2 cup butter, room temperature
3/4 cup creamy peanut butter
1/2 cup packed brown sugar
1/2 cup granulated sugar
1 egg
1 1/2 cups all purpose flour
1/2 teaspoon baking powder
3/4 teaspoon baking soda
1/4 teaspoon salt
1/2 cup peanut butter chips
1/2 cup chocolate chips

Marshmallow Filling:
1 container (7 ounces) marshmallow cream
1/2 cup shortening
1/3 cup powdered sugar
1 1/2 teaspoons vanilla
dash of salt

Preheat the oven to 375F.  Line a baking sheet with parchment paper.

Cream together the butter, peanut butter, brown sugar, and granulated sugar until light and fluffy.  Beat in the egg.  Add the flour, baking powder, baking soda, and salt, and beat until just combined.  Stir in the peanut butter chips and chocolate chips.

Use a cookie scoop (about 2 Tablespoons) to scoop the dough and place on a baking sheet.    Use a fork to press the cookie flat, then lift the fork and press down again in the other direction, creating a criss-cross pattern.  Bake the cookies for about 10 minutes, or until they are just set (you want them to stay soft).  Remove cookies from the oven and let cool on the pan for 3 to 4 minutes, then transfer to a cooling rack to cool completely.

For the marshmallow filling, beat together the marshmallow cream, shortening, powdered sugar, vanilla, and salt until well blended.  

To assemble the cookies, sandwich a large dollop of marshmallow filling between two peanut butter cookies.  Eat.  Repeat.  Makes about 12 cookie sandwiches.

Enjoy!  -Cardamommy
Related Posts Plugin for WordPress, Blogger...