Friday, May 30, 2014

White Chocolate Blondies with Chocolate Covered Cocoa Beans


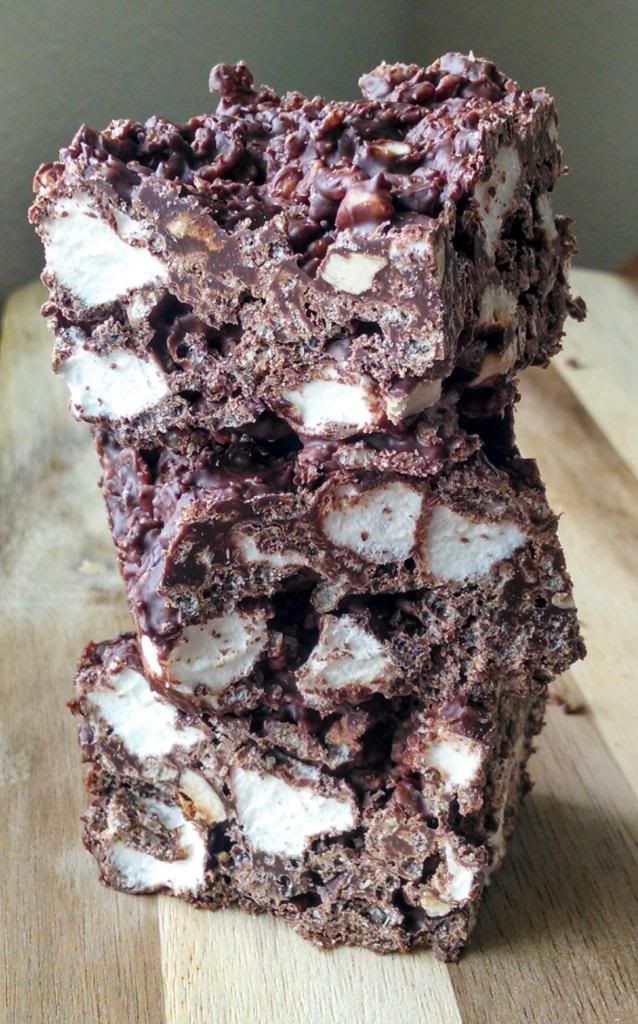
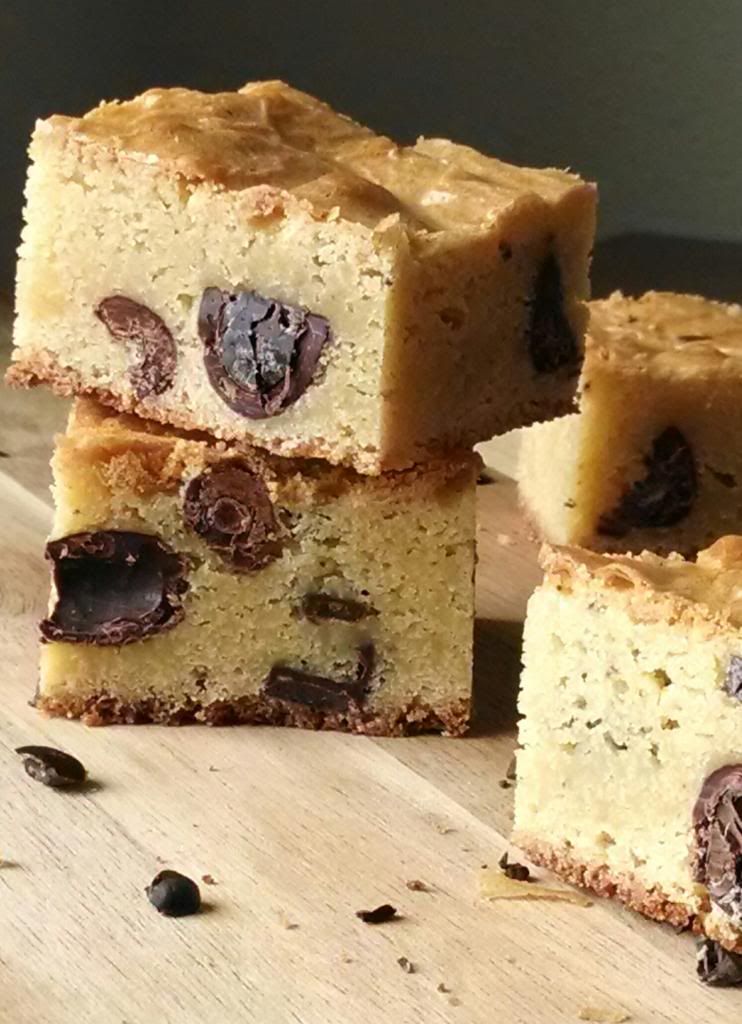
Over the Easter weekend, I was in Salt Lake City with my family.  We were there for my little brother's wedding, and to spend time with the rest of my family.  While we were there, we went to the Natural History Museum and saw the Chocolate Exhibit.  On the way out I picked up some chocolate covered cocoa beans at the gift shop.  I was so excited because I haven't been able to find cocoa beans!  These beans were covered in dark chocolate, so they were quite dark and a bit bitter tasting.  I decided that they would be perfect in a sweet blondie.  I chose the recipe I found here, and modified it just a touch.

White Chocolate Blondies with Chocolate Covered Cocoa Beans

1/2 cup butter
5 ounces white chocolate, chopped (use white baking chocolate, not chips)
1/2 cup granulated sugar
1/4 cup packed brown sugar
2 eggs
1 teaspoon vanilla extract
1 cup all purpose flour
1/4 teaspoon baking powder
1/4 teaspoon salt
1 cup chopped chocolate covered cocoa beans

Preheat the oven to 350F.  Spray a 9x9 inch square baking pan with cooking spray, then line with parchment paper, leaving the edges hanging over the sides (for handles), then lightly spray the parchment.  Set aside.

In a large microwaveable bowl, place the butter and the white chocolate.  Heat in the microwave at 15 second intervals, stirring after each until the butter and white chocolate are melted and smooth.  Stir in the granulated sugar and brown sugar until combined (the mixture will look "gross" as my Hungry Puppies told me.  The oil will separate from the sugar - this is normal.  It will come back together when you add the eggs).  Stir in the eggs and vanilla until completely incorporated. Add the flour, baking powder, and salt, and stir until almost blended.  Add the chopped chocolate covered cocoa beans and stir until evenly distributed.

Pour the blondie batter into the prepared pan and smooth the top.  Bake for about 30 minutes, or until a toothpick inserted in the center comes out with moist crumbs.  Remove the blondies from the oven and let cool completely, then cover with plastic wrap and chill until cold.  Remove the blondies from the refrigerator and remove from the pan using the parchment as handles.  Cut into squares and serve.  Makes 16 blondies.

Enjoy!  -Cardamommy

Monday, May 26, 2014

Peanut Butter and Honey Oat Bars


I saw these amazing bars the other day and absolutely knew that I had to make them.  First, because my family loves anything peanut butter.  Second, I love anything peanut butter and honey.  Third?  Oatmeal, no bake, 3 ingredient?  Where can you go wrong?  I love the strong honey flavor in these bars, and the deliciously nutty flavor and chewy texture of the raw oats is perfect.

Peanut Butter and Honey Oat  Bars

1 cup creamy peanut butter
1/2 cup honey
2 cups old fashioned oatmeal
1 cup quick oats

Line an 8 inch square baking pan with tin foil, and lightly spray with cooking spray.

In a large bowl, combine the peanut butter and the honey.  Microwave for about 30 to 45 seconds until the peanut butter is soft and melty, stir until smooth.  Add the old fashioned oats and quick oats and stir until the oats are evenly coated in the peanut butter and honey mixture.  Scrape the oat mixture into the prepared pan, pressing down lightly and smoothing the top.  Chill until firm.  Cut into squares and serve.  Makes 16 servings.

Enjoy!  -Cardamommy

Friday, May 23, 2014

Cinnamon Roll Pie Crust


This recipe today is just for the pie crust, because I think you can use it for just about any kind of pie you want.  Apple, cherry, blueberry, peach (oooooh, peach would be amazing!), whatever you like.  I found this recipe in a Food Network magazine, and reconfigured it to use my favorite home made pie crust instead of store bought.  It is amazingly delicious, and quite unexpected.  Also, it looks absolutely beautiful.  You will be sure to wow any and all who see it.  This recipe totally reminds me of these Cinnamon Roll Pastry Bites that I made forever ago.  Delicious!

Cinnamon Roll Pie Crust

2 1/2 cups all purpose flour
2 Tablespoons granulated sugar
1 teaspoon salt
8 Tablespoons shortening
12 Tablespoons cold butter
6 to 8 Tablespoons ice cold water
2 Tablespoons butter, room temperature
1/2 cup granulated sugar
1 teaspoon cinnamon

In a large bowl, combine the flour, sugar, and salt.  Add the shortening and butter, and using a pastry blender or a fork or you fingers, cut in the shortening and butter until the mixture resembles coarse crumbs.  Pour 6 tablespoons of the water over the flour mixture and stir and press together until the dough comes together, adding more water if necessary, 1 tablespoon at a time.  Divide the dough into 2 equal pieces, form into disks, wrap in plastic wrap and chill until ready to use.

When ready to make your pie, roll out one disk of pie dough to fit your pie plate, then set aside while you make the cinnamon roll top crust.

Roll out the second disk of dough large enough to fit the pie plate.  Spread the butter over the rolled out dough.  In a small bowl, mix together the sugar and cinnamon, then sprinkle over the buttered dough.  Tightly roll up the pie dough like a cinnamon roll.  Trim about an inch or so off of both ends to make it even.  Cut the cinnamon roll log into 1/2 inch thick slices.  Place the slices cut side down in a tight circle on top of a piece of waxed paper dusted with flour.  Lightly dust the top with more flour, then gently roll out into a circle to fit the top of the pie plate and cover the filling.

Place your desired filling in the bottom crust in the pie plate, then very carefully holding the wax paper, flip the cinnamon roll crust over on top of the filling and gently peel off the wax paper.  If the cinnamon roll pieces separate slightly, it's okay.  Roll the overhanging edges together and crimp.  Bake as directed for your pie filling, covering the pie with tin foil if it browns too quickly.

Enjoy!  -Cardamommy

Monday, May 19, 2014

Hazelnut Coconut Crunch Ice Cream Cake


I made this ice cream cake for Easter and am only now getting around to posting it, but I figured it should be fine because it'll still be Summer for a while, right?  Usually, I would have made this cake from scratch, but I was visiting my family in Salt Lake City, and we were so busy that making an ice cream cake from scratch was totally stressing me out.  I decided to go half and half, and I got this cake made in one morning.  I'm thinking that I've maybe gone a little overboard with these flavors, but I seriously can't help it.  This cake starts with a box mix (but you're no one would ever guess), and is filled with coconut flavored ice cream and hazelnut crunch and covered with coconut hazelnut chocolate frosting and more hazelnut crunch.   

Hazelnut Coconut Crunch Ice Cream Cake

Cake:

1 box chocolate cake mix
1 box (4 serving size) chocolate pudding mix
1 cup sour cream or plain unsweetened greek yogurt
1 cup canola oil
4 eggs
1/2 cup milk

Hazelnut Crunch:
2 ounces chocolate chips
2 Tablespoons butter
1/2 cup Nutella
1/4 to 1/2 cup chopped toasted hazelnuts
3/4 cup shredded coconut
3 cups rice krispies

1/2 gallon Coconut Ice Cream (we used samoas flavored ice cream)

Coconut Hazelnut Chocolate Frosting:
2 cans of Almond Joy Chocolate (or regular chocolate) frosting (or make your own)
1/2 cup Nutella
1 cup shredded coconut

Preheat the oven to 350F.  Grease 2 9-inch round cake pans and line the bottoms with parchment paper (or coffee filters) and lightly grease the papers.

In a large bowl, combine the cake mix, pudding mix, sour cream or yogurt, oil, eggs, and milk.  Mix together for a minute or two, until well blended.  Divide the batter between the two prepared pans and smooth the top (the batter will be thick).  Bake in the preheated oven for about 25 to 27 minutes, or until a toothpick inserted in the center comes out clean.  Remove cakes from the oven and let cool for about 5 minutes.  Turn the cakes out of the pans and let cool completely on a cooling rack.

While the cakes are baking, make the hazelnut crunch.  Melt together the chocolate chips, butter, and Nutella until smooth. Add the hazelnuts, coconut, and rice krispies, and stir until evenly coated.  Pour the mixture onto a waxed paper lined baking sheet and refrigerate until set.  Break into small chunks.

For the ice cream layer, line a 9-inch round cake pan with plastic wrap.  Press all of the ice cream evenly into the pan.  Cover with plastic wrap and freeze until ready to assemble.

For the frosting, in a large bowl, combine the 2 cans of frosting (or about 3 cups of homemade), the Nutella, and the coconut, stirring until combined.

To assemble the cake, place one cake layer on a serving plate.  Sprinkle with some of the hazelnut crunch.  Place the unwrapped ice cream layer on top, and sprinkle some more of the hazelnut crunch on top.  Place the second cake layer on top of the ice cream layer.  Frost the top and sides with the frosting.  Sprinkle more hazelnut crunch on top.  Makes 16 to 20 servings.

Enjoy!  -Cardamommy

Friday, May 16, 2014

Cinnamon Roll Strawberry Shortcake


I have a multi purpose recipe for you today.  I needed to get rid of some leftover whipping cream (seems to be the story of my life), and Coriaunty suggested whipping it up and folding in some strawberries for strawberry shortcake, which I thought was a brilliant idea!  However, the shortcake portion of strawberry shortcake is not particularly exciting to me.  So, I decided to make cinnamon rolls instead.  These no yeast cinnamon rolls can be on the table, start to finish in under one hour.  Yes. Less than 60 minutes.  Pretty amazing, huh?  And they taste great!  If you aren't interested in having Cinnamon Roll Strawberry Shortcake (which would cause me to suspect that you have lost your mind...), you can just top them with a quick frosting.

Cinnamon Roll Strawberry Shortcake

Cinnamon Roll Filling:
3/4 cup packed brown sugar
6 Tablespoons granulated sugar
1 teaspoon cinnamon
pinch of ground  cloves
pinch of salt
1 Tablespoon melted butter

Cinnamon Rolls:
2 1/2 cups all purpose flour
2 Tablespoons granulated sugar
1 1/4 teaspoons baking powder
1/2 teaspoon baking soda
1/2 teaspoon salt
1 1/4 cups buttermilk
4 Tablespoons melted butter, divided

Strawberry Whipped Cream:
1 cup heavy whipping cream
2 to 4 Tablespoons powdered sugar (to taste)
1 pound strawberries, chopped

Vanilla Frosting (optional):
1/4 cup (1/2 stick) butter, room temperature
1 cup powdered sugar
1/4 teaspoon vanilla extract
1 teaspoon milk (if necessary for consistency)

Preheat the oven to 425F.  Grease a 9-inch round cake pan.

For the cinnamon roll filling, combine the brown sugar, granulated sugar, cinnamon, cloves, and salt in a small bowl.  Add the melted butter and stir until the mixture resembles wet sand.  Set aside.

For the cinnamon rolls, in a large bowl whisk together the flour, granulated sugar, baking powder, baking soda, and salt.  Add the buttermilk and 2 tablespoons of the melted butter and stir until the dough comes together (the dough will look rough, like biscuit dough).  Turn the dough out onto a floured surface and knead 3 or 4 turns until the dough is smooth.  

Roll or pat the dough into a 9x12 inch rectangle and spread the remaining 2 tablespoons of butter over the dough.  Sprinkle the filling mixture evenly over the buttered dough, and pat down evenly.  Roll up the dough, starting at the long side, to form a tight log.  Place the roll seam side down on your work surface and cut into 8 equal pieces.  Place one roll in the center of the prepared pan, and gently flatten it slightly with your hand.  Arrange the remaining seven cinnamon rolls around the perimeter of the pan, repeating the flattening process with each roll. 

Place  the pan of cinnamon rolls in the oven and bake for about 20 to 23 minutes, or until the rolls are golden brown.  Remove the cinnamon rolls from the oven and use a thin plastic spatula to loosen the rolls from the side of the pan.  Place a plate upside-down over the pan of cinnamon rolls, and flip it so the plate is on the bottom. Lift the pan off of the cinnamon rolls (the cinnamon rolls should be upside-down on the plate).  Then place a cooling rack upside-down on the plate of cinamon rolls and flip it so the cooling rack is on the bottom.  Lift off the plate (the cinnamon rolls should be right side up).  Let cool while you make the strawberry whipped cream or frosting.

For the strawberry whipped cream, place the whipping cream and powdered sugar in a medium bowl.  Beat with an electric mixer until stiff peaks form.  Fold in the strawberries.  Spoon the whipped cream mixture over the cooled cinnamon rolls.  Serve with a whole strawberry on top, if desired. 

For the vanilla frosting, mix together the butter and the powdered sugar. Mix in the vanilla and milk (if needed for consistency).  Spread the frosting over the warm cinnamon rolls.  Makes 8 Cinnamon Roll Strawberry Shortcakes, or 8 frosted Cinnamon Rolls.

Enjoy!  -Cardamommy

Monday, May 12, 2014

Blueberry and Cream Cookies


This is my very first Momofuku Milk Bar recipe, and I'm sold.  I don't have the cookbook, but found these cookies on their website and was so excited to try them out!  I sort of can't believe how addicting they are.  I ate a quarter of one (they're huge!), and had to consciously step away from the  rest of the cookies.  I had a mental image of me sitting on the kitchen floor with an empty cooling rack in my lap and crumbs everywhere.  I'm going to post the recipe exactly as it was written on the Milk Bar website. Notes: I substituted light corn syrup for the glucose.  I got 12 cookies out of my batch.  I also only made a 1/2 batch of milk crumbs.  Follow up note: I made these cookies again, and changed a couple of things: I used the entire batch of milk crumbs in the cookies instead of 1/2 batch.  I also increased the amount of dried berries to 1 cup and used a mixed berry blend.  Lastly, I reduced the size of the cookies by about half, and adjusted the bake time accordingly.

Blueberry and Cream Cookies

225 g (16 tbs) butter, at room temperature
150 g (3/4 cup) granulated sugar
150 g (2/3 cup) light brown sugar
100 g (1/4 cup) glucose
2 eggs
320 g (2 cups) flour
2 g (1/2 tsp) baking powder
1.5 g (1/4 tsp) baking soda
6 g (1 1/2 tsp) kosher salt
1/2 recipe milk crumbs (recipe below)
130 g (3/4 cup) dried blueberries


 combine the butter, sugars, and glucose in the bowl of a stand mixer fitted with the paddle attachment and cream on medium-high for 2-3 minutes. scrape down the sides of the bowl, add the eggs, and beat for 7 to 8 minutes.
2. reduce the mixer speed to low and add the flour, baking powder, baking soda, and salt. mix just until the dough comes together, no longer than 1 minute. (do not walk away from the machine during this step, or you will risk over mixing the dough.) scrape down the sides of the bowl with a spatula.
3. still on low speed, add the milk crumbs and mix until they’re incorporated, no more than 30 seconds. chase the milk crumbs with the dried blueberries, mixing them in for 30 seconds.
4. using a 2 3/4 oz ice cream scoop (or a 1/3 cup measure), portion out the dough onto a parchment-lined sheet pan. pat the tops of the cookie dough domes flat. wrap the sheet pan tightly in plastic wrap and refrigerate for at least 1 hour, or up to 1 week. do not bake your cookies from room temperature—they will not bake properly.
5. heat the oven to 350°f.
6. arrange the chilled dough a minimum of 4 inches apart on parchment- or silpat-lined sheet pans. bake for 18 minutes. the cookies will puff, crackle, and spread. after 18 minutes, they should be very faintly browned on the edges yet still bright yellow in the center; give them an extra minute or so if that’s not the case.
7. cool the cookies completely on the sheet pans before transferring to a plate or to an airtight container for storage. at room temp, the cookies will keep fresh for 5 days; in the freezer, they will keep for 1 month.

milk crumbs

40 g (1/2 cup) milk powder
40 g (1/4 cup) flour
12 g (2 tbs) cornstarch
25 g (2 tbs) sugar
2 g (1/2 tsp) kosher salt
55 g (4 tbs) butter, melted
20 g (1/4 cup) milk powder
90 g (3 oz) white chocolate, melted

1. heat the oven to 250°f.
2. combine the 40 g (½ cup) milk powder, the flour, cornstarch, sugar, and salt in a medium bowl. toss with your hands to mix. add the melted butter and toss, using a spatula, until the mixture starts to come together and form small clusters.
3. spread the clusters on a parchment- or silpat-lined sheet pan and bake for 20 minutes. the crumbs should be sandy at that point, and your kitchen should smell like buttery heaven. cool the crumbs completely.
4. crumble any milk crumb clusters that are larger than ½ inch in diameter, and put the crumbs in a medium bowl. add the 20 g (¼ cup) milk powder and toss together until it is evenly distributed throughout the mixture.
5. pour the white chocolate over the crumbs and toss until your clusters are enrobed. then continue tossing them every 5 minutes until the white chocolate hardens and the clusters are no longer sticky. the crumbs will keep in an airtight container in the fridge or freezer for up to 1 month.makes about 250 grams (2 ¼ cups)

Enjoy!  -Cardamommy

Friday, May 9, 2014

Hazelnut Crunch Bars


Do you remember these Avalanche Bars?  I sure do.  They are so addictingly delicious!  I made a cake recently that had a hazelnut crunch between the layers and on the top, and I just haven't been able to get over that hazelnut crunch!  So, I decided to turn it into a bar very similar to the avalanche bars.  These crunchy bars are full of chocolate, nutella, toasted hazelnuts, and marshmallows.  We may like these even better than the original avalanche bars!

Hazelnut Crunch Bars

12 ounces semi sweet chocolate chips
1/4 cup nutella
1/2 cup toasted hazelnuts
3 cups rice krispies
1 1/2 cups mini marshmallows

Lightly grease a 9x9 inch baking pan.

In a large bowl, combine the chocolate chips and nutella.  Microwave in 20 second intervals, stirring after each, until melted and smooth.  Add the toasted hazelnuts and rice krispies, and stir until the chocolate is distributed evenly over the rice krispies.  Fold in the mini marshmallows.

Pour the mixture into the prepared pan, pressing lightly to even the top.  Let cool completely before cutting.  Makes about 16 bars.  

Enjoy!  -Cardamommy

Monday, May 5, 2014

Double Marshmallow M&M Rice Krispie Treats


I did my last Art Mom visit a few weeks ago, and I had to decide on another fun treat to help draw the kids' attention away from the fact that I have no art skills.  I'm pretty sure that they have realized this by now, but with their mouths so full of delicious treats, they find it difficult to say so.  These treats are quick and easy to put together, and you can use any type of M&Ms (or other candy for that matter) you want.  They are gooey and delicous.

Double Marshmallow M&M Rice Krispies Treats

1 bag (10 ounces) large marshmallows
1/4 cup (4 Tablespoons) butter
6 cups rice krispies cereal
1 cup M&Ms
1 cup mini marshmallows
Sprinkles

Lightly grease a 9x13 inch baking dish.  Set aside.

In a large microwaveable bowl, combine the marshmallows and butter.  Microwave for about 1 to 1 1/2 minutes, stirring every 30 seconds, until marshmallows are melted and smooth.  Stir in the rice krispies until evenly coated with the marshmallow mixture.  Stir in the M&Ms and mini marshmallows until evenly distributed.  Pour the cereal mixture into the prepared pan and shake the sprinkles over the top.  With lightly greased hands, press down on the treats slightly.  Refrigerate until set.  Cut into bars.  Makes 24 servings.

Enjoy!  -Cardamommy

Friday, May 2, 2014

Hazelnut Crunch Layer Cake


I found this cake and may have lost my mind a little.  Then I made this cake and finished the job.  This cake is totally ridiculous.  It is three layers of my favorite fudgy moist chocolate cake, filled with an insanely silky milk chocolate frosting and hazelnut crunch clusters (hello, I am definitely going to turn that into a bar cookie!), then covered with more of the chocolate frosting and topped with more hazelnut crunch clusters.  This cake is completely delicious, and totally over the top.  If you need a show stopper for chocolate lovers, this is it.  Fun Tip:  Do you hate cutting out parchment circles to fit your cake pans?  Use a coffee filter instead!  Just spray your pan as you normally would, then flatten out a coffee filter and place on the bottom of the pan.  Lightly spray the filter and pour in your batter.  Just don't forget to peel off the coffee filter at the end...

Hazelnut Crunch Layer Cake

Chocolate Cake:
2 1/2 ounces semi sweet chocolate chips
1 cup milk, boiling
1 1/4 cups water
2 1/4 cups all purpose flour
1 cup cocoa powder
2 1/4 teaspoons baking soda
1 1/4 teaspoons baking powder
1 teaspoon salt
1 cup mayonnaise
2 eggs
1 1/2 teaspoons vanilla extract
2 1/4 cups granulated sugar

Hazelnut Crunch:
2 ounces semi sweet chocolate chips
2 Tablespoons butter
1/2 cup Nutella
1/4 cup chopped hazelnuts, toasted
3 cups rice krispies cereal

Milk Chocolate Frosting:
16 ounces milk chocolate chips
1 1/2 Tablespoons light corn syrup
1 1/2 cups heavy cream, boiling
1 cup (2 sticks) cold butter, cut into 1/2 inch pieces

Preheat the oven to 350F.  Grease 3 9-inch round cake pans and line the bottoms with parchment paper (or use a coffee filter!), then lightly grease the parchment paper.  Set aside.

For the cake, place the chocolate chips in a large bowl and pour the boiling milk over them.  Let sit for a minute or two, then stir until chips are melted and smooth.  Add the water.  Set aside.

In a separate bowl, whisk together the flour, cocoa powder, baking soda, baking powder, and salt.  Set aside.

In the bowl of a stand mixer, or with a hand mixer, cream together the mayonnaise, eggs, and vanilla until smooth.  Add the sugar and beat until blended.  Add 1/3 of the flour mixture and beat, followed by 1/2 of the chocolate mixture.  Add another 1/3 of the flour mixture, followed by the remaining chocolate mixture, then the remaining flour mixture, beating after each addition until smooth.  

Divide the batter evenly between the prepared cake pans, then place in the oven and bake for about 25 minutes, or until a toothpick inserted in the center comes out clean.  Remove cakes from the oven and let cool on a rack for about 10 minutes.  Carefully turn the cakes out of the pans and remove the parchment (or coffee filter) from the bottom of the cakes.  Let cool completely before assembling and frosting.

For the hazelnut crunch, in a medium bowl, melt together the chocolate chips and butter until smooth.  Stir in the Nutella and toasted hazelnuts, followed by the rice krispies cereal.  Spread the mixture onto a piece of waxed paper, and refrigerate until set up.  Break into small pieces.

For the frosting, place the milk chocolate chips and corn syrup in the bowl of a stand mixer (or in a large bowl and use a hand mixer).  Pour the boiling cream over the chips and let sit for a minute or two.  Beat the mixture on low speed until blended, then increase the speed and beat the mixture for about 6 or 7 minutes, or until cooled.  With the mixer running, start adding the cold butter, a couple of pieces at a time, beating well after each addition, until all of the butter has been added.  Continue beating for 5 to 10 more minutes until the frosting comes together and thickens. If the frosting is thin and soupy, or looks broken, place the bowl in the refrigerator for 5 to 10 minutes then beat again.  Continue chilling and beating the frosting until it sets up.

To assemble the cake, place one cake layer on a serving plate.  Spread about 1 cup of frosting over the cake, and sprinkle some hazelnut crunch over the top.  Cover with the second cake layer, then spread the cake with another cup of the frosting and sprinkle more hazelnut crunch over the top.  Place the last cake layer on the top, and frost the top and sides of the cake with the remaining frosting.  Sprinkle the top of the cake with hazelnut crunch.  Makes 16 to 20 servings.

Enjoy!  -Cardamommy

Related Posts Plugin for WordPress, Blogger...