Friday, February 27, 2015

Cherry and White Chocolate Chip Brownies


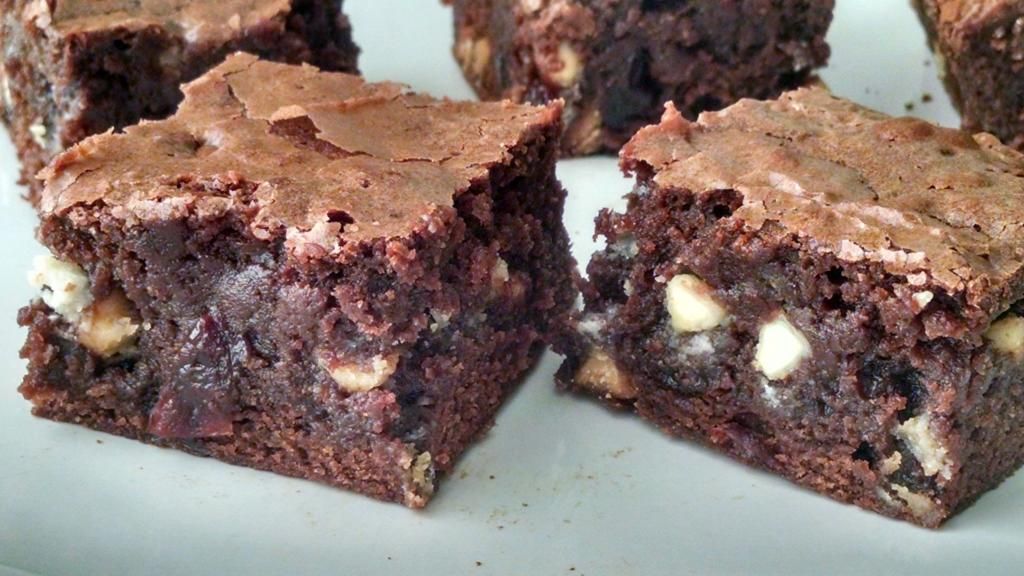
I stumbled across this recipe recently and absolutely couldn't resist it.  I mean, seriously.  Chocolate, cherries, white chocolate...what's not to love?  I made some changes according to what I had in my pantry, and these brownies are totally amazing.  They are super moist and fudgy with little bursts of tart cherry and smooth white chocolate.  Delicious, easy, and irresistible!

Cherry and White Chocolate Chip Brownies

1/2 cup dried cherries
2 Tablespoons maraschino cherry juice
1 cup semi sweet chocolate chips
1/2 cup butter
3/4 cup granulated sugar
1/4 teaspoon salt
3 eggs
3/4 cup all purpose flour
3/4 cup white chocolate chips

Preheat the oven to 325F.  Line the bottom of an 8 inch square baking pan with parchment paper, letting the edges hang over the sides.  Lightly spray the parchment and pan with cooking spray.

Place the dried cherries and cherry juice in a small microwaveable bowl and microwave for 30 to 60 seconds, or until the juice is boiling.  Remove cherries from the microwave and let sit for about 10 minutes, or until much of the juice has been absorbed.

Place the semi sweet chocolate chips and butter in a large microwaveable bowl.  Heat in the microwave in 30 second intervals, stirring after each, until melted and smooth.  Whisk in the sugar and salt until combined.  Add the eggs and whisk until completely incorporated.  Stir in the flour until just combined, followed by the white chocolate chips and the dried cherry mixture until evenly distributed.  

Pour the batter into the prepared pan and smooth the top.  Bake in the preheated oven for 30 to 35 minutes, or until the top forms a shiny crust, and is soft to the touch.  Remove brownies from the oven and let cool completely.  Run a knife around the edge of the brownies to loosen from the pan, then lift the brownies out of the pan using the parchment paper as handles.  Cut the brownies into squares.  These brownies are quite fudgy, so to make clean cuts, wipe the blade of the knife after each cut.  Makes 16 brownies.

Enjoy!  -Cardamommy

Monday, February 23, 2015

Candy Bar Overload Cookies


We still have a massive amount of Halloween candy at our house.  Not just the crummy stuff that no one wants to eat, but candy bars and chocolate and everything!  I've been thinking that I need to grab a bunch of it and throw it in cookies, or brownies, or cake or something, and I'm just now getting around to it.  I slightly adapted this cookie recipe because I wanted a cookie base that could stand up to the serious chunks of candy I was going to put in it.  They turned out perfectly!  The cookies are nice and soft and chewy and full of chocolate, caramel, toffee, yum!  Use whatever assortment of candy you have!

Candy Bar Overload Cookies

3/4 cup (1 1/2 sticks) butter, room temperature
3/4 cup packed brown sugar
1/4 cup granulated sugar
2 eggs
1 teaspoon vanilla extract
2 1/4 cups all purpose flour
1 teaspoon cornstarch
1 teaspoon baking soda
1/4 teaspoon baking powder
1/4 teaspoon salt
2 cups chopped candy bars/candy (snickers, m&ms, whoppers, use what you have!)

Preheat the oven to 350F.  Line a baking sheet with parchment paper.

Cream together the butter, brown sugar, and granulated sugar until smooth.  Ad the eggs and vanilla and beat until light and fluffy.  Add the flour, cornstarch, baking soda, baking powder, and salt, and beat until just combined.  Stir in the chopped candy until evenly distributed.  

Scoop the dough into 2 tablespoon size balls and place on the prepared baking sheet.  Bake for about 10 minutes, or until lightly browned but still soft in the center (not shiny raw looking, though).  Remove cookies from the oven and let cool on the pan for several minutes (all the candy makes them a bit gooey to get off the pan if they are too hot).  Transfer cookies to a cooling rack.  Makes about 24 cookies. 

Enjoy!  -Cardamommy

Friday, February 20, 2015

Dill Cottage Cheese Wheat Bread


I think I'm kind of stuck in a rut when it comes to bread baking at my house.  I usually make my same go to recipe for sandwich bread.  Which is amazing, because we love that bread! But, it is also nice to break away and do something different.  Like this!  I got this recipe from an old Kitchenaid cookbook, and it was wonderful.  So moist and flavorful, just delicious! Dill Cottage Cheese Wheat Bread

1/4 cup warm water
4 1/2 teaspoons active dry yeast
2 cups cottage cheese
1/4 cup honey
1/4 cup butter, melted
2 eggs
2 Tablespoons dried dill weed
3 teaspoons salt
1/2 teaspoon baking soda
4 1/2 cups whole wheat flour, divided

In a large bowl, combine the warm water and yeast and let sit for about 5 minutes.  Add the cottage cheese, honey, butter, eggs, dill weed, salt, baking soda, and 4 cups of the flour.  Stir together with a large spoon until the dough comes together.  Turn the dough out onto a floured surface and knead the dough until smooth and elastic, working in the remaining 1/2 cup of flour as needed.  Place the dough in a greased bowl, grease the top of the dough, then cover with plastic wrap and let rise for about 1 hour.

Grease 2 8x4 inch loaf pans.  Divide the dough in half and form each half into a loaf.  Place the shaped dough in the prepared pans.  Cover and let rise for about 45 minutes.  While the dough is rising, preheat the oven to 350F.  

Bake the bread for 30 to 40 minutes, or until golden brown (you want to make sure it is done in the center!).  Remove the bread from the oven and turn out of the pans.  Let bread cool completely on a cooling rack before slicing. Makes 2 loaves.

Enjoy!  -Cardamommy


Monday, February 16, 2015

Orange Coconut Chocolate Chip Cookies


I have been thinking about these cookies since before Christmas.  They didn't make my Christmas baking list because I let my Hungry Puppies finalize the baking list and these didn't make it.  Oh well.  I knew I'd make them eventually, so here we are!  Originally I planned just to use chocolate chips, but then I accidentally bought my husband a Terry's Chocolate Orange.  A Dark Chocolate Orange.  Oops.  He's definitely not a fan.  So I knew he'd never eat it, but I knew he'd eat it in cookies!  It was perfect for these cookies.  If you don't have a chocolate orange (I've only seen them around Christmas time or in specialty shops), just use chocolate chips.  The cookies are thick and chewy and the orange, coconut, and chocolate are a perfect combination!

Orange Coconut Chocolate Chip Cookies

1/2 cup (1 stick) butter, room temperature
1/4 cup shortening

Grated zest of 1 orange
3/4 cup packed brown sugar
1/4 cup granulated sugar
1 egg
2 teaspoons vanilla extract
2 cups all purpose flour 
1 Tablespoon cornstarch
1 teaspoon baking soda
1/2 teaspoon salt
1 1/2 shredded coconut

1 cup chocolate chips OR 1 Terry's Chocolate Orange, chopped 

Preheat the oven to 350F.  Line a baking sheet with parchment paper.

Cream together the butter, shortening, orange zest, brown sugar, and granulated sugar until light and fluffy.  Add the egg and vanilla, and beat until well blended.  Add one cup of the flour, the cornstarch, baking soda, and salt, and beat until just combined.  Add the second cup of flour and beat until incorporated.  Add the coconut and chopped chocolate orange (or chocolate chips) and beat on low speed until evenly distributed.

Scoop the dough into 2 tablespoon size balls and place on the prepared baking sheet, leaving about 2 inches of space in between each dough ball.  Flatten the tops of the dough balls very slightly (you don't want to spread the dough, just flatten the rounded top of the dough ball).  Place the cookies in the preheated oven and bake for 10 to 11 minutes, or until just golden brown on the edges and very top.  Do not overbake, or the cookies will be more crunchy than chewy (which is a no go in my book).  Remove the cookies from the oven and transfer to a cooling rack to cool.  Makes about 24 cookies.


Enjoy!  -Cardamommy

Friday, February 13, 2015

Buttermilk Layer Cake


I was searching for a buttermilk layer cake and stumbled across this one from the NY Times, and I love it!  Love it.  This cake is definitely going to be my brand new go to favorite vanilla layer cake recipe.  It is nice and light, and tender, and flavorful, and pretty much just amazing!  I frosted mine with this browned butter chocolate frosting, but you can use whatever frosting you want!  

Buttermilk Layer Cake

2 1/3 cups cake flour (Or sub 2 cups +3 Tbsp all purpose flour and 2 Tbsp cornstarch)
1 1/2 teaspoons baking powder
1/2 teaspoon baking soda
1/4 teaspoon salt
12 Tablespoons (1 1/2 sticks) butter, room temperature
1 1/3 cups granulated sugar
3 eggs
1 1/2 teaspoons vanilla
1 cup buttermilk

Preheat the oven to 350F.  Spray 2 9-inch round cake pans with cooking spray. Set aside.

In a medium bowl, whisk together the cake flour, baking powder, baking soda, and salt.  

In a large bowl, cream together the butter and sugar until well blended and smooth.  Add the eggs and vanilla, and beat for 2 to 3 minutes, or until fluffy.  Beat in 1/3 of the flour mixture until just combined, followed by half of the buttermilk.  Add another 1/3 of the flour mixture, followed by the remaining buttermilk.  Beat in the remaining flour until just combine.  

Pour the batter evenly into the two prepared pans and smooth the tops.  Place in the preheated oven and bake for 20 to 22 minutes, or until a toothpick inserted in the center comes out clean.  Remove cakes from the oven and let cool in the pans for 10 to 15 minutes.  Carefully turn the cakes out of the pans and let cool completely on a cooling rack.  Frost with your favorite frosting.  Makes 12 to 16 servings.

Enjoy!  -Cardamommy


Monday, February 9, 2015

Browned Butter Chocolate Frosting - 2 Ways


A friend of mine told me several weeks ago that she uses browned butter in her chocolate frosting.  I had never heard of such a thing, and had obviously not thought of it myself, so I wanted to give it a try.  I totally did it, and I totally love it. The browned butter elevates the frosting to a whole new level, and doesn't get lost in or compete with the chocolate at all, which I was slightly worried about.  I made the frosting 2 different ways, and will share both.  The first uses cocoa powder and the second uses melted chocolate chips.  The texture of the two frostings are a bit different, the cocoa powder frosting is softer and a bit lighter.  The chocolate chip version is a bit heavier and solidifies more especially when refrigerated.  Both are delicious, and will frost a 9x13 or a 9 inch layer cake.  

Browned Butter Chocolate Frosting with Cocoa Powder

1 cup butter, browned and cooled to room temperature
1/2 cup cocoa powder
4 to 5 cups powdered sugar
1 1/2 teaspoons vanilla extract
6 to 7 Tablespoons milk

In a large bowl, beat together the browned butter, cocoa powder, and powdered sugar until crumbly.  Add the vanilla and 3 tablespoons of the milk and beat until incorporated.  Beat in the remaining milk, one tablespoon at a time until the desired consistency is reached.  


Browned Butter Chocolate Frosting with Melted Chocolate

1 cup (2 sticks, 16 tablespoons) butter, browned and cooled to room temperature
2 cups powdered sugar
1 teaspoon vanilla extract
1 cup (6 ounces) semisweet or bittersweet chocolate chips, melted and cooled

In a large bowl, beat together the browned butter and powdered sugar until smooth and combined. Beat in the vanilla extract.  Add the melted chocolate and beat the frosting until it is light and fluffy.  Makes about 3 cups.

Enjoy!  -Cardamommy

Friday, February 6, 2015

Fudge Round Sandwich Cookies


Believe it or not, up until very recently, I had never had Little Debbie Fudge Rounds.  We're not big on snack cakes and things like that, but I was sort of curious so I got some.  I was a little underwhelmed, but I really liked the idea!  I decided to make my own version by changing up a basic copycat recipe I floating around on the internet.  I added some chocolate malted milk powder to the cookie and the frosting to give it a little bit more depth, and they turned out totally delicious!  Lots of chocolate, lots of flavor, lots of yum!

Fudge Round Sandwich Cookies

Fudge Cookies:
1/2 cup + 2 Tablespoons butter, room temperature
1 cup granulated sugar
1 egg
1 teaspoon vanilla extract
1 cup all purpose flour
1/4 cup cocoa powder
2 Tablespoons chocolate malted milk powder
1/2 teaspoon baking soda
1/8 teaspoon salt

Filling:
1/4 cup shortening
1/4 cup butter, room temperature
1/2 teaspoon vanilla extract
2 Tablespoons cocoa powder
1 Tablespoon chocolate malted milk powder
1 1/2 cups powdered sugar
Pinch of salt
1 Tablespoon milk

Preheat the oven to 350F.  Line a baking sheet with parchment paper.

For the cookies, cream together the butter and sugar until light.  Add the egg and vanilla extract and beat until fluffy.  Add the flour, cocoa powder, chocolate malted milk powder, baking soda, and salt, and beat until just combined. Scoop the dough into tablespoon size balls and place on the baking sheet, leaving a bit of room between the cookies because they will spread.

Bake the cookies for 8 to 10 minutes, or until just set (don't overbake, we want these to stay soft).  Remove the cookies from the oven and let cool on the pan for about 5 minutes.  Transfer cookies to a cooling rack to cool completely.

For the frosting, cream together the shortening, butter, and vanilla extract.  Add the cocoa powder and chocolate malted milk powder, and beat until blended.  Beat in the powdered sugar and salt until smooth.  Beat in the milk.  Sandwich the frosting between two fudge cookies.  Drizzle the tops with melted chocolate, if desired.  Makes about 12 sandwich cookies.

Enjoy!  -Cardamommy

Monday, February 2, 2015

Cherry Cheesecake Pie


I've had my eye on this pie for a while now, and I am so incredibly glad that I made it.  Because it was amazing.  I don't often make cheesecake, but this one spoke to me.  Partly because it was a pie, and partly because it was gorgeous!  I am so happy with the way it turned out.  It was so simple to put together, just like a pie.  My husband rightly suggested that you can make this pie with any kind of fruit topping you'd like.  I'm pretty sure that I'll have the opportunity to try out lots because everyone loved it, and I totally can't wait to make it again!  

Cherry Cheesecake Pie

9 inch double pie crust (I used this one, or use a refrigerated crust)
2 packages (8 ounces each) cream cheese (regular or neufchatel), room temperature
1/2 cup granulated sugar
1 Tablespoon cornstarch
1 egg
1/2 teaspoon almond extract
1 can (21 ounces) cherry pie filling (or any other flavor pie filling)

Preheat the oven to 350F. Place one pie crust layer in a 9 inch pie plate.

In a large bowl or a food processor, beat together the cream cheese, sugar, and cornstarch until smooth.  Add the egg and almond extract and beat until well combined and smooth.  Pour the cream cheese mixture into the prepared pastry crust and smooth the top.  Gently spoon the cherry pie filling evenly over the top of the cream cheese mixture.

Cut the remaining pie crust into 1/2 inch strips and arrange in a lattice over the top of the pie.  Seal and crimp the edges as desired.  Bake in the preheated oven for 50 to 60 minutes, or until the cherry filling is bubbling and the crust is golden brown (if the crust browns too quickly, cover loosely with foil).  Remove the pie from the oven and let cool completely on a cooling rack. Serve at room temperature, or chill before serving.  Makes 8 servings.

Enjoy!  -Cardamommy


Related Posts Plugin for WordPress, Blogger...