skip to main
|
skip to sidebar
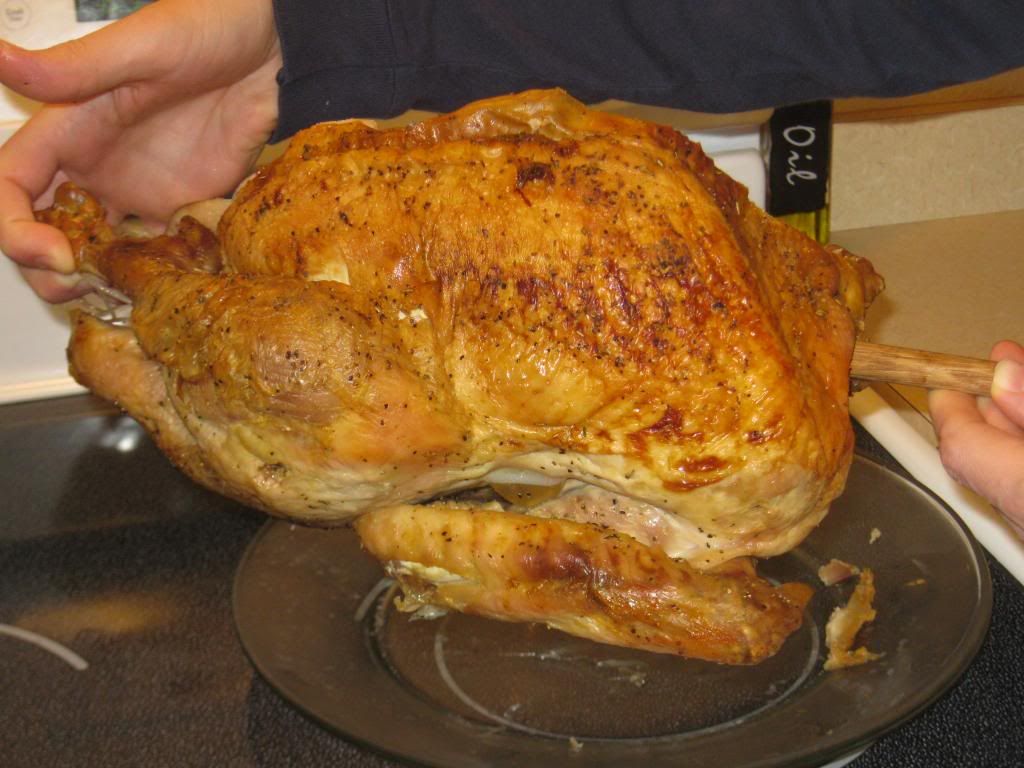
I had a great idea for roasting our turkey this year. If you have to turn over your turkey midway through the roasting process, you've probably found that it can be exceedingly difficult, hot, awkward, and messy. I had my husband go to the hardware store and get a 1/2 inch in diameter wooden dowel. We cut it down so that it would be just long enough to fit in our roasting pan. Then, I stuck it through the large opening of the turkey cavity, and out the other side, giving you essentially a turkey on a stick. The stick makes it so much easier to flip the bird! When it's time, simply grab and lift the two protruding ends of the dowel, and spin the turkey 180 degrees and set back down in the roasting pan to finish roasting. Our turkey came out absolutely perfectly this year!
Enjoy! -Cardamommy
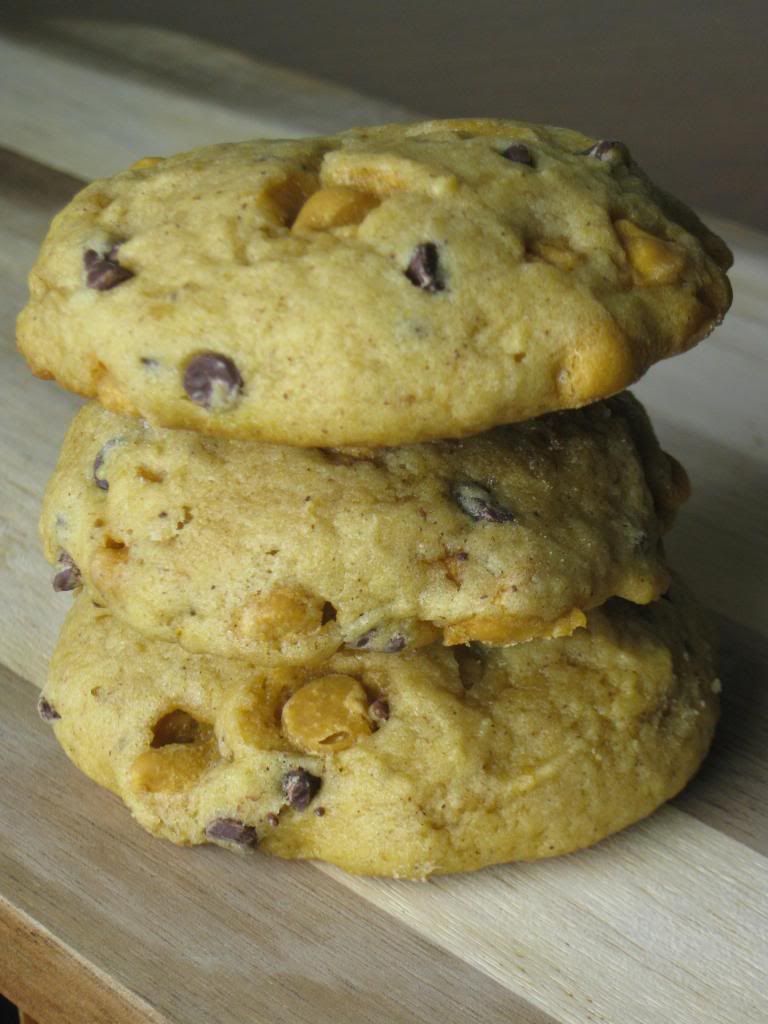
My youngest Hungry Puppy really wanted to contribute something to our Thanksgiving dinner, and she chose pumpkin cookies. We decided on this recipe, and tweaked it so very slightly by using coconut oil and adding some semi sweet chocolate chips. I usually don't like a cakey cookie. At all. But these cookies were totally delicious! I had a hard time stopping eating them. I probably ate about 4 cookies too many! Oh well. Hitting the treadmill in the morning for sure.
Pumpkin Butterscotch Chocolate Chip Cookies
1 cup granulated sugar
2 eggs
1/2 cup coconut oil
1 cup pumpkin puree
1 teaspoon vanilla extract
2 cups all purpose flour
1 1/2 teaspoons baking powder
1 teaspoon baking soda
1 teaspoon cinnamon
1/2 teaspoon salt
1 cup butterscotch chips
1/2 cup mini semi sweet chocolate chips
Preheat the oven to 350F. Line a baking sheet with parchment paper.
Beat the sugar and eggs together until smooth and light colored. Beat in the coconut oil, pumpkin puree, and vanilla extract. Add the flour, baking powder, baking soda, cinnamon, and salt, and beat until just combined. Stir in the butterscotch chips and mini chocolate chips.
Scoop the dough with a 2 tablespoon size cookie scoop, and place about 2 inches apart on the prepared baking sheet. Bake for about 12 minutes, or until the cookies are done and look dry on the top. These cookies are very cakey, so if you underbake them they will be raw in the center. Remove cookies from the oven and let cool on the pan for 2 to 3 minutes. Transfer cookies to a cooling rack to cool completely. Makes about 30 cookies.
Enjoy! -Cardamommy
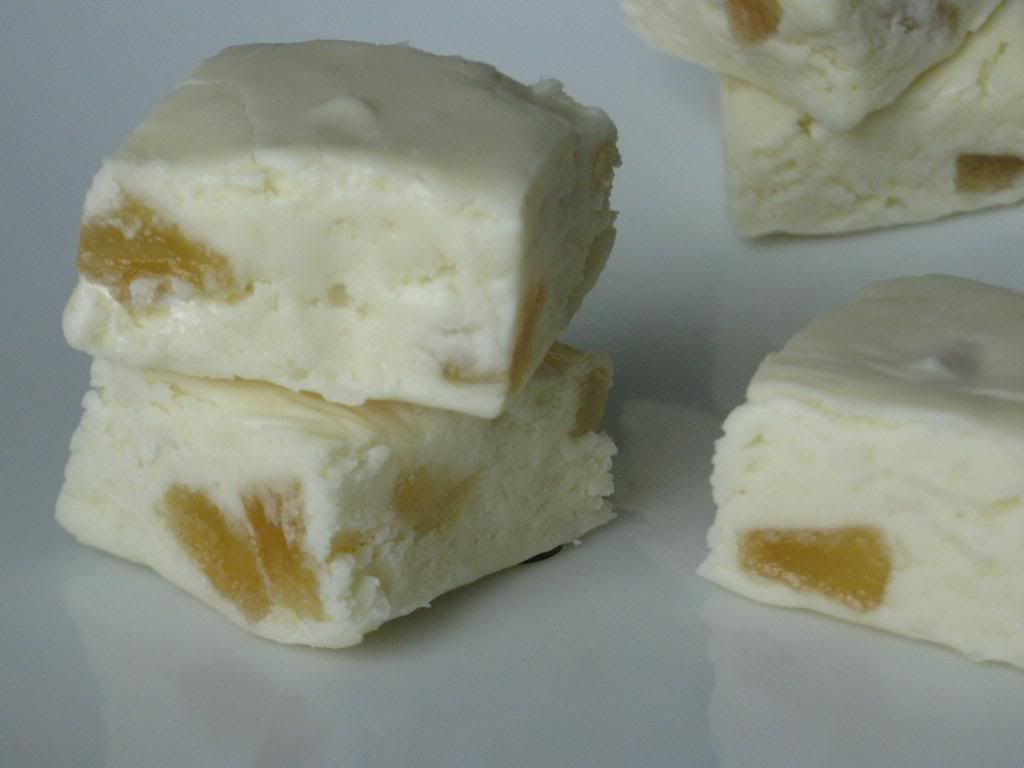
Here we are again. With seized white chocolate x2 batches. Oh, the bane of my baking existence! I have the worst luck melting white chocolate, so I try to avoid it. However, when your Hungry Puppy wants to take white chocolate muddy buddies to school for her 8th birthday treat, you suck it up and ruin two batches and fudge on the third. Get it? Fudge? So, this recipe has been on my to do list, but the ruined white chocolate made it happen. I definitely took a risk, but that white chocolate smoothed out when combined with the rest of the ingredients and we have success! When you make this recipe, you DO NOT need to use seized white chocolate. Regular will do just fine. Just remember you can use your failed white chocolate if necessary.
Pina Colada Fudge
2 cups white chocolate chips
3/4 cup sweetened condensed milk (about half of a 14 ounce can)
1 cup shredded coconut
3/4 cup marshmallow cream (about half of a 7 ounce container)
pinch of salt
1/2 teaspoon coconut extract
1/4 teaspoon rum extract
1/2 cup dried pineapple, chopped
Line an 8x8 inch baking pan with foil and lightly grease the foil.
In a large microwave safe bowl, combine the white chocolate chips and sweetened condensed milk. Microwave in 20 second intervals, stirring after each until chocolate is melted and smooth. Add the remaining ingredients and stir until thoroughly combined. Pour the fudge into the prepared pan and smooth the top. Place in the refrigerator until firm, several hours. Remove fudge from the refrigerator and lift out of the pan using the foil as a handle. Cut the fudge into squares. Makes 24 to 36 servings.
Enjoy! -Cardamommy
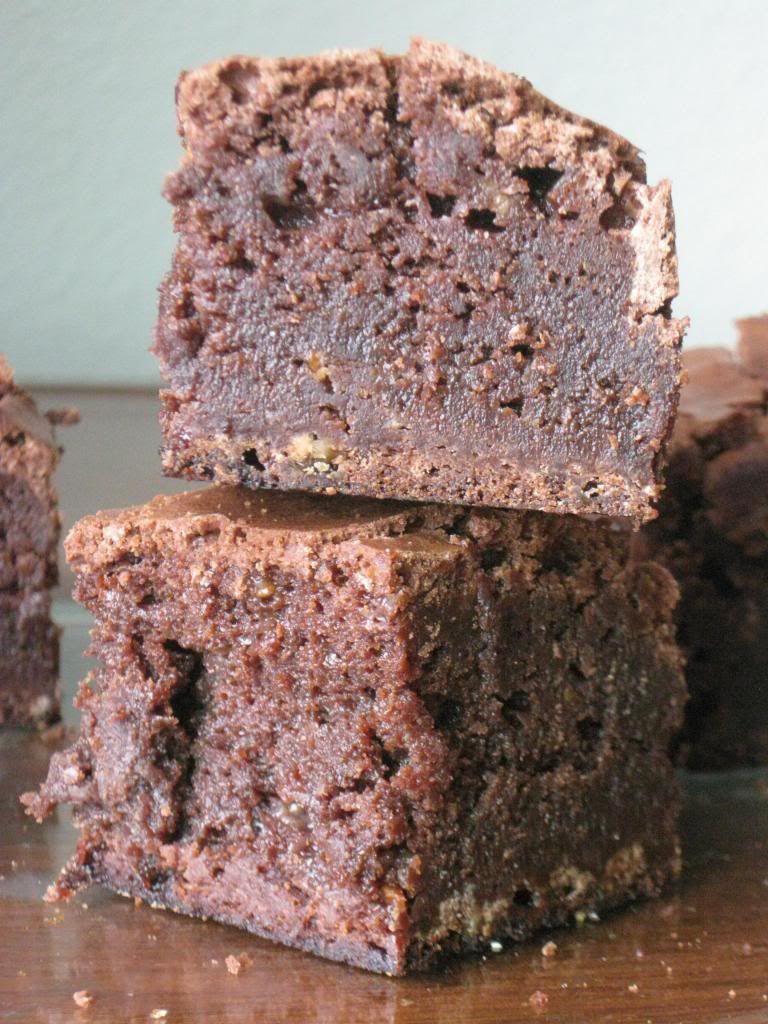
I am so in love with the idea of this type of brownie. This type of brownie being one with no leavening agent (baking powder or baking soda). The execution of said type of brownie is somewhat elusive to me. These brownies are so incredibly delicious and rich and fudgy it is amazing. The baking is what gives me trouble. I have so much trouble finding that just done point. I think that this recipe is the closest I have come to having success in this area, and the edges were still slightly on the burned side. The trick is getting them to bake all the way through to the thick fudgy center without charring the edges. If you (like me) are worried about this, you can simply cut the recipe in half and bake the brownies for about 20 minutes. They will be much thinner, but just as fudgy, delicious, and addicting!
Fudgy Toffee Brownies
1 1/2 cups semi sweet chocolate chips
12 Tablespoons (1 1/2 sticks) butter
1 1/2 cups granulated sugar
4 eggs
1 teaspoon vanilla extract.
3/4 cup all purpose flour
1 cup toffee bits
Preheat the oven to 350F. Line a 9x9 inch baking pan with foil, and lightly grease the foil. Set aside.
In a medium size microwavable bowl, combine the chocolate chips and butter. Microwave in 30 second intervals, stirring after each, until chocolate is melted and smooth. Stir in the sugar, then the eggs, one at a time, followed by the vanilla extract. Add the flour, and stir until just combined. Stir in the toffee bits.
Pour the brownie batter into the prepared pan and smooth the top. Bake the brownies for 45 to 50 minutes, or until a toothpick inserted in the center comes out with moist crumbs. Remove brownies from the oven and let cool completely. Cover and place in the refrigerator until chilled before cutting. Makes 16 brownies.
Enjoy! -Cardamommy
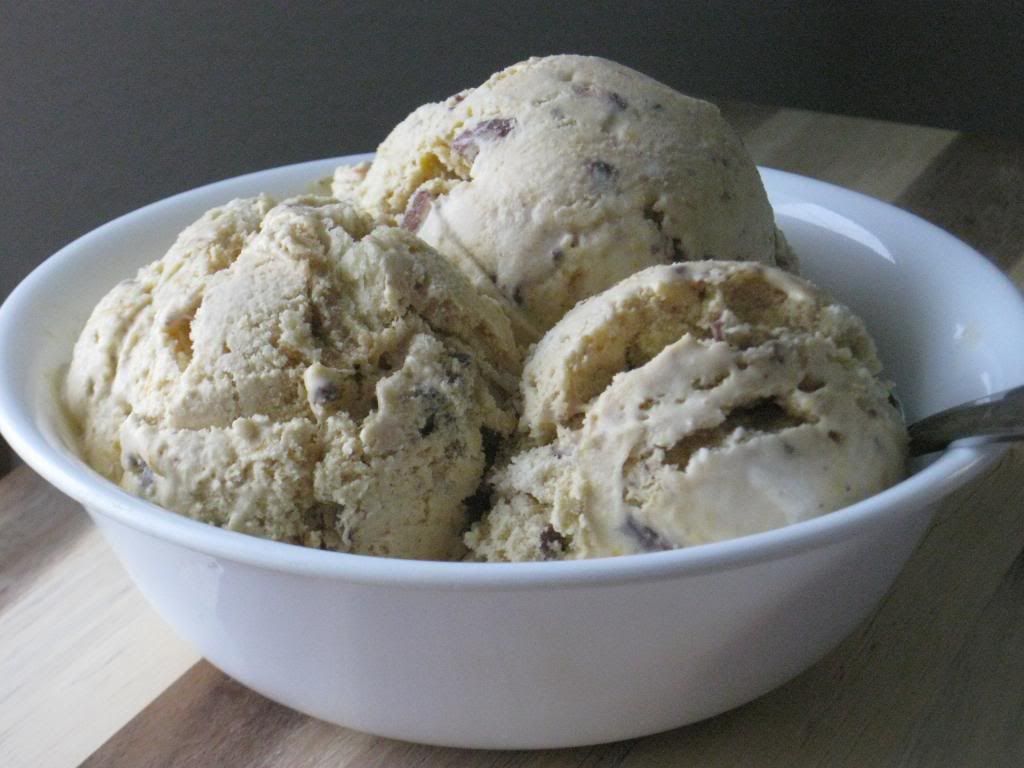
This ice cream recipe is very similar to this one that I made several years ago. Sometimes you need a fast and easy way to make your own ice cream that doesn't include an ice cream maker or a recipe. This recipe totally fits that bill. I actually feel a little weird calling it a recipe even because there is really nothing to it! My oldest Hungry Puppy had a little pumpkin left over from Halloween, and it was decision time. I told her that she had to figure out what to do with it because it can't sit on my counter forever. She thought to bake that little pumpkin and make something with the puree! Smart girl, she chose ice cream, and together we came up with this combination. And let me tell you, it is winning.
Pumpkin Toffee Butter Pecan Pie Ice Cream
Pastry:
1 cup all purpose flour
2 Tablespoons granulated sugar
1/2 teaspoon salt
1/2 cup butter, cold
Ice Cream:
1/2 gallon Butter Pecan Ice Cream, softened
1 tub (8 ounces) cool whip
1 cup pumpkin puree
1 bag chocolate toffee bits
Preheat the oven to 350F. Lightly grease a 9x9 inch baking pan.
In a medium bowl, combine the flour, sugar, and salt. Cut in the cold butter until the mixture resembles coarse crumbs. Press the crumbly mixture firmly into the prepared pan. Bake for 15 minutes or until lightly browned at the edges. Cool completely. Break the pastry into bite sized pieces.
For the ice cream, in a large bowl stir together the ice cream, cool whip, pumpkin puree, and toffee bits. Carefully stir in the pastry pieces. Transfer the ice cream to a freezer container and place in the freezer until firm. Makes about 9 cups of ice cream.
Enjoy! -Cardamommy
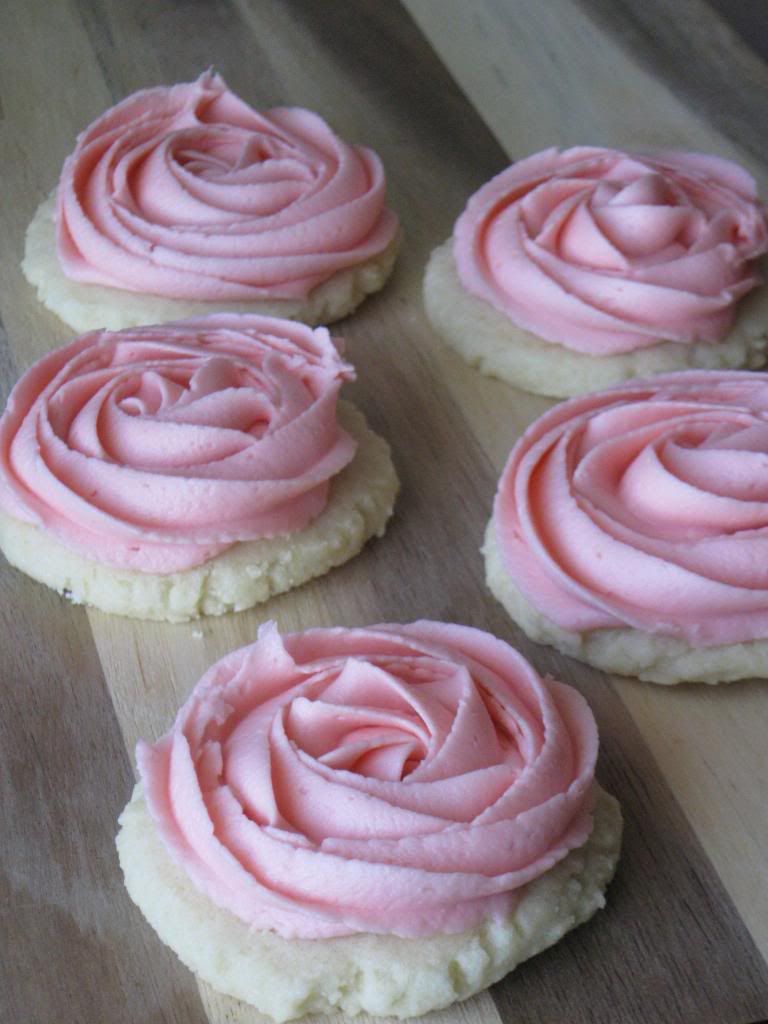
I'm headed to my oldest Hungry Puppy's school again this week for another Art Mom experience. We decided on sugar cookies as the treat to bring. I saw this recipe and decided to give it a shot. With a few modifications of course. They turned out so well, I am really pleased! If you don't pipe the rosettes, you will probably only use about half of the frosting, so just cut the recipe in half or make the whole recipe and refrigerate the leftovers (I can think of worse things than extra frosting in the fridge...) I wonder how all of those 8 year old boys are going to handle eating pink rosette cookies?! These cookies are so stinking cute!
Frosted Sugar Cookies
Cookies:
1/2 cup (1 stick) butter, room temperature
1/4 cup shortening
1 cup granulated sugar
2 eggs
2 teaspoons vanilla extract
1/2 teaspoon almond extract
2 1/2 cups all purpose flour
2 teaspoons cornstarch
1 1/2 teaspoons baking powder
1/4 teaspoon salt
Frosting:
1/2 cup butter, room temperature
1/2 cup shortening
2 teaspoons vanilla extract
4 cups powdered sugar
1 to 2 Tablespoons milk
1 to 2 drops of red gel food coloring
Line a baking sheet with parchment paper. Set aside.
Cream together the butter, shortening, and granulated sugar until light and fluffy. Beat in the eggs, one at a time, scraping down the sides of the bowl as necessary. Beat in the vanilla extract and almond extract. Add the flour, cornstarch, baking powder, and salt, and beat until incorporated.
Using a small cookie scoop, scoop the dough into balls and place on the prepared baking sheet about 2 inches apart. Using a lightly floured glass, or the bottom of a measuring cup, press down the dough balls until they are about 1/2 inch thick. Place the dough cookies in the refrigerator for 10 to 15 minutes while you preheat the oven.
Preheat the oven to 375F. When the oven is ready, remove the cookies from the refrigerator and place in the oven. Bake for 8 minutes, or until the cookies are just set in the center. Remove cookies from the oven and let cool on the pan for several minutes. Transfer cookies to a cooling rack to cool completely before frosting.
For the frosting, cream together the butter, shortening, and vanilla extract. Beat in the powdered sugar in two additions (2 cups at a time) until combined. Beat in the milk, 1 tablespoon at a time until you reach a stiff but still spreadable consistency (if the frosting is too soft, the rosettes will not hold up). Beat in the red gel food coloring until the desired color is reached. Spoon the frosting into a pastry bag fitted with a 1M star tip. Starting in the center of each cookie, pipe the frosting in a circle moving outward until you reach the edge of the cookie. Repeat with the remaining cookies. If you choose not to pipe the rosettes, just spread the frosting on top of the cookies. Makes 30 cookies.
Enjoy! -Cardamommy
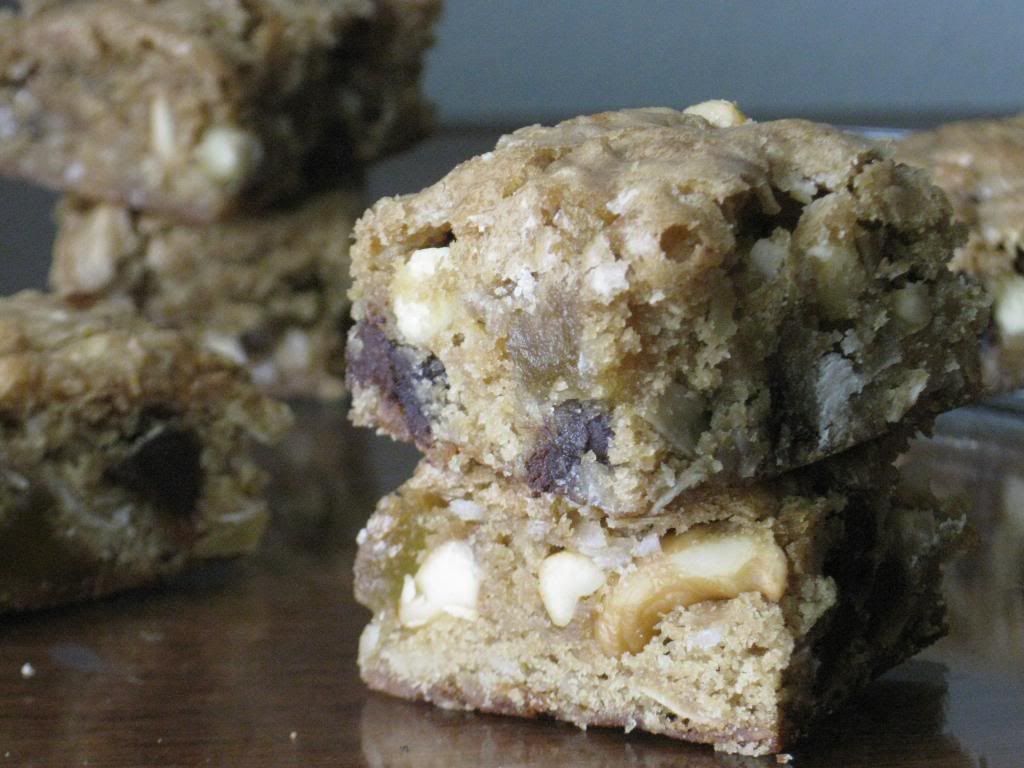
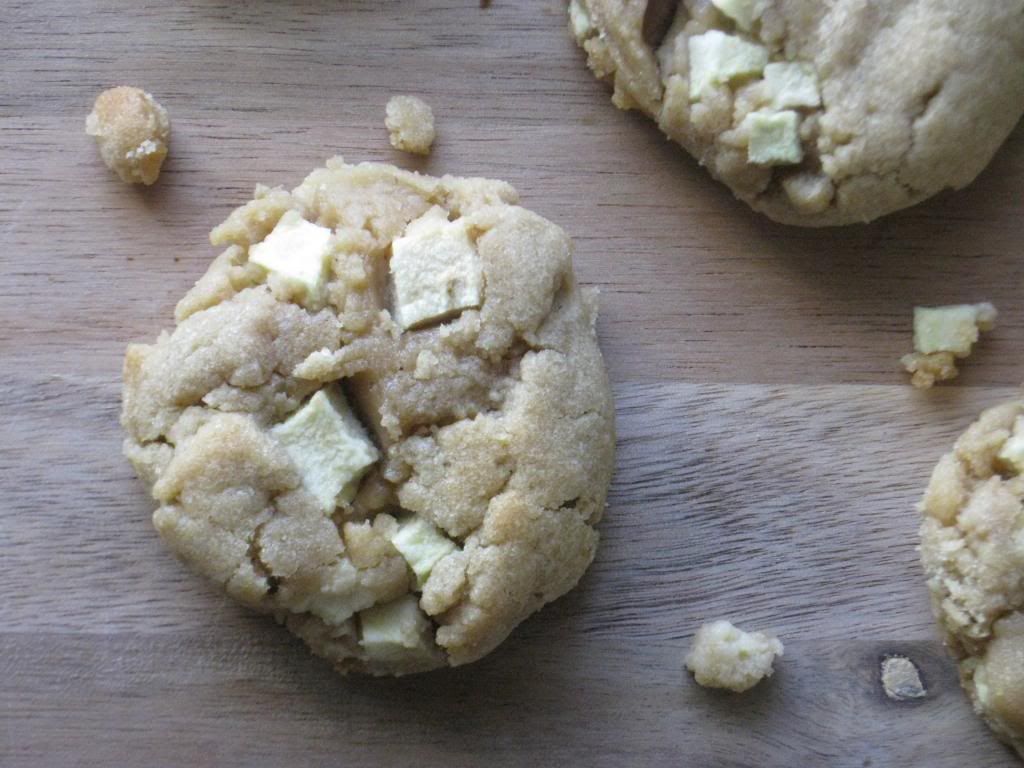
We don't eat a lot of blondies at my house. Not because we don't like them, it just never comes to mind to make them. That being said, we have had a variety of blondies and this recipe ranks pretty high in the favorites. These blondies are not your typical blondie. They are full of cashews, coconut, chocolate and white chocolate, and dried pineapple. They are full of a variety of flavors and textures, and so simple to throw together!
Tahiti Blondies
6 Tablespoons butter, melted
3/4 cup packed brown sugar
1 egg
2 teaspoons vanilla extract
3/4 cup all purpose flour
1/2 teaspoon baking powder
1/4 teaspoon salt
3/4 cup shredded coconut
1/2 cup cashews, chopped
1/2 cup dried pineapple, chopped
1/4 cup semi sweet chocolate chips
1/4 cup white chocolate chips
Preheat the oven to 350F. Line a 9x9 inch baking pan with foil, then lightly spray the foil with cooking spray. Set aside.
Stir together the melted butter and brown sugar until smooth. Add the egg and vanilla and stir until well blended. Add the flour, baking powder, and salt, and stir until just combined. Stir in the coconut, cashews, dried pineapple, chocolate chips, and white chocolate chips. Pour the batter into the prepared pan and smooth the top.
Bake the blondies for 25 minutes, or until a toothpick inserted in the center comes out clean, or with a few crumbs. Remove from the oven and let cool before cutting. Makes 16 blondies.
Enjoy! -Cardamommy
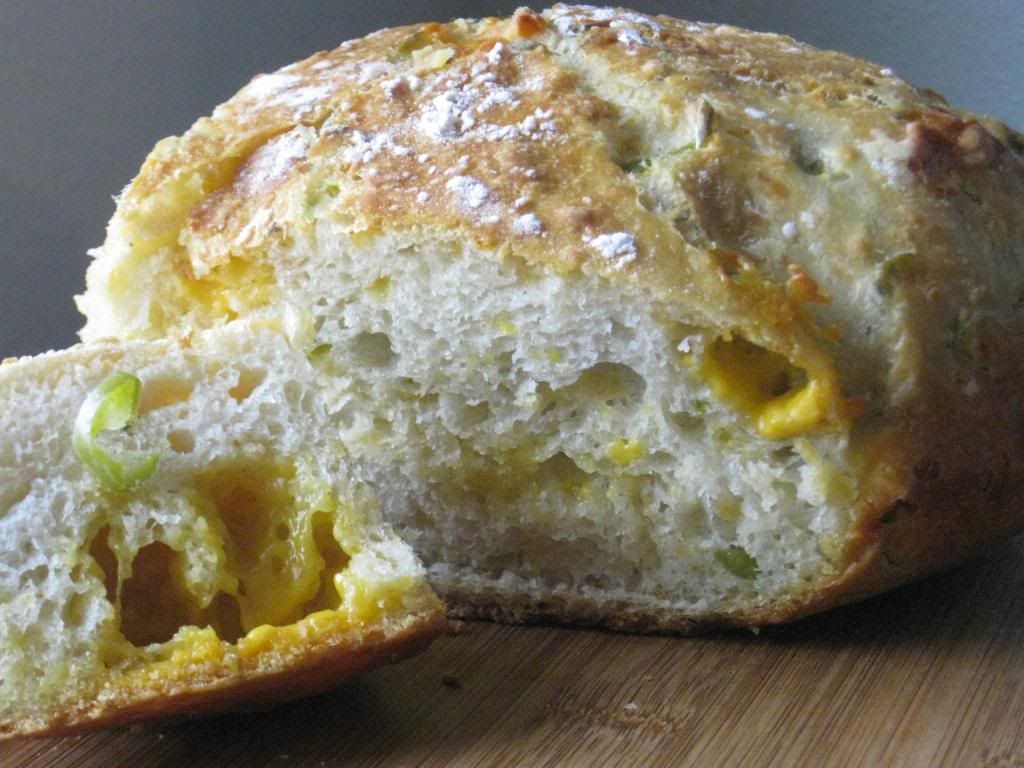
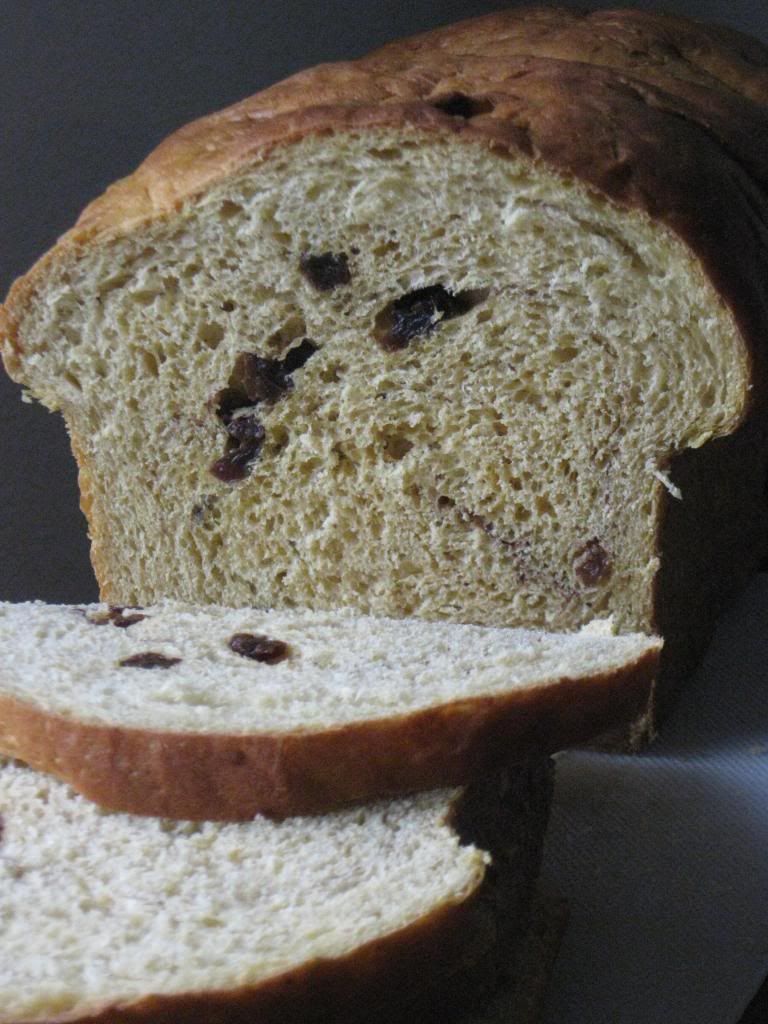
I have been making no knead beer bread for quite some time and it is one of the best artisan no knead bread recipes I have ever made. It is flavorful and delicious and so so simple! It's hard to believe that you put so little effort in and get such an amazing product out! I received an abundant amount of jalapenos last week, and have been trying to use them up. I had the idea to do a cheddar jalapeno zucchini bread and the flavor was amazing (although the texture had some difficulties...). It was so amazing, that I immediately knew that I had to turn it into my favorite no knead beer bread. So that's what I did, and oh man is it ever good. I may have made a meal out of it twice this week. My recipe makes 2 loaves, but you can easily cut the recipe in half to make just one. Why you would want to, though, is beyond my capacity to understand. This bread needs to rise for 8 to 18 hours, so plan ahead. I make this dough the night before I want to bake it.
No Knead Cheddar Jalapeno Beer Bread
6 cups (30 ounces) all purpose flour
1 Tablespoon salt
1/2 teaspoon instant yeast
1 3/4 cup warm water
3/4 cup beer, room temperature
2 Tablespoons white vinegar
2-3 jalapenos, seeded and sliced into rings
6 ounces shredded cheddar cheese
6 ounces cubed cheddar cheese
In a large bowl (I actually use a 21 cup, which is about 1.3 gallons, tupperware container with a lid), stir together the flour salt and yeast. Add the water, beer, and vinegar and stir until there is no standing liquid. Add the jalapenos, shredded cheese, and cubed cheese, and continue stirring the dough until a shaggy looking ball forms, making sure to scrape up the dry flour from the bottom of the bowl. Cover the bowl with plastic wrap, or cover the tupperware container with the lid, only pressing down on 2 corners, and let the dough sit at room temperature for 8 to 18 hours.
Line an oval dutch oven or french oven (8 quart size) with parchment paper, or 2 round 10 inch dutch or french ovens. If you don't have a dutch or french oven, you can use a heavy bottomed pot with a lid, but you will have the best results with a dutch or french oven. Spray the parchment paper lightly with cooking spray. Remove the dough from the bowl or tupperware container, and knead on a floured surface several times. Divide the dough into two equal portions and form each portion into a ball. If using a large oval french oven, place the two dough balls seam side down on opposite sides of the french oven. If using two smaller french ovens, place one dough ball in each. Lightly spray the top of the dough with cooking spray, then loosely cover with plastic wrap. Let the dough rise for about 2 hours.
About 30 minutes before baking the bread, carefully remove the bread dough from the french oven, using the parchment paper as a sling to lift it out, and place dough on the counter. Put the lid on the french oven and place it in the oven. Preheat the oven to 500F. When the oven has preheated and is ready, remove the plastic wrap from the bread dough and lightly dust the dough with flour. With a very sharp knife or razor blade, make a long slash about 1/2 inch deep in the top of each dough ball.
Carefully remove the preheated french oven from the oven and remove the lid. Again using the parchment paper as a sling, carefully lift the dough and place in the french oven. If the parchment paper hangs over the sides, it is okay. Put the lid on the french oven and place in the preheated oven. Immediately lower the oven temperature to 425F, and bake the bread, covered, for 30 minutes. Remove the lid and continue baking the bread for 15 to 20 minutes until the top is golden brown. Remove the french oven from the oven and carefully take the bread out, again using the parchment as a handle. Place the bread on a cooling rack. If you don't eat both loaves immediately, you can place the remaining loaf in a 450F oven for about 5 to 7 minutes to crisp up the crust. Makes 2 loaves.
Enjoy! -Cardamommy
I was totally fascinated by the idea of these cookies, and at first was a little skeptical. Then I remembered how fabulous peanut butter and apples are together and decided to give these cookies a try. They turned out really nicely! They are a tiny bit crumbly and a little sandy in texture. The apple chunks provide little bursts of tart apple flavor in the peanut butter cookie. The final and somewhat surprising component is cinnamon! I almost didn't add the cinnamon because cinnamon in a peanut butter cookie didn't seem quite right to me. It is totally right. There is just enough cinnamon to be an intriguing flavor without screaming cinnamon.
Peanut Butter Apple Cookies
1/2 cup shortening
1/2 cup creamy peanut butter
1/2 cup granulated sugar
1/2 cup packed brown sugar
1 egg
1 Tablespoon milk
1/2 teaspoon vanilla extract
1 1/2 cups all purpose flour
1/2 teaspoon baking soda
1/2 teaspoon salt
1/4 teaspoon cinnamon
1 small granny smith or other tart apple, peeled and diced
Preheat the oven to 375F. Line a baking sheet with parchment paper. Set aside.
Cream together the shortening, peanut butter, granulated sugar, and brown sugar until light and fluffy. Beat in the egg, milk, and vanilla extract until well combined. Add the flour, baking soda, salt, and cinnamon, and beat until just combined. Stir in the diced apples.
Use a 2 Tablespoon size scoop to scoop the dough into balls. Place on the prepared baking sheet about 2 inches apart. Bake for 12 minutes, or until lightly browned at the edges and the top. Remove the cookies from the oven and let cool for a minute or two on the pan before transferring to a cooling rack. Makes about 18 cookies.
Enjoy! -Cardamommy
I have pretty much fallen into a bread making rut. I make the same basic recipe every time I make bread. Now, don't get me wrong, my recipe is absolutely delicious, and it is our favorite. It is super versatile and I frequently add different flavors, spices, sweeteners, and flours to change things up. Today, however, something new was calling to me. So, I decided to jump on the pumpkin bandwagon (I love pumpkin, but September 1st is a little early for me. I'm still in Summer mode!). This pumpkin sandwich bread is adapted from a King Arthur Flour recipe, and we love it. It is soft and moist and flavorful, with a hint of warm cinnamon that doesn't overpower. This recipe makes 2 loaves, so I made one as is, and added raisins and a cinnamon swirl to the second. You can do both plain, both raisin cinnamon swirl, or one of each! Either way, you will love this bread.
Pumpkin Sandwich Bread
1/2 cup warm water
2 Tablespoons yeast
2/3 cup warm water
1/4 cup dry milk powder
2 eggs
1/2 cup mashed potato flakes
1 can (15 ounces) pumpkin puree (or use homemade)
2 Tablespoons canola oil
1/2 cup brown sugar
2 teaspoons salt
1 teaspoon cinnamon
1/2 teaspoon cardamom
6 cups all purpose flour
cinnamon (optional for creating a swirl)
raisins (optional)
Place the 1/2 cup warm water in a large bowl and sprinkle the yeast on top. Let sit for a minute or two until the yeast softens and starts to get bubbly. Add the remaining water, dry milk powder, eggs, mashed potato flakes, pumpkin puree, canola oil, brown sugar, salt, cinnamon, and cardamom, and stir until combined. Add the flour and stir until the dough begins to come together. When you can no longer stir it by hand, turn the dough out onto a lightly floured surface and knead until smooth and elastic, continuing to sprinkle flour on the work surface as needed.
Place the dough in large greased bowl, then turn the dough over to grease the top. Cover the bowl with a towel or plastic wrap, and let the dough rise for about 1 hour, or until the dough has doubled in volume. After the dough has risen, remove it from the bowl and place on a lightly greased or floured counter. Divide the dough into two equal parts. Form the dough into two loaves and place each in a lightly greased 9x5 inch loaf pan. Or, to make one loaf a cinnamon swirl pumpkin bread, knead the desired amount of raisins (I used about 1/2 cup for one loaf) into one portion of the dough, then roll or pat the dough into a large rectangle. Sprinkle the dough with cinnamon, then roll the dough like a cinnamon roll, tucking the ends under, and place the dough into the loaf pan.
Preheat the oven to 375F. Cover the loaves and let rise for 30 to 45 minutes, until the bread has risen over the top of the pan about an inch or two. Bake the bread for about 20 to 25 minutes, or until the top is golden brown. Remove the bread from the oven and immediately take the bread out of the loaf pans. Cool the bread on a cooling rack. Makes 2 loaves.
Enjoy! -Cardamommy