Monday, December 31, 2012

Gingerbread Oreo Blondies


I've had a package of Gingerbread Oreos sitting around for about a month, and decided that I needed to do something with them.  Before it turned out to be March and there was no longer a desire for gingerbread anything.  I patterned these blondies after the Mint Oreo Brownies that I made some time ago, and they turned out amazing.  They have a good gingerbread flavor that is not overpowering.  Definitely a win.

Gingerbread Oreo Blondies

1/2 cup butter, melted
1 cup brown sugar
1 egg
1 cup brown sugar
1 cup all purpose flour
1/2 teaspoon baking powder
1/8 teaspoon baking soda
1/4 teaspoon salt
1/4 teaspoon cinnamon
1/4 teaspoon ginger
1/4 teaspoon nutmeg
1/2 cup white chocolate chips
10 gingerbread Oreo cookies, chopped

2 Tablespoons shortening
2 Tablespoons butter
1 cup powdered sugar
1/2 teaspoon ginger
1/4 teaspoon vanilla
1 teaspoon milk
1/2 7-ounce container marshmallow cream
1/4 cup plus 2 Tablespoons white chocolate chips, melted and cooled slightly
10 gingerbread Oreo cookies, chopped

Preheat the oven to 350F.  Grease a 9 inch square baking pan.

In a bowl, stir together the melted butter and brown sugar.  Beat in the egg and vanilla.  Add the flour, baking powder, baking soda, salt, cinnamon, ginger, and nutmeg, and stir until combined.  Stir in the white chocolate chips and chopped Oreo cookies.

Spread the batter into the prepared pan and bake for 25 to 30 minutes, or until a toothpick inserted in the center comes out clean.  Remove from oven and let cool completely before frosting.

While the blondies are cooling, make the frosting.  In a bowl, beat together the shortening, butter, powdered sugar, ginger, vanilla, and milk until smooth.  Beat in the marshmallow cream and melted white chocolate.  Spread the frosting over the top of the cooled blondies.  Sprinkle the chopped Oreo cookies evenly over the frosting and press in slightly.  Cut into squares.  Makes 12 blondies.

Enjoy!  -Cardamommy

Friday, December 28, 2012

Eggnog Cream Pie


I made this pie for our Christmas dinner, but I feel totally okay sharing it with you now because pie is good no matter what day it is.  This pie was actually not my absolute favorite, despite my love (and apparent obsession) for all things eggnog.  I thought that the custard layer was just a touch too firm and rubbery for me.  Maybe cooking it a little less would help that.  However, the flavor was delicious, and you really can't go wrong with freshly whipped cream.   Recipe adapted from Paula Deen.

Eggnog Cream Pie

Pastry Crust:
1 cup all purpose flour
2 Tablespoons granulated sugar
1/2 teaspoon salt
1/2 cup (1 stick) cold butter

Eggnog Custard:
4 egg yolks
1/3 cup packed brown sugar
1 1/2 cups milk
1 envelope unflavored gelatin
1 cup heavy whipping cream
1 teaspoon rum extract
1 teaspoon ground nutmeg

Whipped Cream:
2 cups heavy whipping cream
1/2 cup powdered sugar
1 teaspoon vanilla extract
Ground nutmeg

Preheat the oven to 350F.

In a medium bowl, combine the flour, sugar, and salt.  Cut in the butter until the mixture is crumbly.  Press the crust onto the bottom and sides of a pie plate.  Bake for 15 minutes.  Remove from the oven and place on a cooling rack while you prepared the eggnog custard.

In a medium bowl, whisk together the egg yolks and brown sugar.  In a separate bowl, combine the milk and gelatin, stirring until the gelatin dissolves.  In a medium saucepan, heat the heavy whipping cream until it is steaming and just starting to form bubbles on the edges.  Pour the milk/gelatin mixture into the hot cream, and mix well.

Slowly pour the hot cream mixture into the egg yolks, whisking constantly, until about half of the hot cream has been mixed into the egg yolks.  Return the egg yolk mixture to the saucepan of hot cream, whisking constantly.  Cook the cream mixture, while continuing to whisk, over medium heat until thick. Do not boil.  Remove from the heat and stir in the rum extract and nutmeg.  Allow the mixture to cool slightly before pouring it into the prepared crust.  Cover with plastic wrap and refrigerate 8 hours, or overnight.

When ready to serve, make the whipped cream by beating the whipping cream, powdered sugar, and vanilla with a mixer until soft peaks form.  Spread the whipped cream on top of the chilled pie.  Garnish by sprinkling ground nutmeg over the top.  Makes 1 9-inch pie, 8 to 12 servings.

Enjoy!  -Cardamommy


Monday, December 24, 2012

Cranberry Pistachio Cookies


This recipe is one that I have been saving for Christmastime, and for my Hungry Puppies to do.  This is an easy semi-homemade recipe that my Hungry Puppies did completely on their own (with the exclusion of one or two minor things like chopping the pistachios...).  They opened packages, mixed the ingredients, scooped the dough and baked. Can I tell you how relaxing it was for me?  I just kind of sat back an observed.  These cookies are also pretty fail safe (although I generally fail when I make this sort of semi-homemade recipe).  My Hungry Puppies did a fantastic job, and were so pleased with the results.  The cookies are a huge hit.

Cranberry Pistachio Cookies

1 pouch sugar cookie mix
1 box (4 serving size) pistachio instant pudding
1/4 cup all purpose flour
1/2 cup butter, melted
2 eggs
1 cup chopped pistachios
1/2 cup dried cranberries

Preheat the oven to 350F.  Line a baking sheet with parchment paper.

In a large bowl, stir together the cookie mix, pudding mix, and flour.  Add the butter and eggs and stir until well combined.  Stir in the pistachios and cranberries.  Use a cookie scoop to drop the dough onto the prepared baking sheet.  Bake for 10-11 minutes, or until the cookies are just barely set on top.  Do not overbake.  Remove cookies from the oven and let cool on the pan for 2 to 3 minutes before transferring to a cooling rack to finish cooling.  Makes 18 cookies.

Enjoy!  -Cardamommy & Hungry Puppies

Friday, December 21, 2012

Orange Coconut Cinnamon Rolls


These cinnamon rolls are really really good.  They are definitely not your traditional cinnamon rolls in that they don't really contain cinnamon.  Except for that bit sprinkled on the top.  These rolls are flavored with orange peel and almond extract, and filled with toasted coconut, sugar and butter which creates a lusciously gooey experience.  Totally delicious.  I guarantee that you won't miss the cinnamon.  I sent these to work with my husband, and he brought home an empty plate.  These would also be a perfect addition for a delicious Christmas morning breakfast or brunch.

Orange Coconut Cinnamon Rolls

Dough:
1 1/2 cups warm water
1 egg
1/4 cup canola oil
1/4 cup honey
1/4 cup dry milk powder
1/2 cup mashed potato flakes
1 1/2 teaspoons salt
1/2 teaspoon almond extract
finely grated zest of 2 oranges
3 to 4 cups all purpose flour
1 Tablespoon active dry yeast

Filling:
1/2 cup butter, melted
1/2 cup granulated sugar
1 1/2 cups toasted coconut
finely grated zest of 2 oranges
Cinnamon to sprinkle over the unbaked rolls

Frosting:
4 Tablespoons butter, room temperature
1 1/4 cups powdered sugar
1/2 teaspoon cinnamon
4 Tablespoons Cream of Coconut (or substitute a Tablespoon of milk)

Combine all of the dough ingredients in a bread machine, or mix by hand, starting with 3 cups flour and adding more if needed to form a soft dough.  Program the bread machine to the dough cycle, or knead the dough by hand and let rise in a covered bowl for about 1 hour. While the dough is rising, combine the melted butter, sugar, coconut, and orange zest in a bowl and stir together.  

When the dough has finished rising, roll the dough into a large rectangle and spread evenly with the filling.  Roll up the dough like a jelly roll, starting at a long side, and pinching the seam to seal.  Cut the cinnamon rolls with a sharp knife (I usually use dental floss, but it doesn't work well with the coconut here), and place in the prepared pans.  

Preheat the oven to 350F.  Grease 2 9-inch round cake pans.  Let the cinnamon rolls rise for about 30 minutes.  Sprinkle the unbaked rolls with cinnamon, then bake in the preheated oven for about 25 minutes, or until they are golden on the top.  Remove from oven and let cool.  

While the cinnamon rolls are baking, make the frosting.  Cream together the butter, powdered sugar, and cinnamon, then add the cream of coconut (or milk), and stir until smooth.  Use enough liquid to reach your desired consistency   I like my  cinnamon roll frosting to be a bit thicker like frosting instead of a thin glaze.  Do whatever moves you. Makes 18 cinnamon rolls.

Enjoy!  -Cardamommy

Monday, December 17, 2012

Chocolate and Vanilla Peppermint Layer Cake


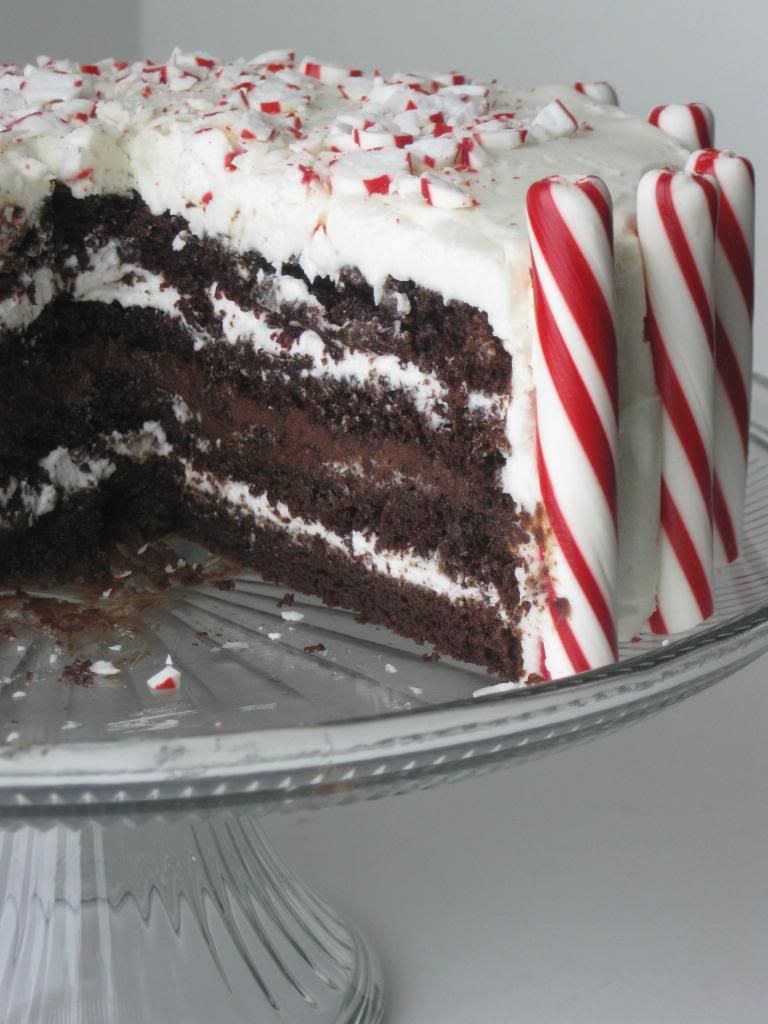
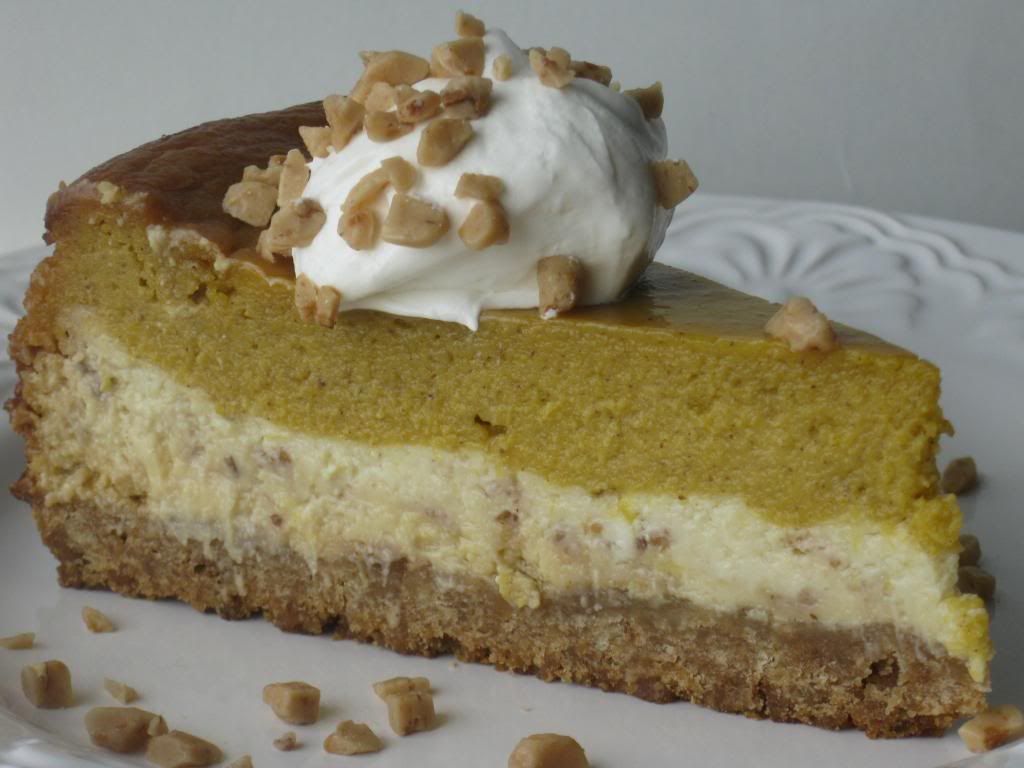
I created this cake for my husband's work Christmas party.  I haven't made a layer cake in quite a very long time, so I thoroughly enjoyed making this one.  This cake has a handful of different components, so it was kind of difficult to come up with the amazing name (right...).  The two cake layers are a super moist and delicious chocolate cake that have been sliced in half (more room for filling, you know).  A light and fluffy peppermint marshmallow filling isn't overpowering and balances the peppermint chocolate ganache filling perfectly.  All is topped off with a plain old ordinary vanilla peppermint frosting with soft peppermint sticks for garnish.  Delicious, and surprisingly not too heavy and rich.

Chocolate and Vanilla Peppermint Layer Cake

Cake:
1 1/2 cups all purpose flour
2/3 cup cocoa powder
1 1/2 teaspoons baking soda
3/4 teaspoon baking powder
3/4 teaspoon salt
1 1/2 ounces unsweetened or bittersweet chocolate, chopped
2/3 cup milk
2/3 cup hot water or coffee
2 eggs
2/3 cup mayonnaise
1 teaspoon vanilla extract
1 1/2 cups granulated sugar

Peppermint Chocolate Ganache Filling:
3/4 cup heavy cream
2 Tablespoons butter
2 ounces semi sweet chocolate chips
1/2 teaspoon vanilla extract
1/2 teaspoon peppermint extract
3/4 cup granulated sugar
2 ounces cocoa powder
2 Tablespoons corn syrup
Pinch of kosher salt

Peppermint Marshmallow Filling:
1/2 cup shortening
1 (7 ounce) container marshmallow cream
1/3 cup powdered sugar
1 teaspoon vanilla extract
1/2 teaspoon peppermint extract
2 teaspoons hot water
pinch of salt

Vanilla Peppermint Frosting:
1/2 cup shortening
1/2 cup butter, room temperature
1 teaspoon vanilla
1 teaspoon peppermint extract
4 cups powdered sugar
2 Tablespoons milk
Soft peppermint sticks, for garnish

For the chocolate ganache filling, combine the cream, butter, and chocolate in a microwaveable bowl.  Microwave for 1 to 2 minutes, or just until the cream starts to steam and bubble.  Stir until the chocolate is completely melted and smooth.  Whisk in the vanilla extract, peppermint extract, sugar, cocoa powder, corn syrup, and salt.  Stir until smooth and well combined.  Return to the microwave for 1 minute, then remove and stir well until the sugar has dissolved.  Cover chocolate mixture with plastic wrap and refrigerate overnight, or freeze for 2 to 4 hours until chilled and firm. 

For the cake, preheat the oven to 350F.  Grease and flour 2 9-inch pans.  Stir together the flour, cocoa powder, baking soda, baking powder, and salt.  Set aside.  In a microwaveable bowl, combine the chopped chocolate and milk.  Heat in the microwave for about 1 minute, or until the milk is steaming and starting to bubble.  Remove from the microwave and stir until chocolate is melted and smooth.  Stir in the hot water (or coffee) and set aside.

In a large bowl, cream together the eggs, mayonnaise, vanilla extract, and granulated sugar.  Beat in the flour mixture and the chocolate milk mixture alternately in 2 additions (each), beating until completely combined.  Pour the batter into the prepared pans, and smooth the tops.  Bake for 25 minutes, or until a toothpick inserted in the center comes out clean.  Remove from the oven and let cool in the pans for 15 minutes, then transfer cakes to a cooling rack to cool completely.  Once completely cooled, cut each layer in half horizontally to make two layers (you will have 4 layers total).

For the peppermint marshmallow Filling, beat together the shortening, marshmallow cream, powdered sugar, vanilla extract, peppermint extract, hot water, and salt, until completely combined and fluffy.  Set aside.

For the vanilla peppermint frosting, cream together the shortening, butter, vanilla, and peppermint extract.  Beat in the powdered sugar, a little at a time until completely incorporated.  Beat in the milk.  Set aside.

When you are ready to assemble the cake, remove the chocolate ganache filling from the refrigerator (or freezer) and beat with a stand mixer or hand mixer until it is light and fluffy and smooth.  To assemble the cake, place one cake layer cut side down on a serving plate.  Spread half of the peppermint marshmallow filling over the top.  Place another cake layer, cut side down, on top.  Spread the chocolate ganache filling over the second layer (you may not use all of it).  Place the third cake layer, cut side down, on top of the ganache.  Spread the rest of the peppermint marshmallow filling over the top.  Place the remaining cake layer, cut side down on top.  Frost the top and sides with the vanilla peppermint frosting and garnish with peppermint sticks.  Makes 12 to 16 servings.

Enjoy!  -Cardamommy


Friday, December 14, 2012

Pumpkin Pie Toffee Cheesecake


So, I realize that this post is extremely late given that it was meant to be for Thanksgiving, but I loved this dessert so much I'm posting it anyway. I was given the assignment to make the pie for Thanksgiving this year.  My mom asked what kind of pie I was going to make.  My Hungry Puppies replied quite vehemently that it had to be pumpkin!  My mom replied that of course it would be pumpkin, but what was I going to do to it this year?  This is so hilarious and typical me.  I don't do anything plain old ordinary, and have to put a little spin on just about everything.  I found this recipe on ourbestbites.com some time ago but never made it.  Thanksgiving ( or Christmas!) would be the perfect opportunity for that.  I made a few changes to the recipe and we had a fabulous Thanksgiving dessert. 

Pumpkin Pie Toffee Cheesecake

Cheesecake Layer:
2 cups cinnamon graham cracker crumbs
1/2 cup (1 stick butter, melted
2 packages (8 ounces each) cream cheese (I used Neufchatel)
1/2 cup granulated sugar
1 teaspoon vanilla
2 eggs
1 cup toffee bits

Pumpkin Pie Layer:
1 can (15 ounces) pumpkin puree (or use homemade)
3/4 cup eggnog
3 eggs
2/3 cup granulated sugar
3/4 teaspoon cinnamon
1/8 teaspoon salt

Sweetened whipped cream, for topping (optional)
Toffee bits, for topping (optional)

Preheat the oven to 300F.  Grease a 9-inch springform pan.

In a small bowl, combine the graham cracker crumbs and melted butter.  Stir until the crumbs are evenly moistened.  Press into the prepared pan and bake for 10 minutes.  Remove crust from the oven. While the crust is baking, make the cheesecake layer.

For the cheesecake layer using a hand mixer or a food processor (I used a food processor and it was fabulously simple), beat together the cream cheese, sugar, vanilla, eggs, and toffee bits until blended.  Spread the cream cheese mixture over the crust. 

For the pumpkin pie layer, using a hand mixer or a food processor, beat together the pumpkin, eggnog, sugar, cinnamon, salt, and eggs until combined.  Carefully spoon the pumpkin mixture over the cream cheese layer (so as not to create holes in the cream cheese layer).

Bake the cheesecake for 1 hour, then increase the oven temperature to 325F and bake for 1 more hour.  The cheesecake should be set at the edges but should jiggle slightly in the center.  Remove the cheesecake from the oven and cool on a cooling rack for about 1 hour.  Cover the cheesecake with plastic wrap and refrigerate overnight.

To serve, run a knife around the edges of the cheesecake to loosen from the pan.  Remove the sides of the pan.  Top the cheesecake with whipped cream and toffee bits if desired.

Enjoy!  -Cardamommy

Monday, December 10, 2012

Lemon White Chocolate Coconut Macadamia Cookies (Paradise Bakery Copycat)


Some time ago, my sister requested that I recreate a Lemon Coconut White Chocolate Chip cookie that she loves from Paradise Bakery.  I was totally up for the task, but had never had one before.  Thankfully, my sister was so desperate for me to recreate these cookies at home, she flew 1000 miles to bring me a sample.  Now that's dedication.  She claims that she was actually here to visit us, but....she also really loves these cookies.  

So, after two attempts, I totally nailed this one down.  These cookies are totally amazing. "Totally Wicked", as my 3 year old Hungry Puppy likes to say.  I can down a large number of these in a small amount of time.  In fact, I am sending the remaining cookies 1000 miles back to my sister for Christmas.  These cookies are crisp and lemony and a little bit sandy.   We added coconut because we couldn't resist.

Lemon White Chocolate Coconut Macadamia Cookies

2 cups shortening

1 cup granulated sugar
1 cup powdered sugar
Finely grated zest of 1 lemon
2 teaspoons lemon extract
1 egg
3 3/4 cups all purpose flour
3/4 teaspoon baking soda
3/4 teaspoon baking powder
1/4 teaspoon salt
1 bag (11.5 ounces) bag white chocolate chips
1 cup (5 ounces) chopped macadamia nuts
1 cup shredded coconut

Preheat the oven to 375F.  Line a baking sheet with parchment paper.

Cream together the shortening, granulated sugar, powdered sugar, and lemon zest.  Scrape down the sides of the bowl with a spatula, then add the lemon extract and egg.  Beat until completely incorporated.  Add the flour, baking soda, baking powder, and salt, and beat until just combined.  Do not overbeat, as you don't want these cookies to be tough.  Stir in the white chocolate chips, macadamia nuts, and coconut.

Scoop dough with a 2 tablespoon cookie scoop and place on the prepared baking sheet, about 2 inches apart.  Flatten each dough ball with the palm of your hand.  Bake the cookies for 10 to 11 minutes, or until the centers are set.  The cookies should not be browned.  Remove the cookies from the oven and let cool on the pan for several minutes before transferring to a cooling rack to cool completely.  Makes 36 cookies.

Enjoy!  -Cardamommy

Wednesday, December 5, 2012

Eggnog Cupcakes


These cupcakes have a mild eggnog flavor, and a nice light texture.  For the frosting, I used the new Cool Whip Frosting, which turned out to be alright.  It had a decidedly Cool Whip-y flavor and was a bit lighter than traditional frosting.  It is a nice and easy option if you want something more than whipped cream and less than frosting.  You can substitute whichever vanilla frosting you desire.

Eggnog Cupcakes

2 1/4 cups all purpose flour
1 1/4 cup granulated sugar
3 teaspoons baking powder
1 teaspoon salt
1/2 cup vegetable oil
1 cup eggnog
2 eggs
2 teaspoons vanilla extract
Vanilla frosting for 24 cupcakes (I used the new Cool Whip brand frosting)
grated nutmeg

Preheat the oven to 350F.  Line 24 muffin cups with paper liners.

In a large bowl, mix together the flour, sugar, baking powder, and salt.  Add the oil and buttermilk to the dry ingredients and beat or whisk until well blended.  Add the eggs and vanilla, and beat or whisk again until completely combined.

Divide the batter evenly among the prepared muffin cups, and bake for 15 to 20 minutes, or until a toothpick inserted in the center of a cupcake comes out clean.  Remove the cupcakes from the oven and let cool on a cooling rack.  Cool completely before frosting.

Spread or pipe the frosting on top the of the cupcakes, then sprinkle with nutmeg.  Makes 24 cupcakes.

Enjoy!  -Cardamommy
Related Posts Plugin for WordPress, Blogger...