Showing posts with label Tart. Show all posts

Friday, July 29, 2016

Lemon Curd Mascarpone Fresh Raspberry Tart


My oldest Hungry Puppy asked if she could make something today.  I said sure!  She decided cookies with frosting and fresh raspberries on top.  Somehow, those cookies morphed into this tart.  My Hungry Puppy has been a little hot and cold about baking recently, and I think I have figured out why. When I ask her if she wants to do a baking project with me, she is usually reluctant.  She really gets excited in the kitchen when she comes up with her own idea on her own time and wants to make it herself without help.  Which means I need to encourage that as much as I can.  Today, she made this tart crust while I was taking a nap.  And she totally nailed it.  The rest of the tart had a little drama with it: burning her wrist...having the rim of the tart pan slip off and break her crust...picking wild raspberries specifically for this tart and then dropping them all in the dirt and having to start over...  This tart was a labor of love for her, and she was amazing. Afterward, she declared it worth all of the blood sweat and tears she put in!  This tart is filled with sweetened mascarpone, home made lemon curd, fresh picked wild raspberries and topped with a raspberry glace.  A perfect combination of sweet, tart, and fresh!  Tart crust recipe found here.

Mascarpone Lemon Curd Fresh Raspberry Tart

Tart Dough:

8 tablespoons unsalted butter (1 stick), melted
3 tablespoons granulated sugar
1/4 teaspoon fine salt
1 1/4 cups all-purpose flour, plus more as needed

Glace:
1/2 cup granulated sugar
1 Tablespoon cornstarch
1/2 cup raspberry puree
1/4 cup water

Filling:
8 ounces (1 cup) mascarpone cheese, room temperature
1/4 cup powdered sugar
1/2 teaspoon vanilla extract
1 cup lemon curd (home made or store bought)
2 cups fresh raspberries

For the tart crust, combine the butter, sugar, and salt in a large bowl and stir until evenly incorporated. Add the measured flour and stir until just combined and a soft dough forms.

Sprinkle the dough over the bottom of a 9-inch tart pan with a removable bottom. Using a measuring cup or your fingers, evenly press the dough into the bottom and up the sides of the pan (flour the cup occasionally to prevent sticking).  Cover the tart shell with plastic wrap and let it rest in the refrigerator for 30 minutes. 
Preheat the oven to 350F. 

Once chilled, prick all over the bottom of the dough with a fork and bake until golden brown, about 20 to 25 minutes. Remove from the oven and cool completely on a wire rack before filling.

For the glace, in a small saucepan, stir together the sugar and cornstarch.  Add the raspberry puree and water and cook over medium high heat, stirring constantly until mixture thickens and boils.  Boil for about 1 minute, then remove from heat and cool.  Mixture should pour easily from a spoon when warm.  If too thick, just add a little water until the desired consistency is reached.

For the filling, stir together the mascarpone, powdered sugar, and vanilla until well blended and smooth.  Spread the mascarpone mixture over the bottom of the cooled tart crust.  Spoon the lemon curd over the mascarpone and spread evenly.  Sprinkle the raspberries evenly over the lemon curd.  Drizzle the glace over the raspberries.  Use as much or little as you'd like.  We had some left over.  Chill the tart for several hours, or overnight before slicing.  Makes 8 - 12 servings.

Enjoy!  -Cardamommy

Friday, December 27, 2013

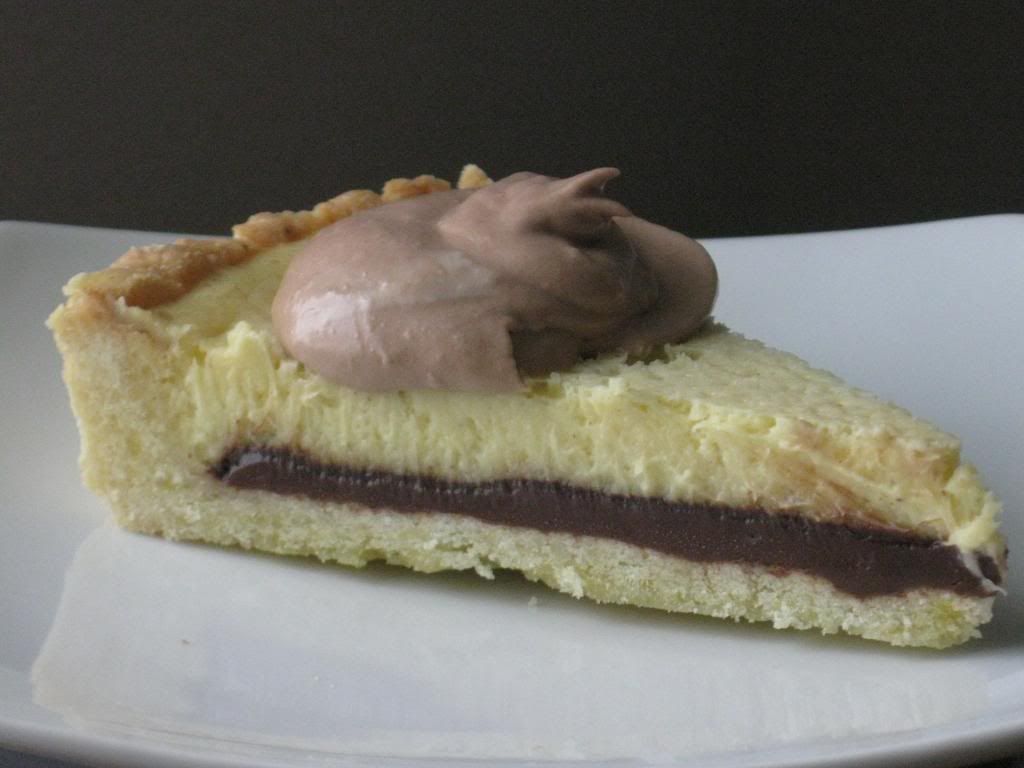
Nutella Eggnog Tart


I faced a difficult decision on what dessert to make for Christmas dinner this year.  We wanted to do something a little different, but I had no idea where to go with it!  We finally settled on some kind of eggnog dessert, but it was really tough to figure out what to make.  I finally came across this recipe, and inspiration hit.  I modified the recipe to incorporate the nutella, and it turned out amazing.  The eggnog and nutella work really well together and don't overpower each other.  The nutella whipped cream...well, what can you really say about that except for yum!  Note:  If you use a 9 inch tart pan, you may have a very small bit of the eggnog filling left over that doesn't fit in the tart shell.  Just pour it into a lightly greased ramekin and bake it.

Nutella Eggnog Tart

Crust:
1 1/4 cups all purpose flour
1/4 cup granulated sugar
1/2 teaspoon salt
7 Tablespoons butter, room temperature
1 large egg
1/2 cup Nutella

Cream Cheese Eggnog Filling:
12 ounces Cream cheese, room temperature
1/2 cup granulated sugar
5 Tablespoons eggnog, divided
2 large eggs
2 large egg yolks
1 teaspoon vanilla extract
1/2 teaspoon rum extract
1/2 teaspoon ground nutmeg
1/4 teaspoon salt

Nutella Whipped Cream:
1 cup heavy whipping cream
2 Tablespoons powdered sugar
4 Tablespoons nutella

In a food processor, pulse together the flour, sugar, salt, butter and egg until a dough forms.  Press the dough evenly onto the bottom and up the sides of a 9 or 10 inch tart pan with a removable bottom.  Place the tart shell in the refrigerator and chill for about 30 minutes.

Preheat the oven to 350F.  Remove the tart shell from the refrigerator and line with aluminum foil.  Fill the foil lined shell with pie weights, or uncooked rice.  Bake for 20 minutes.  Remove pie from the oven, and carefully remove aluminum foil and pie weights.  Return the tart to the oven and bake for 20 minutes, or until the tart shell is golden brown.  Remove the tart shell from the oven and immediately spoon the nutella into the bottom of the shell, spreading it evenly to the edges. Let cool completely.

Reduce the oven temperature to 300F.

For the cream cheese eggnog filling, place the cream cheese, sugar, and 2 tablespoons of the eggnog into a food processor and blend until smooth.  Scrape down the sides of the food processor bowl.  Add the eggs, egg yolks, remaining 3 tablespoons of eggnog, vanilla extract, rum extract, nutmeg, and salt.  Process until smooth.  Gently pour the cream cheese filling over the nutella in the tart shell.

Bake the tart for about 35 minutes, or until the filling is set, but jiggles slightly in the center.  Remove the tart from the oven and cool completely.  Cover the tart and refrigerate until cold.

When ready to serve, make the nutella whipped cream.  Beat the whipping cream and powdered sugar together until stiff peaks form.  Add the nutella and beat gently until incorporated.  Remove the sides of the tart pan, and cut the tart into wedges.  Spoon the nutella whipped cream over the individual pieces.  Makes 12 to 16 servings.

Enjoy!  -Cardamommy


Monday, March 5, 2012

Pineapple Macadamia Nut Tart


I found this recipe on finecooking.com and absolutely had to make it.  I had never made a tart before, so this entered the realm of the unknown.  In fact, I didn't even have a tart pan.  I had to buy one specially for this recipe.  Good thing there is a cooking store right down the street from my husband's work, huh?  I'll not disclose the number of times I have sent him there to pick up a little something.  

This tart has a buttery, nutty macadamia crust and filling, and is topped with juicy fresh pineapple.  A note of warning:  Do not spill boiling honey on your hand when you make this recipe.  You will not like the extreme pain or the unsightly blisters that now comprise what used to be the palm of your hand.  Thanks to my husband for finishing this recipe for me while I tied an ice pack to my hand for the rest of the night.


Pineapple Macadamia Nut Tart


Crust:
1/2 cup toasted macadamia nuts
1/4 cup granulated sugar
1 cup (4.5 ounces) all purpose flour
1/4 teaspoon kosher salt
1/2 cup (4 ounces, 1 stick) cold butter, cut into 1/2 inch pieces
1 large egg, lightly beaten


Filling:
3/4 cup macadamia nuts
1/4 cup granulated sugar
1 large egg
1/4 cup (2 ounces, 1/2 stick) butter, softened
2 Tablespoons all purpose flour
1/4 teaspoon rum extract
1/4 teaspoon vanilla extract


Topping:
1 Tablespoon all purpose flour
1 medium fresh pineapple (about 3.5 pounds) peeled, cut lengthwise into quarters, cored, and cut crosswise into 1/8 inch thick slices
3 Tablespoons honey
1/4 teaspoon rum extract


For the crust, pulse the nuts and sugar together in a food processor until finely chopped but not smooth.  Add the flour and salt and pulse to combine.  Add the butter and pulse until the dough resembles coarse crumbs.  Pour the egg evenly over the mixture and pulse just until combined.  Do not overmix.


Press the crust evenly into a 9 1/2 inch tart pan with a removable bottom.  The dough will be sticky.  If it sticks to your hands, dip your fingers in water.  Freeze the crust for 20 to 30 minutes.


For the filling, grind the macadamia nuts in the food processor until they resemble coarse sand.  Add the remaining filling ingredients and process for about 2 minutes, until completely smooth.


Preheat the oven to 375F.


Spread the filling evenly over the tart crust, leaving a 1/4 inch border around the edge of the pan.  Sprinkle the 1 tablespoon of flour evenly over the filling.  To place the pineapple, tightly layer the pineapple in a ring around the outside edge of the tart, leaving a 1/4 inch border at the edge of the pan.  Tightly layer another ring of pineapple, overlapping the first ring by about a 1/2 inch.  Repeat the tight layers overlapping each previous layer 1/2 inch until you reach the center of the tart.  You may not use all of the pineapple.  The pineapple will shrink as it bakes, so make sure to err on the side of more pineapple than less.  


Bake the tart for 30 to 35 minutes, rotating the pan after about 20 minutes for even baking.    While the tart bakes, place the honey in a small bowl and warm in the microwave until it is thin and runny.  Stir in the rum extract.  After the tart bakes for 30 to 35 minutes, remove from the oven and gently brush on half of the honey mixture.  Place back in the oven and continue baking for about 10 minutes more.  Remove tart from the oven and place on a wire rack.  Brush the tart with the remaining syrup and let cool completely.  Makes 6 to 8 servings.


Enjoy!  -Cardamommy
Related Posts Plugin for WordPress, Blogger...