skip to main
|
skip to sidebar
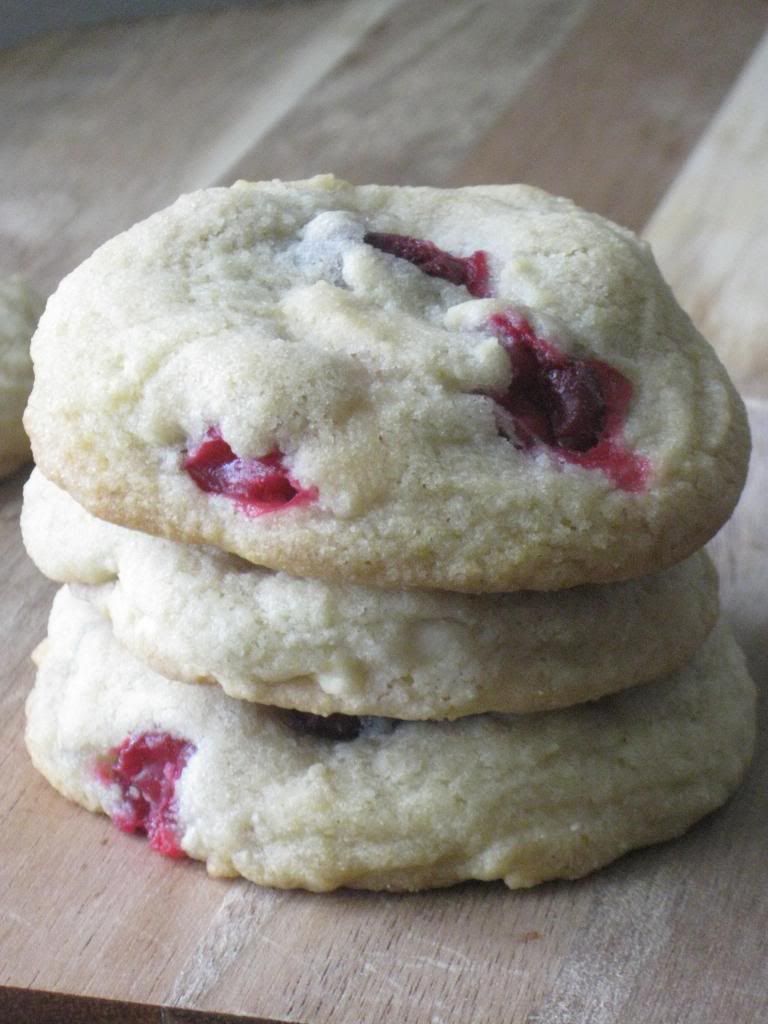
I was tasked by my sister to make these cookies. She sent me a text a while ago that the cookie she was eating was amazing, and I had to figure it out. I was really excited because I'm not sure if I've ever really done a fresh berry in a cookie before. I was a bit worried that it wouldn't work out and that we'd have a cranberry lava flow in the oven, but it worked great! My Hungry Puppies seriously can't get enough of these cookies. The tartness of the cranberries is offset nicely by the sweetness of the cookie and white chocolate chips. Since my sister and I live about 1000 miles apart, I had to send her a box of cookies so she could try them. I suppose I could have just emailed her the recipe so she could make her own...but...maybe I'm just nice.
Blond Chocolate Chip Cookies
3/4 cup (1 1/2 sticks) butter, room temperature
1/4 cup shortening
1 1/2 cups granulated sugar
2 teaspoons vanilla extract
2 eggs
2 1/2 cups all purpose flour
1 teaspoon baking soda
1/2 teaspoon salt
2 cups fresh cranberries
1 cup white chocolate chips
Preheat the oven to 375F. Line a baking sheet with parchment paper.
Cream together the butter, shortening, sugar, syrup, and vanilla extract until light and smooth. Beat in the eggs. Add the flour, baking soda, and salt, and beat until combined. Stir in the fresh cranberries and white chocolate chips.
Using a cookie scoop, scoop the dough and place on the prepared baking sheet. Bake for 11 to 12 minutes, or until the cookies are just barely browned on the edges and top. Remove from the oven and let cool for several minutes on the pan. Transfer cookies to a cooling rack to cool completely. Makes about 36 cookies.
Enjoy! -Cardamommy
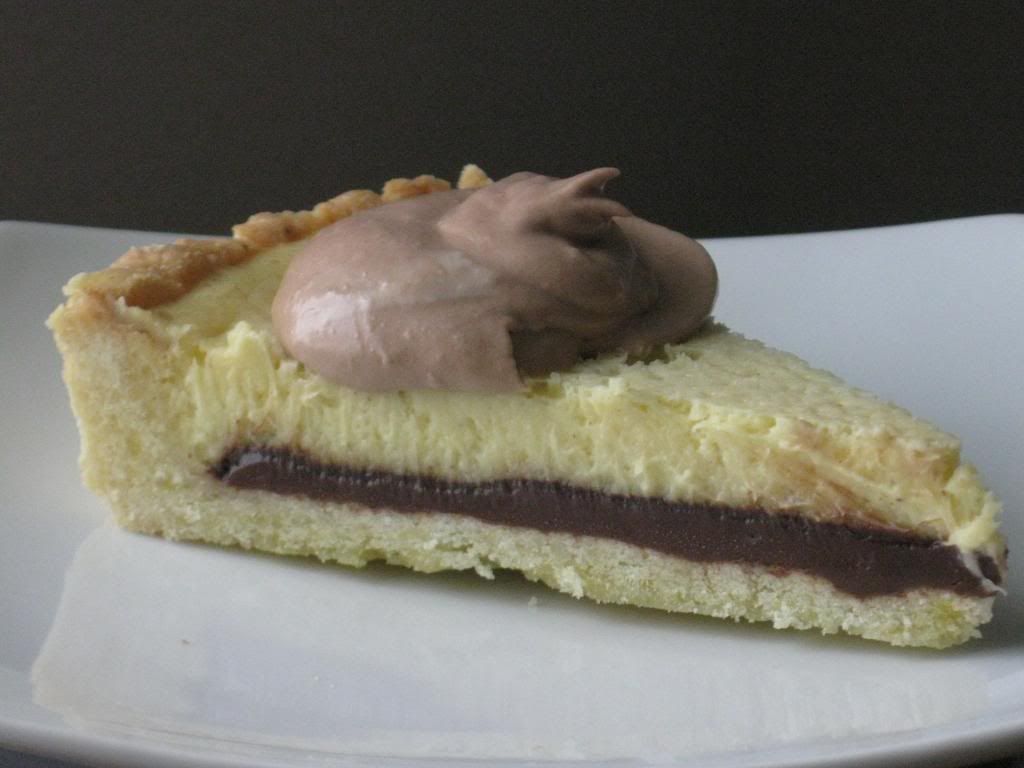
I faced a difficult decision on what dessert to make for Christmas dinner this year. We wanted to do something a little different, but I had no idea where to go with it! We finally settled on some kind of eggnog dessert, but it was really tough to figure out what to make. I finally came across this recipe, and inspiration hit. I modified the recipe to incorporate the nutella, and it turned out amazing. The eggnog and nutella work really well together and don't overpower each other. The nutella whipped cream...well, what can you really say about that except for yum! Note: If you use a 9 inch tart pan, you may have a very small bit of the eggnog filling left over that doesn't fit in the tart shell. Just pour it into a lightly greased ramekin and bake it.
Nutella Eggnog Tart
Crust:
1 1/4 cups all purpose flour
1/4 cup granulated sugar
1/2 teaspoon salt
7 Tablespoons butter, room temperature
1 large egg
1/2 cup Nutella
Cream Cheese Eggnog Filling:
12 ounces Cream cheese, room temperature
1/2 cup granulated sugar
5 Tablespoons eggnog, divided
2 large eggs
2 large egg yolks
1 teaspoon vanilla extract
1/2 teaspoon rum extract
1/2 teaspoon ground nutmeg
1/4 teaspoon salt
Nutella Whipped Cream:
1 cup heavy whipping cream
2 Tablespoons powdered sugar
4 Tablespoons nutella
In a food processor, pulse together the flour, sugar, salt, butter and egg until a dough forms. Press the dough evenly onto the bottom and up the sides of a 9 or 10 inch tart pan with a removable bottom. Place the tart shell in the refrigerator and chill for about 30 minutes.
Preheat the oven to 350F. Remove the tart shell from the refrigerator and line with aluminum foil. Fill the foil lined shell with pie weights, or uncooked rice. Bake for 20 minutes. Remove pie from the oven, and carefully remove aluminum foil and pie weights. Return the tart to the oven and bake for 20 minutes, or until the tart shell is golden brown. Remove the tart shell from the oven and immediately spoon the nutella into the bottom of the shell, spreading it evenly to the edges. Let cool completely.
Reduce the oven temperature to 300F.
For the cream cheese eggnog filling, place the cream cheese, sugar, and 2 tablespoons of the eggnog into a food processor and blend until smooth. Scrape down the sides of the food processor bowl. Add the eggs, egg yolks, remaining 3 tablespoons of eggnog, vanilla extract, rum extract, nutmeg, and salt. Process until smooth. Gently pour the cream cheese filling over the nutella in the tart shell.
Bake the tart for about 35 minutes, or until the filling is set, but jiggles slightly in the center. Remove the tart from the oven and cool completely. Cover the tart and refrigerate until cold.
When ready to serve, make the nutella whipped cream. Beat the whipping cream and powdered sugar together until stiff peaks form. Add the nutella and beat gently until incorporated. Remove the sides of the tart pan, and cut the tart into wedges. Spoon the nutella whipped cream over the individual pieces. Makes 12 to 16 servings.
Enjoy! -Cardamommy
I first made these cookies exactly 4 years ago. I have been meaning to make them every Christmas since then, but it has never seemed to work out! This year, I decided to make them for a cookie drive for the Air Force Base here. These cookies are just like peanut butter blossoms, except they are a coconut and almond cookie instead of peanut butter. Absolutely delicious. You can use plain Hershey's Kisses or Hugs. I like the Hugs, as the chocolate and white chocolate swirl is a particularly nice touch. They are simple, really delicious, and so pretty!
Coconut Blossoms
1/3 cup butter, room temperature
3 ounces cream cheese, room temperature
3/4 cup granulated sugar
1 egg yolk
2 teaspoons almond extract
1 1/2 cups all purpose flour
2 teaspoons baking powder
1/2 teaspoon salt
3 cups shredded coconut
36 Hershey's Kisses, unwrapped
1 to 2 cups shredded coconut
Preheat the oven to 350F. Line a baking sheet with parchment paper.
Cream together the butter, cream cheese, and sugar until light and fluffy. Add the egg yolk and almond extract an beat until well blended. Add the flour, baking powder, and salt, and beat until just combined. Beat in the 3 cups coconut.
Scoop the dough into heaping tablespoon size balls, and roll in the extra shredded coconut. Place the cookie dough balls on the prepared baking sheet (about an inch apart, as they won't spread during baking), and place in the preheated oven. Bake for 10 minutes, or until lightly browned. Remove the cookies from the oven and immediately press a chocolate kiss into each hot cookie. After pressing the kisses into the cookies, let the cookies cool for several minutes on the pan before removing to a cooling rack to finish cooling. Makes about 36 cookies
Enjoy! -Cardamommy
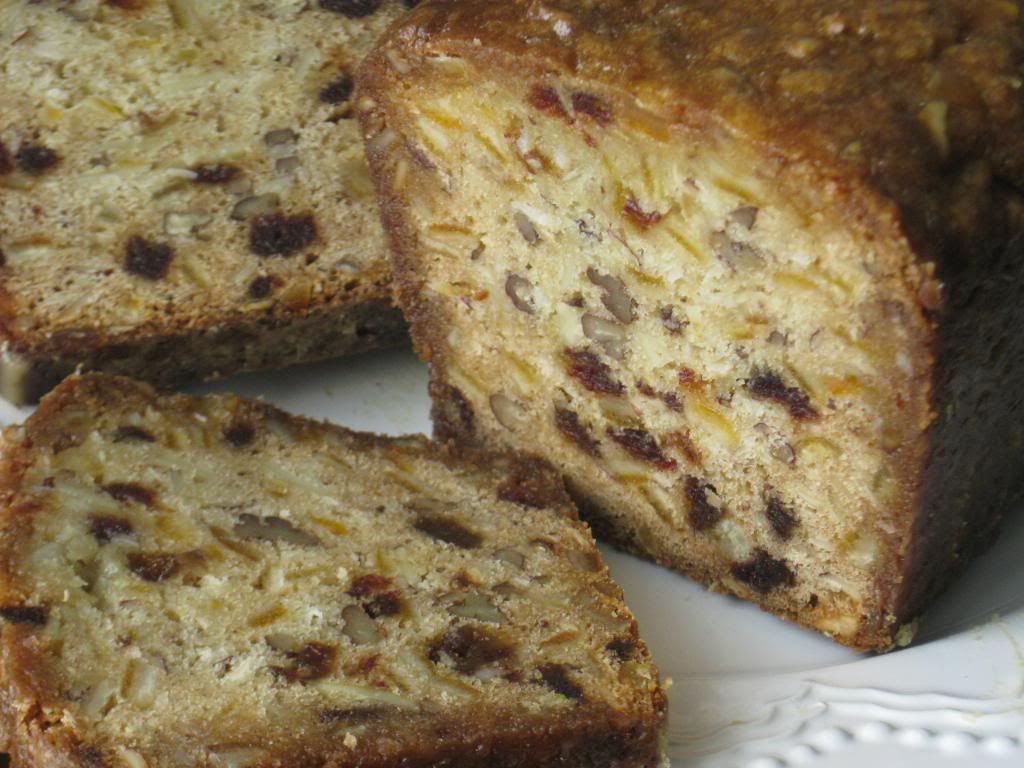
I don't even know where to start with this fruitcake. I am so excited to share this with you, mostly because the only thing you ever hear about fruitcake is that it is awful! And how often do you come across a fruitcake recipe? Almost never (in my recipe wanderings anyway). So, I am here to introduce you to my most favorite fruitcake ever. Not that I have a lot of experience, but why look for better when the best is right here?! And yes, my Hungry Puppies have given this fruitcake their stamp of approval.
This is my Mom's fruitcake recipe, and I have always loved it. This is not a dark molasses-y fruitcake at all. In fact, there is no molasses in this fruitcake at all. It is full of candied orange peel, dates, pecans, almonds, and coconut, and is smothered in an orange glaze. The glaze soaks into the outside of the fruitcake and you get a wonderfully magnificent coating all around the outside. Please try this. This is not a storebought, thing of nightmares and Christmas spoofs fruitcake. This is not the fruitcake that has been regifted (ie: pawned off) multiple times over the last five years. This fruitcake is one that you will want to eat! A couple things to note: You can easily cut the recipe in half to make one 8x4 inch loaf. Also, it will look like you have an obscene amount of mix-ins (candied orange peel, dates, nuts, etc...) but don't worry, there is supposed to be that much!
Orange Slice Fruitcake
3 1/2 cups all purpose flour
1/2 teaspoon salt
1 pound candied orange peel
8 ounces chopped dates
1 cup sliced almonds
1 cup chopped pecans
1 cup shredded coconut
1/2 cup buttermilk
1 teaspoon baking soda
1 cup (2 sticks) butter, room temperature
2 cups granulated sugar
4 eggs
1 cup orange juice
2 cups powdered sugar
Preheat the oven to 300F. Grease and Flour two 9x5 inch loaf pans. Set aside.
In a medium size bowl, mix together the flour and salt, remove 1/2 cup of the flour mixture and set aside. In a separate large bowl, combine the the candied orange peel, dates, almonds, pecans, and coconut. Add the reserved 1/2 cup of the flour mixture to the fruit mixture and toss until all of the fruit is evenly coated. In a separate small bowl, mix together the buttermilk and the baking soda.
In a large bowl, cream together the butter and sugar until light and fluffy. Beat in the eggs, one at a time, until combined. Add half of the flour mixture to the creamed mixture, and beat until combined. Pour in the buttermilk/baking soda mixture and beat until blended. Beat in the remaining flour until just combined. Stir in the fruit/nut mixture. Divide the batter equally between the two prepared pans and smooth the tops. Place the fruitcake in the oven and bake for 1 hour and 45 minutes. Remove from the oven.
When the fruitcake has almost finished baking, whisk together the orange juice and powdered sugar. Pour the orange juice mixture carefully over the hot fruitcakes (you want the orange juice to run down the insides of the pan, not overflow to the outside and land on the counter). Let the fruitcakes cool to room temperature, then cover with plastic wrap and refrigerate overnight. Run a knife around the edges of the pans to loosen the cakes, then remove the fruitcakes from the pans, slice, and serve. Store fruitcake wrapped tightly in plastic wrap. Makes two 8x4 inch loaves of fruitcake.
Enjoy! -Cardamommy
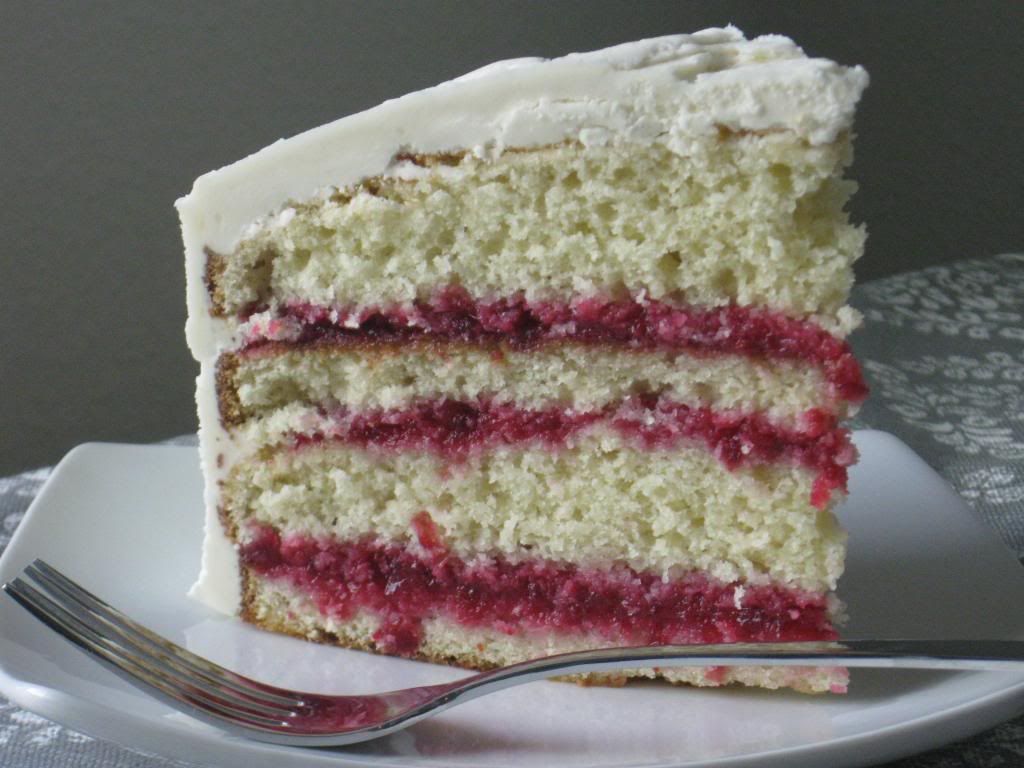
I just made this cake, and I think we're in love. My oldest Hungry Puppy inhaled her piece. Yes. Inhaled. I handed it to her, turned around to serve another piece and when I looked back, she had only a few bites left. I asked her if she liked it, and she vigorously nodded her head yes because her mouth was stuffed full of cake. That's the kind of positive response I like to get when I try a new recipe. I found this recipe on the Better Homes and Gardens website, which I love lately. It is a moist white chocolate cake with a perfectly spiced cranberry filling, covered with a white chocolate frosting. The tart cranberries are a perfect complement to the sweetness of the white chocolate. This one definitely will be going on the repeat list. And please don't mind the uneven layers...I'm not quite sure what happened, but I obviously need some work on that. One quick note: You want to make sure that all of your ingredients are room temperature. If they are too cold, when you add the white chocolate, it will harden up a bit and you may get not so lovely little chunks of white chocolate.
White Chocolate Cranberry Cake
Cranberry Filling:
1 12 ounce bag of fresh (or frozen) cranberries
1 1/4 cups granulated sugar
1/4 cup water
Zest of one orange
1 Tablespoon lemon juice
1/4 teaspoon cinnamon
1/8 teaspoon ground cloves
1/8 teaspoon ground ginger
White Chocolate Cake:
2 1/4 cups all purpose flour
2 1/4 teaspoons baking powder
1/4 teaspoon salt
10 Tablespoons butter, room temperature
1 1/3 cups granulated sugar
4 eggs
2 teaspoons vanilla extract
1 1/4 cups milk
8 ounce white chocolate, melted
White Chocolate Frosting:
1 cup (2 sticks) butter, room temperature
Pinch of salt
12 ounces white chocolate, melted
2 teaspoons vanilla extract
2 cups powdered sugar
For the cranberry filling, in a medium saucepan over medium-high heat, combine the cranberries, sugar, water, orange zest, lemon juice, cinnamon, cloves, and ginger. Cook and stir until mixture reaches a boil. Reduce heat and simmer the cranberry mixture for about 10 to 15 minutes, or until thickened. Transfer the cranberry mixture to a bowl, cover, and chill for at least 2 hours. When the cranberry mixture is chilled, transfer to a food processor and process until smooth. Set aside until ready to assemble the cake.
Preheat the oven to 350F. Grease 2 9-inch round cake pans and line the bottoms with parchment paper, then lightly grease the parchment. Set aside.
For the cake, in a medium bowl, combine the flour, baking powder, and salt. Set aside. With a stand mixer or hand mixer, cream together the butter and granulated sugar until light and fluffy. Beat in the eggs, one at a time, followed by the vanilla extract, until well blended, scraping down the sides of the bowl if necessary. Beat in 1/3 of the flour mixture, followed by 1/2 of the milk. Beat in another 1/3 of the flour mixture, followed by the remaining milk. Beat in the remaining 1/3 of the flour mixture until just combined. Beat in the melted white chocolate just until blended.
Divide the cake batter evenly between the prepared cake pans, smoothing the tops. Bake in the preheated oven for 25 to 30 minutes, or until a toothpick inserted in the center comes out clean. Remove cakes from the oven and let cool for about 10 minutes, then run a knife around the edges of the cake and carefully turn out onto a cooling rack to finish cooling completely.
For the white chocolate frosting, beat the butter and salt until smooth. Add the white chocolate and vanilla, and beat until blended. Gradually beat in the powdered sugar, then continue to beat until the frosting is smooth.
To assemble the cake, cut each cake layer in half horizontally (this will give you 4 cake layers). Place one layer on a serving plate, then spread 1/3 of the cranberry filling over the top. Place the next cake layer on top, then spread with 1/3 of the filling. Place the third cake layer on top, then spread with the remaining cranberry filling. Place the last cake layer on top, with the cut side down. Spread the white chocolate frosting over the top and sides of the cake. If the frosting gets too stiff, gently heat it in the microwave for about 5 seconds (you don't want to melt it!), stir, and finish spreading on the cake. Makes about 16 servings.
Enjoy! -Cardamommy
I found these cookie cutters in a Scandinavian store a couple of months ago, and I knew immediately that I had to buy them and make chocolate moose cookies with them. I totally love them! How cute are they?! Moving past the cute factor, we have a serious delicious factor going on here too. The cookies are chocolatey and delicious, and hold the cutout shape extremely well, and the frosting is amazing. It's the same filling that I used in this Chocolate Peanut Butter Layer Cake. If you don't have moose cookie cutters, just use whatever shapes you want.
Chocolate Moose Cookies
Chocolate Cutout Cookies:
1 cup butter, room temperature
1 cup granulated sugar
1 egg
1 teaspoon vanilla extract
2 1/2 cups all purpose flour
1/2 cup cocoa powder
1/2 teaspoon salt
Chocolate Marshmallow Filling:
1/2 cup cocoa powder
1 cup powdered sugar
pinch of salt
1/4 cup butter, room temperature
1/4 cup shortening
1 Tablespoon milk
1 cup (1/2 of a 7 ounce container) marshmallow cream
Preheat the oven to 350F. Line a baking sheet with parchment paper.
Cream together the butter and sugar until light and fluffy. Beat in the egg and vanilla until completely combined. Add the flour, cocoa powder, and salt, and beat on low until the dough comes together.
On a lightly floured surface, roll out the dough about 1/4 inch thick. Cut out cookies with a cookie cutter, then place cut outs on the prepared baking sheet. Bake in the preheated oven for about 6 minutes. Remove from oven and let cool for 1 minute on the pan. Carefully transfer cookies to a cooling rack to cool completely.
For the chocolate marshmallow filling, stir together the cocoa powder, powdered sugar, and salt. With the mixer on low speed, beat in the butter and shortening. Mixture will be crumbly. Beat in the milk until the mixture comes together. Add the marshmallow cream, increasing the speed to high, beat until the filling is light and fluffy.
To assemble the cookies, spread or pipe some of the chocolate filling on one cookie, then place another cookie on top of the frosting, gently pressing down to secure. Makes 18 to 36 sandwich cookies (depending on the size of the cutter).
Enjoy! -Cardamommy
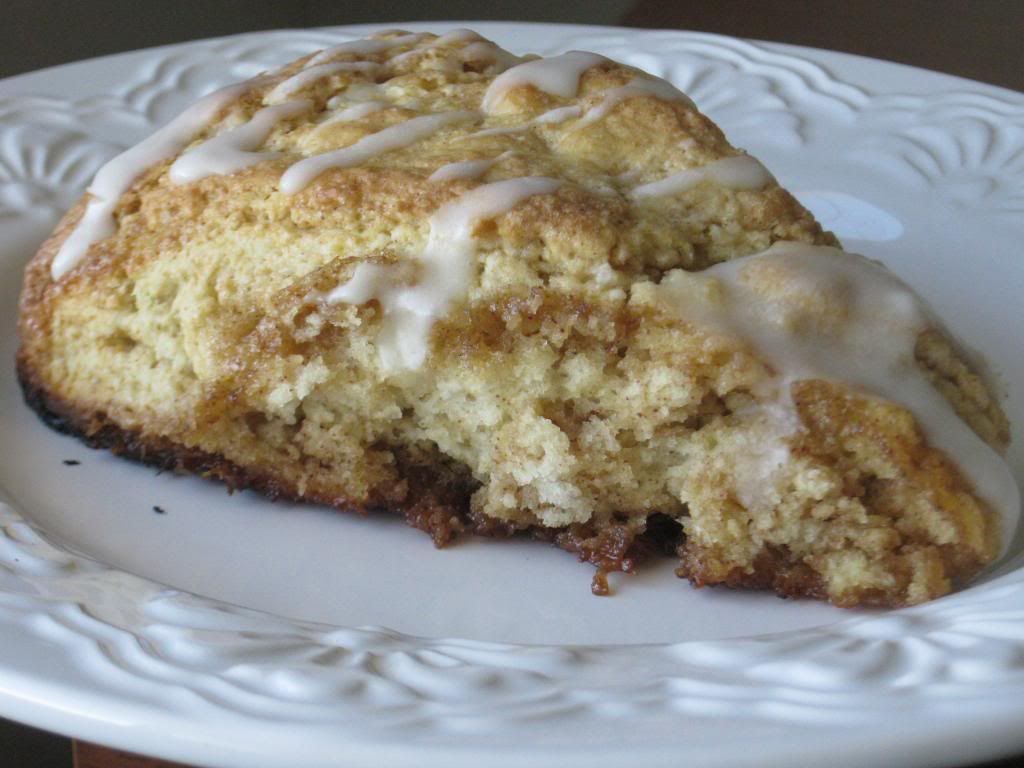
I'm not a breakfast person. I'm usually at the gym during breakfast time, so my husband makes and serves breakfast to my Hungry Puppies. Even on Saturdays, I get to sleep in (a blessed day) while he does breakfast duty. Sunday is out because we have really early church. Like at 8am. Which means that sometimes my youngest Hungry Puppy (who is also not a super breakfast person) will have a slice of cheese for breakfast. Very very very occasionally, I will drag myself out of bed on a Sunday when church is not so early, and make a special breakfast. These scones fit that bill. And they were devoured! They are tender and yummy, full of cinnamon brown sugar ribbons, and topped with a quick vanilla glaze. Delicious!
Iced Cinnamon Bun Scones
Cinnamon Brown Sugar Swirl:
2/3 cup packed brown sugar
1 teaspoon cinnamon
2 Tablespoons butter, room temperature
Scones:
3 cups all purpose flour
1/3 cup granulated sugar
1 Tablespoon baking powder
1/2 teaspoon salt
1/4 teaspoon cinnamon
1 stick (8 Tablespoons) cold butter, cut into 8 slices
1 cup heavy cream
1 large egg
1 teaspoon vanilla extract
Glaze:
2 Tablespoons butter, room temperature
1 cup powdered sugar
1 to 2 teaspoons milk (enough to reach desired consistency)
Preheat the oven to 425F. Line a baking sheet with parchment paper, Set aside.
For the Cinnamon Brown Sugar Swirl, in a food processor pulse the brown sugar, cinnamon, and butter until crumbly. Transfer to a small bowl and set aside.
For the scones, place the flour, sugar, baking powder, salt and cinnamon in the food processor and pulse several times to blend. Add the cold sliced butter and pulse until the butter is the size of peas. Transfer the flour mixture to a large bowl and add the cream, egg, and vanilla. Stir until a firm dough forms. Sprinkle the brown sugar mixture over the dough and knead several times to incorporate the swirl, making sure not to overknead it as you want to have streaks of the brown sugar mixture.
On a floured work surface, shape the dough into into an 8 inch circle, about 1 inch thick. Cut the circle into 8 wedges, and transfer to the prepared baking sheet, leaving about 1/4 inch of space between the wedges. Bake for about 15 to 20 minutes, until golden brown. Remove scones from the oven and let cool while you make the glaze.
For the glaze, combine the butter and powdered sugar in a small bowl and mix until it starts to blend together. Add the milk and stir until the glaze is smooth. Transfer the scones to a cooling rack, and drizzle the glaze over the top. Serve warm. Makes 8 large scones.
Enjoy! -Cardamommy
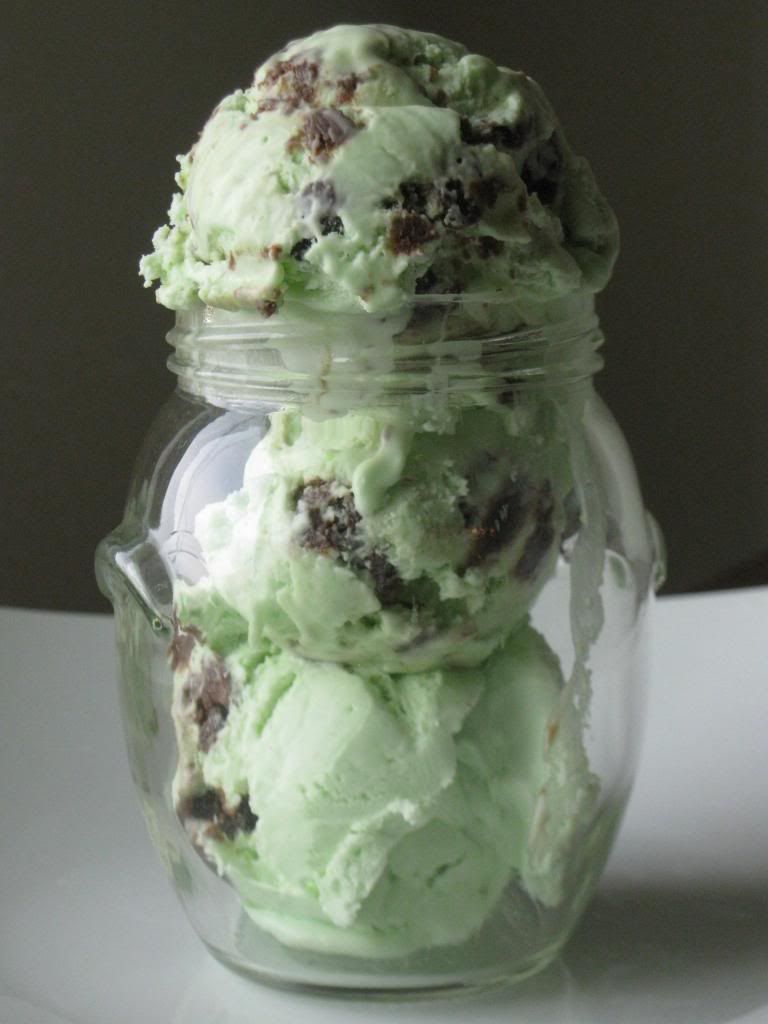
I have been dreaming about this ice cream flavor for a couple of weeks now, but was too chicken to do anything about it until now. Why? Because I have had horrible luck with mint ice cream. I mean horrible. As in pour entire batches down the sink before. So discouraging! This one, though, I totally nailed. I started with a basic 2 ingredient ice cream recipe and just went from there. This recipe is so simple and you don't need an ice cream maker to make it. Does it get better than mint and chocolate cookie dough? Tell me why I've never run into this flavor at the store! I think that this ice cream ranks high up there with this, this, this, and this recipe as one of my favorites.
Mint Chocolate Cookie Dough Ice Cream
Chocolate Cookie Dough:
6 Tablespoons butter, melted
1/2 cup packed brown sugar
1/4 cup granulated sugar
1 teaspoon vanilla extract
3/4 cup all purpose flour
1/4 cup cocoa powder
1 Tablespoon milk
1/2 cup mini chocolate chips
Mint Ice Cream:
2 cups heavy whipping cream
2 teaspoons peppermint extract
green gel food coloring
3/4 cup sweetened condensed milk (about 1/2 of a 14 ounce can)
3/4 cup marshmallow cream (about 1/2 of a 7 ounce container)
To make the cookie dough, stir together the butter, brown sugar, granulated sugar, vanilla, and salt. Add the flour and cocoa powder and stir until combined. Stir in the milk, then the chocolate chips. Roll the dough into little balls and freeze. You won't need all of the cookie dough, but use as much or as little as you like!
For the ice cream, whip the heavy whipping cream until stiff peaks form. Add the peppermint extract and food coloring, and whip until combined. Add the sweetened condensed milk and marshmallow cream, and beat until completely incorporated. Remove the cookie dough bites from the freezer and fold them into the ice cream. Place the ice cream in a freezer container and freeze until firm, about 4 hours or overnight. Makes about 1 1/2 quarts of ice cream.
Enjoy! -Cardamommy
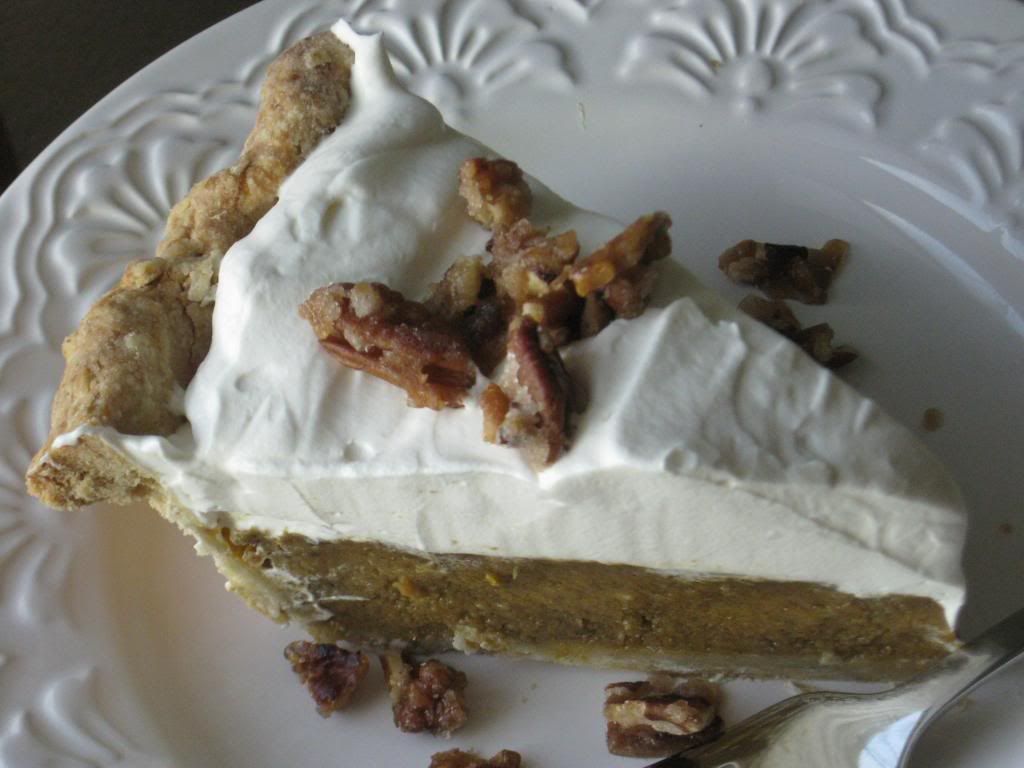
I definitely have a repertoir of favorites when it comes to Holiday recipes, but I also like to be on the look out for new ones that might be amazing. This pie absolutely caught my eye in a really big way. Why? One word: mascarpone. This deliciously pumpkin pie is spiced with the classic pumpkin pie spices as well as with lemon and orange zest, baked inside an oat pastry crust then topped with lightly sweetened mascarpone whipped cream. Some candied pecans sprinkled on top provide a perfect finish.
Pumpkin Mascarpone Pie with Candied Pecans and Oat Pastry Crust
Oat Pastry Crust:
1 1/4 cups all purpose flour
1/2 cup quick oats
1 Tablespoon granulated sugar
1/2 teaspoon salt
3 Tablespoons vegetable shortening
4 Tablespoons (1/2 stick) cold butter
4 to 6 Tablespoons ice cold water
Pumpkin Filling:
1 can (15 ounces) pumpkin puree
3/4 cup packed brown sugar
3 eggs
1 teaspoon vanilla extract
1 teaspoon cinnamon
1/2 teaspoon ground ginger
1/2 teaspoon salt
1/4 teaspoon nutmeg
1/4 teaspoon ground cloves
Zest from 1/2 lemon
Zest from 1/2 small orange
Candied Pecans:
1/2 cup coarsely chopped pecans
1/4 cup granulated sugar
1 Tablespoon butter
Mascarpone Whipped Cream:
1 1/2 cups heavy whipping cream
1/2 cup mascarpone cheese
4 Tablespoons powdered sugar
1 teaspoon vanilla extract
Preheat the oven to 350F. For the crust, in a medium bowl, combine the flour, oats, sugar and salt. Using a pastry blender or a fork or your fingers, cut in the shortening and butter until the mixture resembles coarse crumbs. Add 4 tablespoons of the cold water and toss together until the crust comes together, adding the remaining water 1 tablespoon at a time if necessary. Form the dough into a ball, then on a floured surface, roll the dough into a circle large enough to fit a 9 inch pie plate. Transfer the crust into a pie plate and roll and crimp the edges. Set aside.
In a large bowl, combine the pumpkin puree, brown sugar, eggs, vanilla extract, cinnamon, ginger, salt, nutmeg, cloves, lemon zest and orange zest. Whisk until well blended. Pour the pumpkin filling into the prepared pie crust. Bake in the preheated oven for 1 hour, or until a knife inserted in the center of the pie comes out clean. If necessary, cover the edges of the crust with tin foil towards the end of baking to prevent over browning. Remove the pie from the oven and let cool to room temperature. Cover with plastic wrap and chill.
While the pie is chilling, make the candied pecans. Lightly grease a piece of tin foil and set aside. In a small skillet, combine the chopped pecans, sugar, and butter. Heat over high heat until the butter melts and the sugar starts to melt. Reduce heat to medium low and stir until the sugar turns golden. Spread candied pecans on the prepared tin foil and let cool. Once cool, break apart. Candied pecans can be stored in a sealed container at room temperature.
When ready to serve the pie, make the mascarpone whipped cream. Whip the whipping cream, mascarpone cheese, powdered sugar and vanilla extract with a stand mixer or a hand mixer until stiff peaks form. Spread the whipped cream mixture evenly over the pumpkin pie. Sprinkle the candied pecans on top. Serve. Makes 8 to 12 servings.
Enjoy! -Cardamommy