Friday, August 29, 2014

Lemon Mascarpone Tiramisu


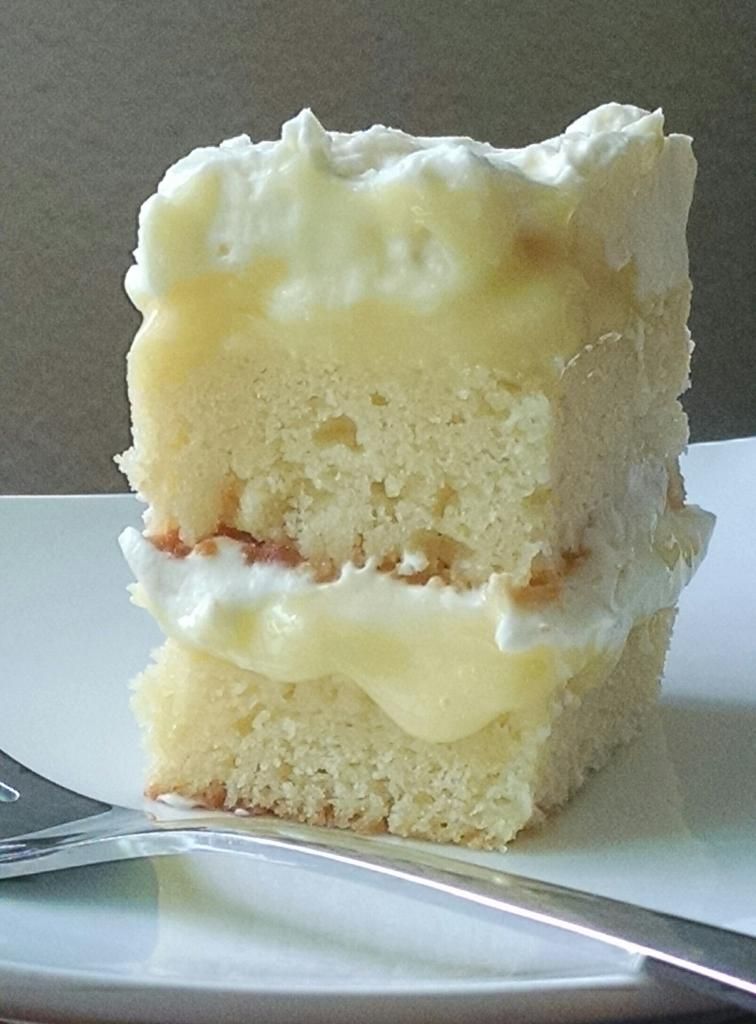
I first made this recipe with my sister about a year ago, and we absolutely loved it.  I found the recipe here, and the first time we made it we followed it pretty closely.  This time, thought, I wanted to really make it awesome, so I made my own pound cake instead of ladyfingers (plus, I can't find ladyfingers anywhere!), and my own lemon curd.  Is it a bit time consuming?  Yes.  Is it totally worth it?  Absolutely.  Layers of lemon pound cake, lemon curd, and mascarpone whipped cream make this sweet and tangy dessert one that you'll want to make again soon.

Lemon Mascarpone Tiramisu

Lemon Curd:
4 eggs
6 Tablespoons (3/4 stick) butter
1 cup granulated sugar
Juice of 2 lemons (6 Tablespoons)
Zest of 2 lemons
Pinch of salt

Lemon Pound Cake:
1 cup butter, room temperature
1 1/2 cups granulated sugar
4 eggs
2 teaspoons vanilla extract
1 1/2 cups all-purpose flour
1 teaspoon baking powder
1/2 teaspoon salt
1/4 cup lemon juice

To Assemble:
1/2 cup lemon juice
3 Tablespoons powdered sugar
1 cup heavy whipping cream
1 carton (8 ounces) mascarpone cheese
1/2 cup powdered sugar, divided
1 teaspoon vanilla extract

For the lemon curd , whisk the eggs in a small bowl.  Set aside.  Melt the butter in a small saucepan over medium-low heat.  Whisk the sugar, lemon juice, lemon peel, and salt into the butter, and bring to almost a simmer.  Very slowly, drizzle the about 3/4 of the hot butter mixture into the beaten eggs, whisking the eggs constantly.  Return the egg mixture to the saucepan, whisking constantly.  Continue cooking over medium-low heat, whisking constantly until the mixture thickens and reaches about 180F.  Do not boil.  Transfer the lemon curd to a small bowl, and press a piece of plastic wrap directly on the surface.  Chill at least four hours (can be made 2 days in advance, store covered in the refrigerator).

Preheat the oven to 350F.  Lightly grease an 8x8 inch square baking pan, then line the bottom with parchment paper, then lightly grease the parchment.

For the lemon pound cake, cream together the butter and sugar until light and fluffy.  Beat in the eggs, one at a time until completely incorporated, followed by the vanilla extract.  Add the flour, baking powder, and salt, and beat until partially combined.  Add the lemon juice, and beat on low until just combined, and no streaks of flour remain (being careful not to over beat).  Scrape the batter into the prepared baking pan and smooth the top.  

Bake for about 40 minutes, or until a toothpick inserted in the center comes out with moist crumbs.  Remove from the oven and let cool in the pan for about 10 minutes, then turn out of the pan and remove the parchment paper from the bottom of the cake.  Let cake cool completely on a cooling rack.

To assemble the tiramisu, in a medium bowl, beat the whipping cream with 1/4 cup of powdered sugar until stiff peaks form.  Set aside.  In a large bowl, combine the mascarpone cheese, the remaining 1/4 cup powdered sugar, and the vanilla extract.  Mix until completely blended and smooth.  Spoon the whipped cream into the bowl with the mascarpone cheese, and using a spatula, fold in the whipped cream until the mixture is combined.  

In a small bowl, combine the lemon juice and 3 Tablespoons of powdered sugar, stirring until sugar is dissolved.  Cut the lemon pound cake in half so you have two pound cake layers.  Place the bottom layer cut side up in an 8 inch square pan and brush with half of the lemon juice mixture.  Spread half of the lemon curd over the pound cake, then carefully spread half of the mascarpone mixture on top.  Place the second pound cake layer cut side up on top of the mascarpone.  Brush the pound cake with the remaining lemon juice.  Spread the remaining lemon curd over the pound cake, followed by the remaining mascarpone mixture.  Cover and chill at least 6 hours, or overnight.  Makes 9 to 12 servings.

Enjoy!  -Cardamommy

Monday, August 25, 2014

Georgian Cheese Skillet Bread


I first posted this recipe about 3 1/2 years ago and totally forgot that I had posted it!  I am completely reconfiguring my recipe binder right now (which is seriously taking me a ridiculous number of hours!!!), and I was having trouble locating this recipe with a picture.  So.  Poor me...I had to make it again just so I could take a picture.  Ah, sacrifices. 

First of all, for the record, we are talking Georgia as in Russia, not Georgia as in the Peach State.  This is a King Arthur Flour recipe that I found in my mom's vast expanse of cooking literature.  In fact, when I  made this bread my mom asked me for the recipe.  She was surprised when I told her that I had gotten it from her in the first place.  

This is a fairly easy recipe and very versatile.  The dough is a simple quick bread, like a biscuit dough.  The filling is a mixture of several different cheeses and an egg.  You can vary the types of cheese that you use, add diced meat, or even increase the number of eggs in the filling to match this bread to any occasion.  My sister's brilliant idea was to make these for breakfast in the car on her long trip home.  With two hungry puppies, I am always looking for non-messy, non-crumbly (I tend to get a little freaky-outy about food in my car), kid friendly food to bring on trips in the car.  Whether in the car or for a casual lunch,  this bread will bring you back for more. Note: You can easily double the recipe, just divide the dough and filling into four instead of two, and proceed as directed.

Georgian Cheese Skillet Bread

Dough:
1 2/3 cups (7 ounces) all purpose flour
1 Tablespoon cornstarch
1 teaspoon baking soda
1/2 teaspoon salt
3/4 cup (6 ounces) plain unsweetened yogurt
3 Tablespoons canola oil

Filling:
1 1/2 cups (6 ounces) shredded white cheddar cheese
1 1/2 cups (6 ounces) shredded Swiss cheese
1 large egg

For the dough, in a large bowl combine the flour, cornstarch, baking soda, and salt.  In a small bowl, stir together the yogurt and oil.  Pour the yogurt mixture into the flour mixture, and mix together until a soft dough forms.  Divide the dough in half, form into two disks, wrap in plastic wrap and refrigerate for 1 to 2 hours.

For the filling, stir together the white cheddar and Swiss cheese with the egg, and mix until combined.  Place two sheets of plastic wrap on a work surface.  Divide the cheese mixture in half and place each half onto the plastic wrap to make two 5 inch disks.  Wrap and chill until you are ready to make the breads.

To assemble the breads, remove the dough from the refrigerator.  Roll each disk into a 10  inch circle, about 1/4 inch thick in the center, and thinner toward the outside edge.  Place one cheese disk in the center of each circle of dough, then pick up the edges of the dough and fold them over to cover the cheese.  Seal the folded edges with water.

Preheat the oven to 350F.  Heat a heavy bottomed oven safe frying pan (if you don't have an oven safe frying pan, you may transfer the bread to a baking sheet) over medium-low heat.  Lightly grease the pan, then put the bread into the pan with the sealed side up.  Cover the pan and cook over medium-low heat for 5 minutes, shaking the pan from time to time to keep the bread from sticking.  After 5 minutes, turn the bread over and cook another five minutes.  Transfer the bread to the oven (in the pan or transferred to a baking sheet), and bake for 10 minutes more. This will ensure that the dough is fully cooked in the center.  Remove from the oven, cut into quarters and serve.  Makes 2 breads, 8 servings.

Enjoy!  -Cardamommy

Friday, August 22, 2014

Oreo Layer Cake with Marshmallow Cream Filling


I have a seriously impressive yet easy cake for you today.  I don't normally use cake mixes, but my life has been seriously crazy lately and I needed a break!  I've been wanting to make an Oreo cake, and this is what I came up with.  I threw some black cocoa powder in with the cake mix to give me a seriously dark Oreo-like chocolate flavor in these moist cake layers.  The marshmallow cream filling is light and fluffy and delicious.  Can't even get over the filling.  The frosting is full of chopped Oreos, which give you some nice chunks of Oreo in each bite.

Oreo Layer Cake with Marshmallow Cream Filling

Chocolate Cake:
1 box dark chocolate cake mix
1 box (4 serving size) instant chocolate pudding mix
1/4 cup black cocoa or dark cocoa powder
2 eggs
1 3/4 cups milk

Marshmallow Cream Filling:
1 container (7 ounces) marshmallow cream
1/2 cup shortening
1/3 cup powdered sugar
pinch of salt
1 teaspoon clear vanilla extract
2 teaspoons hot water

Oreo Frosting:
1/2 cup butter, room temperature
1/2 cup coconut oil
1 teaspoon vanilla extract
1/2 teaspoon butter flavoring
4 cups powdered sugar
2 Tablespoons milk
18 Oreos, chopped
Extra Oreos for garnish

Preheat the oven to 350F.  Grease 2 9-inch round baking pans and line the bottoms with parchment paper, then lightly grease the paper.  Set aside.

In a large bowl, whisk together the cake mix, pudding mix, and cocoa powder.  Whisk in the eggs and milk until combined and well blended.  Pour the cake batter evenly in the prepared pans and smooth the tops.  Bake in the preheated oven for about 20 minutes, or until a toothpick inserted in the center comes out clean.  Remove cakes from the oven and let cool for about 10 minutes.  Carefully turn the cakes out onto a cooling rack to cool completely.

For the marshmallow cream filling, in a medium bowl, place the marshmallow cream, shortening, powdered sugar, salt, vanilla, and hot water.  Beat together until completely combined, smooth and fluffy.

For the Oreo frosting, cream together the butter, coconut oil, vanilla, and butter flavoring.  Beat in the powdered sugar, one cup at a time, until combined.  Add the milk (adding more if necessary to reach the desired consistency), and beat the frosting until smooth.  On low speed, beat in the chopped oreos until evenly distributed.

To assemble the cake, place one cooled cake layer on a serving plate.  Spread the cream filling on top, then place the second cake layer on top of the cream filling, pressing down slightly.  Frost the top and sides of the cake with the Oreo frosting.  Garnish with extra Oreos, if desired. Makes 16 servings.

Enjoy!  -Cardamommy

Monday, August 18, 2014

Peanut Butter White Chocolate Rice Krispies Brownies


These brownies are the reworked smashingly successful version of the not so successful vacation brownies that I made in Wyoming.  We start with a deliciously easy fudgy brownie (recipe slightly adapted from King Arthur Flour), topped with an incredible vanilla frosting, and finished off with a layer of peanut butter white chocolate rice krispies.  These brownies have a variety of flavors and textures, and are perfectly addicting.


Peanut Butter White Chocolate Rice Krispies Brownies


Brownie Layer:
1 cup all purpose flour
3/4 cup cocoa powder
2 cups granulated sugar
1/4 teaspoon salt
1/4 teaspoon baking powder
3 large eggs
1/2 cup (1 stick) butter, melted
1/4 cup canola oil
2 teaspoons vanilla extract

Frosting Layer:
2 Tablespoons butter, room temperature
2 Tablespoons coconut oil
1/4 teaspoon vanilla extract
1/8 teaspoon butter flavoring (optional)
1 cup powdered sugar
1 to 2 teaspoons milk

Rice Krispies Layer:
1 1/4 cups white chocolate chips
2/3 cups creamy peanut butter
3 cups rice krispies cereal

Preheat the oven to 375F.  Lightly spray an 8x11 inch baking dish with cooking spray.

In a large bowl, stir together the flour, cocoa powder, sugar, salt, and baking powder.  Add the eggs, melted butter, oil, and vanilla, and stir together until completely blended and smooth.  Pour the batter into the prepared baking dish and smooth the top.  Bake in the preheated oven for 22 to 25 minutes, or until a toothpick inserted in the center comes out with moist crumbs.  Remove brownies from the oven and let cool completely before frosting.

For the frosting, beat together the butter, coconut oil, vanilla, and butter flavoring (if using).  Beat in the powdered sugar, a little at a time until completely combined.  Beat in the milk, starting with 1 teaspoon and adding more if necessary to reach the desired consistency.  Beat until smooth.  Spread frosting evenly over the completely cooled brownies.

For the the rice krispies layer, place the rice krispies in a medium bowl.  Place the white chocolate chips and peanut butter in a plastic microwaveable bowl (I have never had white chocolate seize when I melt it in a plastic bowl!).  Microwave in 15 second intervals, stirring after each interval until the mixture is melted and smooth.  Pour the peanut butter white chocolate mixture over the rice krispies and stir together until combined.  Spread the rice krispies mixture evenly over the frosting brownies, pressing down lightly.  Let cool completely or chill for an hour or two before cutting.  Makes 20 brownies.

Enjoy!  -Cardamommy

Friday, August 15, 2014

Chocolate Pudding Sheet Cake with Condensed Milk Frosting


I made this cake last week while on vacation in Wyoming.  We had such a great time with my sister and her family!  We needed some dessert, so I was put to work.  Twice, actually, but the first time was not exactly a smashing success (a reworked recipe will be coming your way soon).  My sister brought a cake mix, and asked for something that didn't have a buttercream frosting, and this is what I came up with.  The cake is incredibly moist and the chocolate chips inside were perfect little bursts of chocolate.  The frosting was pretty ridiculous too.  It reminded me of German chocolate frosting without the pecans or coconut.  Absolutely amazing.  Note: If you'd like pecans and coconut in your frosting, just stir them in after the frosting is done cooking.

Chocolate Pudding Sheet Cake with Condensed Milk Frosting

Chocolate Pudding Sheet Cake:
1 box chocolate cake mix
1 box (4 serving size) instant chocolate pudding mix
1 3/4 cup milk
2 eggs
1 cup milk chocolate chips
1 cup white chocolate chips

Condensed Milk Frosting:
2 cans (14 ounces each) sweetened condensed milk
1/2 cup packed brown sugar
1/2 cup butter
1 teaspoon vanilla extract

Preheat the oven to 350F.  Lightly spray a 9x13 inch baking dish with cooking spray.

In a large bowl, whisk together the cake mix, chocolate pudding mix, milk, and eggs until well blended.  Stir in the milk chocolate chips and white chocolate chips.  Pour the batter into the prepared pan and bake for about 25 minutes, or until a toothpick inserted in the center comes out clean.  Remove cake from the oven and let cool before frosting.

For the frosting, in a medium saucepan over medium heat, stir together the condensed milk, brown sugar, and butter.  Bring the mixture to a boil, stirring constantly.  Continue to boil the frosting for about 5 minutes, stirring constantly until the mixture reaches the consistency of pudding.  Remove from the heat and stir in the vanilla extract.  Let cool until just warm.  Pour the slightly warm frosting over the cake and spread evenly.  Let cool completely or chill before serving.  Makes 20 servings.

Enjoy!  -Cardamommy

Monday, August 11, 2014

White Chocolate Peanut Butter Oatmeal Oreo Blondies


I found this brilliant recipe the other day and was totally smitten, and immediately set about creating my own version.  My family loves peanut butter treats, and although I'm fairly ambivalent about peanut butter, the peanut butter frosting in that recipe is one of my favorite peanut butter applications ever.  Ever.  This recipe starts with a peanut butter oatmeal Oreo blondie and is topped with a peanut butter white chocolate chip frosting.  Unbelievable.  

White Chocolate Peanut Butter Oatmeal Oreo Blondies 

Blondies:
1/4 cup (4 Tablespoons) butter, room temperature
2 Tablespoons creamy peanut butter
1/2 cup packed brown sugar
1/4 cup granulated sugar
1 egg
3/4 cup all purpose flour
3/4 cup old fashioned oats
1/2 teaspoon baking powder
1/8 teaspoon salt
1 cup chopped peanut butter Oreos (about 8 or 10 Oreos)

Peanut Butter White Chocolate Chip Frosting:
1/2 cup creamy peanut butter
1 cup powdered sugar
4 Tablespoons milk
1/2 cup white chocolate chips

Preheat the oven to 350F.  Line a 9x9 inch square baking pan with parchment paper, leaving the edges of the paper hanging over the sides to use as handles.

In a large bowl, cream together the butter and peanut butter until smooth.  Beat in the brown sugar and granulated sugar until light and fluffy.  Beat in the egg.  Add the flour, oats, baking powder, and salt, and beat until just combined.  Stir in the chopped Oreos until evenly distributed.  Spread the batter evenly in the prepared pan.  Place in the oven and bake for about 20 minutes, or until the edges are golden and a toothpick inserted in the center comes out with moist crumbs.  Remove from the oven and let cool for about 5 minutes before frosting.

While the blondies are cooling make the frosting.  In a large bowl, combine the peanut butter and powdered sugar, and beat until blended (mixture may be crumbly).  Add 2 tablespoons of the milk and beat well, then add the remaining 2 tablespoons of milk and beat until well blended and smooth.  Stir in the white chocolate chips.  Immediately spread the frosting over the warm blondies, spreading evenly.  Let cool.  Makes 16 servings.

Enjoy!  -Cardamommy


Friday, August 8, 2014

Cherry Chocolate Chip Brownies


So I've been on this cherry kick recently, and I've been experimenting with brownies too.  I figured this to mean that it would be a great idea to put some cherries with my chocolate and get down to serious business.  I made some chocolate cherry cookies recently, but they didn't work out as I anticipated so I had to rework the chocolate cherry plan.  I threw these brownies together, and it was sketchy for a while, but they came together in the end and are crazy delicious.  I'd forgotten how much I love cherries and chocolate!  The brownies are a copycat box mix recipe, and I adapted the frosting from these delicious Mint Oreo Brownies (which I should probably make again soon!).  The brownies are super dark and dense and fudgy which is perfect for the sweet cherry topping.

Cherry Chocolate Chip Brownies

Brownies:
3/4 cup canola oil
1 1/2 cups granulated sugar
1 1/2 teaspoons vanilla extract
3 eggs
3/4 cup all purpose flour
1/2 cup dark cocoa powder (you can substitute regular cocoa powder)
1/2 teaspoon baking powder
1/4 teaspoon salt
1/2 cup semi sweet chocolate chips

Cherry Chocolate Chip Frosting:
1/4 cup (48g) shortening
1/4 cup (1/2 stick) butter, room temperature
1/2 teaspoon vanilla
2 cups powdered sugar
2 Tablespoons maraschino cherry juice
1 jar (7 ounces) marshmallow cream
3/4 cups white chocolate chips, melted and cooled slightly
1 10-ounce jar maraschino cherries, drained and cut in quarters (reserve the juice for another use)
1/2 cup mini chocolate chips

Preheat the oven to 350F.  Lightly spray an 8x11 inch baking dish with cooking spray.  Set aside.

In a large bowl, stir together the oil, sugar, and vanilla.  Stir in the eggs until completely incorporated.  Add the flour, cocoa powder, baking powder, and salt, and stir until just blended.  Stir in the chocolate chips.  Pour the batter into the prepared pan and smooth the top.  Bake in the preheated oven for 25 to 30 minutes, or until a toothpick inserted in the center comes out with moist crumbs.  Remove brownies from the oven and let cool completely before frosting.

For the frosting, in a large bowl, beat together the shortening, butter, and vanilla until light and fluffy.  Slowly beat in the powdered sugar until combined.  Add the cherry juice and beat until smooth.  Beat in the marshmallow cream, followed by the melted and cooled white chocolate.  Stir in the cherrries and chocolate chips until evenly distributed.  Spread the frosting evenly on top of the cooled brownies. Makes 15 brownies.

Enjoy!  -Cardamommy

Monday, August 4, 2014

Chocolate Cherry Chip Rice Krispies Treats


My oldest Hungry Puppy came to me yesterday and asked if she could make something.  We were short on time and had no ideas about what she could make.  So, we created these yummy cherry chocolate rice krispies treats!  They start with chocolate brownie marshmallows and rice krispies, with regular marshmallows and cherry chips thrown in.  They are gooey and delicious and a perfect little treat for Hungry Puppies.

Chocolate Cherry Chip Rice Krispies Treats

8 ounces chocolate brownie marshmallows
1/4 cup (1/2 stick) butter
4 cups rice krispies cereal
4 ounces (2 cups) mini marshmallows
1/2 cup cherry chips

Spray an 8-inch square baking pan with cooking spray, set aside.

Place the chocolate brownie marshmallows and the butter in a large microwaveable bowl.  Microwave the marshmallows and butter in 30 second intervals, stirring after each, until the mixture is melted and smooth.  Remove from the microwave and stir in the rice krispies cereal.  Add the mini marshmallows and cherry chips, and stir just until evenly distributed.  Pour the mixture into the prepared pan and press lightly to flatten.  Let cool completely before cutting.  Makes 16 treats.

Enjoy!  -Cardamommy

Friday, August 1, 2014

Cherries and Cream Cookies


I bought some cherry chips the other day, and couldn't wait to create something with them.  I've seen cherry chips many times at the grocery store, but I've never tried them out until now.  These cherries and cream cookies are a slight variation of these cookies, and they turned out amazing.  The flavors are crazy good, cherry and white chocolate together are a little magical.  The cornmeal gives these cookies a little crunch and a unique texture that leaves you wanting more.  I can't wait to experiment some more with the cherry chips!

Cherries and Cream Cookies

3/4 cup butter, room temperature
1 cup granulated sugar
1/2 cup packed brown sugar
1 egg
1 1/2 teaspoons vanilla extract
1 3/4 cups all purpose flour
1/2 cup cornmeal
1/2 teaspoon baking powder
1/2 teaspoon baking soda
1/2 teaspoon salt
1/2 cup cherry chips
1/2 cup white chocolate chips

Preheat the oven to 350F.  Line a baking sheet with parchment paper.

Cream together the butter, granulated sugar, and brown sugar.  Beat in the egg and vanilla extract.    Stir in the flour, cornmeal, baking powder, baking soda, and salt until the dough is combined.  Stir in the cherry chips and white chocolate chips until evenly distributed.  

Drop the dough by tablespoonfuls onto the prepared baking sheet.  Bake for about 8 to 10 minutes, or until the edges are just barely golden brown.  Remove from the oven and let cool on the pan for several minutes.  Transfer cookies to a wire rack and let cool completely.  Makes about 48 cookies.

Enjoy!  -Cardamommy
Related Posts Plugin for WordPress, Blogger...