Monday, June 29, 2015

Pineapple Strawberry Pie


I am so excited about this pie!  I absolutely love fresh fruit, and pineapple is one of my favorites.  I also really love fresh strawberries and fresh pineapple together.  I made a strawberry rhubarb pie a few weeks ago, and the strawberry just called to me from that pie.  So I decided to combine strawberry and pineapple in a fabulous pie!  I modified this Fresh Pineapple Pie recipe just slightly.


Pineapple Strawberry Pie

2 Layer 9-inch pie crust
3 cups (26 ounces, 1 large) fresh pineapple, cut in bite sized chunks

1 pound strawberries, washed, hulled and sliced
1 1/2 cups (10 1/2 ounces) granulated sugar
1/4 cup (1 ounce) all purpose flour
1/8 teaspoon salt
2 large eggs
1 Tablespoon fresh lemon juice

Preheat the oven to 425F.  Roll out one pie crust layer and fit into a 9-inch pie plate.

In a large bowl, toss together the pineapple and strawberries.  For the filling, in a medium sized bowl, whisk together the sugar, flour, and salt.  Add the eggs and lemon juice, and whisk until combined.  Place half of the pineapple strawberry mixture in the pie crust.  Pour half of the filling mixture over it.  Layer the remaining pineapple and strawberry on top, then pour the rest of the filling mixture over the pineapple.  With the top layer of pie dough, make a lattice crust over the top of the pie and crimp the edges .  
Bake the pie for 50 to 60 minutes.  Check after 40 minutes, and place a piece of tin foil loosely over the top to prevent over browning, if necessary.  The pie is done when you see the filling bubbling in the center.  Remove pie from the oven and cool completely on a wire rack before slicing.  Makes 1 pie, 8 servings.

Enjoy!  -Cardamommy

Friday, June 26, 2015

Coconut Custard Pie


I am so loving this pie.  It is simple and delicious, and the top totally reminds me of coconut macaroons!  Next time I might try adding some cinnamon to the filling, or perhaps serving it with some cinnamon or vanilla ice cream.  Original recipe found here.

Coconut Custard Pie

1 9-inch Pie crust
1 cup granulated sugar
1/4 teaspoon salt
4 Tablespoons (1/2 stick) butter, melted
6 eggs
1 cup buttermilk
2 teaspoons vanilla extract
2 cups shredded coconut

Preheat the oven to 375F.  Roll out the pie crust and fit into a 9 inch pie plate.  Crimp the edges.  Carefully line the pie crust with foil, letting it hang over the sides of the pie place.  Pour rice or beans (or use pie weights if you have them) into the foil lined crust, filling it about 1/4 to 1/3 full.  Bake the pie crust for about 15 to 20 minutes.  Remove from the oven and lift out the foil and rice/beans/weights.  Cover the edges with strips of foil, and return the crust to the oven and bake for about 5 minutes more, until the crust is just set.  Lower the oven temperature to 350F.

In a large bowl, whisk together the sugar, salt, and melted butter until combined.  Whisk in the eggs, one at a time until incorporated.  Add the buttermilk and vanilla extract and whisk until well blended.  Stir in the coconut.  Pour the filling into the crust and bake the pie for about 45 minutes, keeping the edges of the crust covered with foil to prevent overbrowning.  The center of the pie will be just set and the top should be golden brown.  Let the pie cool completely before slicing.  Makes 8 servings.

Enjoy!  -Cardamommy


Monday, June 22, 2015

Orange Rhubarb Raspberry Jam


I found this recipe in a super old cookbook of my Grandmother's called Cooking Scandinavian. The cookbook was badly water damaged and covered in mold and ickiness, so I was only able to grab a couple of recipes from it.  This was one of them.  Apparently it is a traditional Norwegian recipe, and it turned out really amazing! I didn't make any changes except to use a whole lemon  instead of 1/2, but otherwise I followed the recipe exactly.

Orange Rhubarb Raspberry Jam

2 oranges
1/2 lemon (I used a whole lemon)
Water
1 1/2 cups granulated sugar
1/3 cup water
1 pound rhubarb, cut into 1/2 inch pieces
1 cup raspberries
1 cup granulated sugar

Cover oranges and lemon with water.  Cover and simmer 3 hours.  Let fruits stand in water overnight.  Next day, cut fruits in quarters.  Spoon out pulp and save; discard seeds.  Cut peel into fine, even slivers.  Combine pulp, peel, the 1 1/2 cups sugar, and the 1/3 cup water.  Simmer 45 minutes, or until liquid is honey-like in consistency, stirring constantly.  Meanwhile, in another saucepan, combine rhubarb, raspberries, and the 1 cup sugar.  Slowly bring to a boil, stirring.  Continue to cook, stirring, until thick.  Combine rhubarb mixture thoroughly with orange mixture.  Heat to a full rolling boil.  ladle into hot sterilized glasses and seal.  Makes about four 8 ounce glasses.

Enjoy!  -Cardamommy


Friday, June 19, 2015

Coconut Chocolate Chip Cake


I love this cake.  It is kind of amazing. The cake is super moist and the frosting is unbelievable.  The chocolate chips don't overwhelm the nice coconut flavor, and the entire thing is just irresistible.  My girls could barely wait until it was time to eat it!  This cake is definitely a new favorite at my house.  Original recipe found here.

Chocolate Chip Coconut Cake

Cake:
1 box white cake mix
8 ounces sour cream
1 cup coconut milk
1/4 cup oil
3 eggs
1 cup mini chocolate chips

Frosting:
1/2 cup (1 stick) butter, room temperature
1/2 cup shortening
Pinch of salt
1/2 teaspoon vanilla extract
1/2 teaspoon coconut extract
1/4 teaspoon butter flavoring
2 teaspoons meringue powder (optional)
1 pound (about 4 cups) powdered sugar
2 Tablespoons coconut milk
3/4 cup mini chocolate chips
1 cup shredded coconut

Preheat the oven to 350F.  Grease a 9x13 inch baking dish.

In a large bowl, stir (or beat with an electric mixer) together all of the cake ingredients until well blended.  Pour into the prepared baking dish and smooth the top.  Bake for about 25 to 30 minutes, or until a toothpick inserted in the center comes out with a few moist crumbs.  Remove from the oven and cool completely before frosting.

For the frosting, in a large bowl cream together the butter, shortening, salt, vanilla, coconut extract, and butter flavoring.  Add the meringue powder (if using) and half of the powdered sugar and beat until smooth.  Add the remaining powdered sugar and beat until combined.  Beat in the coconut milk, one tablespoon at a time, until you reach the desired consistency.  Stir in the chocolate chips.

Spread the frosting over the cooled cake.  Sprinkle the coconut over the top and press lightly to adhere it to the frosting.  Makes 20 servings.  

Enjoy!  -Cardamommy


Monday, June 15, 2015

Mississippi Mud Pie


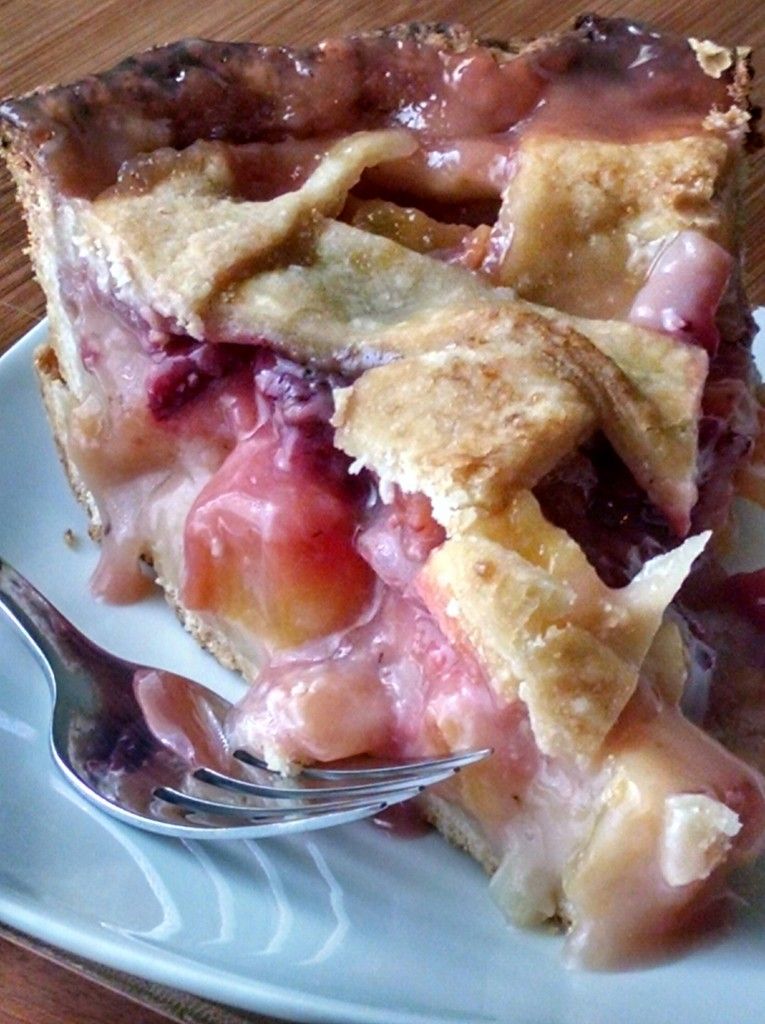
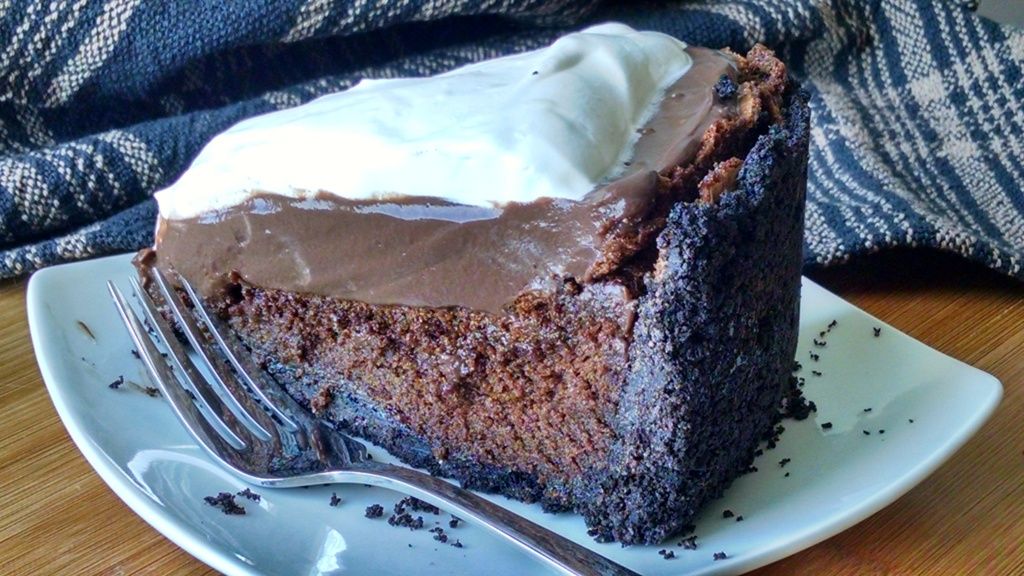
This cake has been two years in the making.  Well, it took me two years to work up the guts to try it again after the first one was an epic failure.  Epic.  I originally found this recipe on Martha Stewart's website and decided to make it for my dad's birthday.  I'm still not totally sure what happened... The oreo crust somehow leaked some sort of grease onto the bottom of my oven which burned off to create a noxious gas in my apartment. Then I think I rushed things a bit. I didn't really strictly follow the chilling time, so my pudding layer kind of got swallowed by the cake.  I can't even remember if I topped it with whipped cream or if I just quit at that point.  To top things off, it had a faint scorchy taste, which everyone else said they didn't notice.  Maybe they were just being nice?  Well, round two, and I decided to do a little bit more research.  I found this recipe on a lot of different blogs, with a variety of suggestions.  This time, I'm pleased to announce, the pie was a complete success.  If your heart goes pitter patter over oreos, flourless chocolate cake, chocolate pudding, and whipped cream, then this pie is for you.  Notes: I deviated from Martha's recipe just a bit.  I substituted water for coffee in the cake, and added chocolate extract.  I added slightly  more cornstarch and 2 whole eggs instead of 4 egg yolks to the pudding.  I also stabilized the whipped cream to help the leftovers last longer without melting into whipped cream puddles.

Mississippi Mud Pie

Crust:
16 ounces whole (cream included) Oreos (35-40 cookies), crushed
5 tablespoons unsalted butter, melted

Flourless Chocolate Cake:
4 tablespoons (1/2 stick) unsalted butter
6 ounces good-quality dark chocolate (60-70%), chopped (I used chocolate chips)
1/4 water
1 tablespoon pure vanilla extract
2 teaspoons chocolate extract
1/4 teaspoon salt
6 large eggs, separated, at room temperature
1 cup sugar, divided

Chocolate Pudding:
3/4 cup sugar
1/2 cup unsweetened cocoa powder
6 Tablespoons cornstarch
1/4 teaspoon salt
2 eggs
2 1/2 cups milk
3 tablespoons unsalted butter
2 teaspoons pure vanilla extract
3 ounces good-quality dark chocolate (60-70%) (I used chocolate chips)

Stabilized Whipped Cream:
4 teaspoons granulated sugar
1 teaspoon cornstarch
1 cup heavy whipping cream, divided
1/2 teaspoon vanilla extract

For the crust, preheat the oven to 300F.  Lightly grease a 9 inch springform pan with cooking spray.

Place the cookies in a food processor and process until you have fine crumbs.  Transfer the crumbs to a bowl and pour in the melted butter.  Stir together until evenly moistened.  Press the buttered crumbs evenly onto the bottom and up the sides of the prepared pan, leaving about 1/2 inch at the top of the pan.  Bake for about 10 minutes.  Remove crust from the oven and let cool.

For the chocolate cake, increase the oven temperature to 350F.  Place the butter and chocolate in a microwaveable bowl, and heat in the microwave in 30 second intervals, stirring after each, until chocolate is melted and smooth.  Set aside.

In a small bowl, combine the water, vanilla extract, chocolate extract, and salt.  Set aside.

Place the egg yolks and 1/2 cup of the sugar in a bowl.  Beat until the mixture is a pale yellow color, 3 to 4 minutes.  Add the chocolate mixture and beat until just combined, scraping down the sides of the bowl as necessary.  Add the water mixture and beat on low until just combined.

In a separate bowl, beat the egg whites until foamy.  Continue to beat while gradually adding the remaining 1/2 cup sugar until soft peaks form.  Scoop about 1 cup of the egg whites into the chocolate batter and fold in gently with a spatula.  Add the remaining egg whites and gently fold in until incorporated.

Pour the batter into the prepared crust and smooth the top.  Place the cake in the oven and bake for 40 to 50 minutes or until the cake is set, but has a wiggle to it.  The cake may look underdone.  Remove cake from the oven and let cool completely.  The cake will sink in the middle (leaving lots of room for pudding!).  Cover the cake tightly with plastic wrap and refrigerate at least 3 hours, or overnight.

For the pudding, place the sugar, cocoa powder, cornstarch, and salt in a large saucepan and gently whisk together. Whisk in the eggs until combined.  Slowly whisk in the milk.  Cook the mixture over medium-high heat, whisking constantly, until the pudding thickens and just starts to bubble.  Don't let it boil, or the eggs will scramble.  Whisk in the butter, vanilla, and chocolate until melted and well blended.  

Transfer the pudding to a bowl and cover with plastic wrap directly on the pudding surface to prevent a skin from forming on the top.  Chill for at least 3 hours, or overnight.

For the stabilized whipped cream, place the sugar and cornstarch in a small bowl and stir together.  Add 1/4 cup of the whipping cream and stir until smooth.  Micrwave in 15 second intervals, stirring after each, until the mixture comes to a boil (be careful that it doesn't overflow in the microwave!).  Stir the vanilla into the thickened mixture, then let cool completely.

Place the remaining 3/4 cup whipping cream in a bowl and beat until tracks begin to form in the cream.  Continue to beat while slowly adding the thickened cream mixture.  Beat until stiff peaks form.

To assemble the pie, spoon the cold pudding onto the cooled cake, staying within the crust, and smooth the top.  Spread the whipped cream over the pudding.  Refrigerate the cake for at least 30 minutes before serving.  Makes 16 to 20 servings.

Enjoy!  -Cardamommy

Friday, June 12, 2015

Loaded Peanut Butter Cookies


I decided that I needed to make some peanut butter cookies, for the sake of my poor peanut butter deprived family.  Since I am a kind and benevolent baker, I decided to go all out with the peanut butter.  I stuffed these peanut butter cookies with peanut butter chips and mini reeces peanut butter cups.  So here's the actual story.  I made these cookies and they didn't come out how I wanted.  So instead of tweaking the same recipe, I brilliantly decided to try a different one.  Fail.  So I decided to try one last one.  Fail.  Then because I got a clue, I decided to  try the first recipe again and change it just a touch.  Oh my goodness win!!!  It totally worked and was totally worth it because the cookies were 10x better.  And now I am swimming in peanut butter cookies.  I used a copycat recipe of the Magnolia Bakery Peanut Butter Cookies.  Definitely my new hands down favorite peanut butter cookie recipe.  


Loaded Peanut Butter Cookies

1/2 cup butter, room temperature
1 cup creamy peanut butter
3/4 cup granulated sugar
1/2 cup packed brown sugar
1 egg
1 Tablespoon milk
1 teaspoon vanilla extract
1 1/4 cups all purpose flour
3/4 teaspoon baking soda
1/2 teaspoon baking powder
1/4 teaspoon salt
1 cup peanut butter chips
8 ounce bag (about 1 1/4 cups) unwrapped mini peanut butter cups 

In a large bowl, cream together the butter and peanut butter until smooth.  Add the granulated sugar and brown sugar and beat until smooth.  Beat in the egg, milk, and vanilla, until completely incorporated.  Add the flour, baking soda, baking powder, and salt, and beat until just combined.  Stir in the peanut butter chips and peanut butter cups until evenly distributed. Refrigerate the dough while you preheat the oven.

Preheat the oven to 350F.  Line a baking sheet with parchment paper.  

When the oven is ready, scoop the dough into 2 tablespoon size balls and place on the prepared baking sheet.  Use your fingers to flatten the balls very slightly, just enough to flatten the rounded top.  Place the cookies in the oven and bake for 10 to 12 minutes, or until the tops are just barely set.  Remove cookies from the oven and let cool for several minutes on the pan.  Transfer cookies to a cooling rack to cool completely.  Makes about 24 cookies.

Enjoy!  -Cardamommy

Monday, June 8, 2015

Double Cranberry Oatmeal Chocolate Chip Cookies


I'm always on the lookout for new flavor ideas for cookies, and I've been coming up short lately!  I stumbled across a recipe for double cranberry cookies and I thought it was a brilliant idea, so I combined it with an oatmeal chocolate chip cookie and this cookie was born!  These cookies are thick and hearty and packed with oatmeal and cranberries and chocolate.  

Double Cranberry Oatmeal Chocolate Chip Cookies

1 cup (2 sticks) butter, room temperature
1 cup packed brown sugar
1/3 cup granulated sugar
2 eggs
1 teaspoon vanilla extract
1 1/2 cups all purpose flour
1 teaspoon baking soda
1/2 teaspoon salt
3 cups old fashioned oatmeal
3/4 cup fresh or frozen cranberries
3/4 cup dried cranberries (craisins)
1/2 cup semi sweet chocolate chips
1/2 cup milk chocolate chips

Preheat the oven to 350F.  Line a baking sheet with parchment paper.

In a large bowl, cream together the butter, brown sugar, and granulated sugar until light and fluffy.  Beat in the eggs and vanilla extract and beat until well blended and smooth.  Add the flour, baking soda, salt, and oatmeal, and beat until just combined.  Stir in the cranberries, dried cranberries, semi sweet chocolate chips, and milk chocolate chips.

Drop the dough in tablespoon size balls on the prepared baking sheet.  Bake for 10 to 12 minutes, or until the cookies are lightly browned on the edges and very top.  Remove cookies from the oven and let cool for 3 or 4 minutes on the pan.  Transfer cookies to a cooling rack.  Makes about 4 dozen cookies.

Enjoy!  -Cardamommy

Friday, June 5, 2015

Double Lemon Chocolate Chip Cookies


Sometimes I hear about flavor combinations that just don't make sense in my head.  I love chocolate and orange together.  Love!  Chocolate and lemon, however, I just could never wrap my head around.  Until these cookies.  I thought I would give it a shot, and it totally blew me away. You usually see lemon and white chocolate together, which can sometimes be a little one note and sweet for me. With these cookies, the lemon is so fresh and is perfect with the bite of dark chocolate.  The chocolate doesn't drown out the lemon, and it gives a great contrast.

Double Lemon Chocolate Chip Cookies

1/2 cup (1 stick) butter, room temperature
1/4 cup shortening

Zest of 2 lemons
1/2 cup packed brown sugar
1/2 cup granulated sugar
1 egg
1 teaspoon vanilla extract

1/2 teaspoon lemon extract (optional)
2 cups all purpose flour 
1 Tablespoon cornstarch
1 teaspoon baking soda
1/2 teaspoon salt
1 cup semi sweet or dark chocolate chips

Preheat the oven to 350F.  Line a baking sheet with parchment paper.

Cream together the butter, shortening, lemon zest, brown sugar, and granulated sugar until light and fluffy.  Add the egg and vanilla, and beat until well blended.  Add one cup of the flour, the cornstarch, baking soda, and salt, and beat until just combined.  Add the second cup of flour and beat until incorporated.  Add the chocolate chips and beat on low speed until evenly distributed.

Scoop the dough into tablespoon sized balls and place on the prepared baking sheet.  Place the cookies in the preheated oven and bake for 9 to 10 minutes, or until just golden brown on the edges and very top.  Do not overbake, or the cookies will be more crunchy than chewy (which is a no go in my book).  Remove the cookies from the oven and transfer to a cooling rack to cool.  Makes about 36 cookies.


Enjoy!  -Cardamommy

Monday, June 1, 2015

Halfway Cookie Bars


I have never in my life heard of these cookies.  Not that I'm some kind of walking encyclopedia of baked goods or anything.  As usual, I had to give them a try, and the results are amazing.  I started with this recipe, cut it in half, and swapped out the chocolate filling for chocolate and nutella.  Definitely a brilliant plan, especially when you consider that my oldest Hungry Puppy asks me for Nutella sandwiches all the time. She's kind of a nutella fan.  These cookie bars start with a sugar cookie base, are filled with nutella and chocolate chips, and are topped with a brown sugar meringue.  We can't get enough of them!

Halfway Cookie Bars

1 cup all purpose flour
1/2 teaspoon salt
1/8 teaspoon baking soda
1/2 teaspoon baking powder
1/4 cup butter, room temperature
1/4 cup granulated sugar
1/2 cup brown sugar, separated
1 egg, separated
1 1/2 teaspoons water
1/2 teaspoon vanilla extract
3 ounces (about 1/3 cup) nutella, softened slightly in the microwave
3 ounces (about 1/2 cup) chocolate chips

Preheat the oven to 350F.  Line a 9x9 inch square baking pan with a length of parchment paper, letting the edges hang over the sides of the pan.  Spray the parchment and edges of the pan lightly with cooking spray.

In a medium bowl, stir together the flour, salt, baking soda, and baking powder.  In a large bowl, cream together the butter, granulated sugar, and 1/4 cup of the brown sugar.  Beat in the egg yolk (reserving the egg white), water, and vanilla extract until well blended.  Add the flour mixture and beat until the mixture is crumbly.  Press the mixture evenly onto the bottom of the prepared pan.

Spread the softened nutella evenly over the cookie layer, then sprinkle the chocolate chips evenly over the top of the nutella.

Place the egg white in a bowl and beat with a mixer until foamy.  Continue to beat the egg white while gradually adding the remaining 1/4 cup brown sugar, until soft peaks form.  Spread the meringue evenly over the chocolate chip/nutella layer.  Place a square of greased parchment paper directly on top of the meringue.  

Bake the cookie bars for about 20 minutes, then remove the parchment and bake for an additional 5 minutes.  Remove the pan from the oven and let cool completely.  Using the parchment paper as handles, lift the bars out of the pan and cut into bars.  Makes 12 to 16 servings. 

Enjoy!  -Cardamommy

Related Posts Plugin for WordPress, Blogger...